Workshop Manuals Factory service & repair Audi
01 Running gear02 Body03 Power unit04 Power transmission05 Vehicle electrics06 Heating, ventilation, air conditioning system
Audi A104 · Power transmission
04 · Transmission

Exploded view - clutch unit

Make
Audi
Model
A1
Section
6-speed manual gearbox 02U › Clutch, control › Exploded view - clutch unit
Power transmissionExploded view - clutch unit
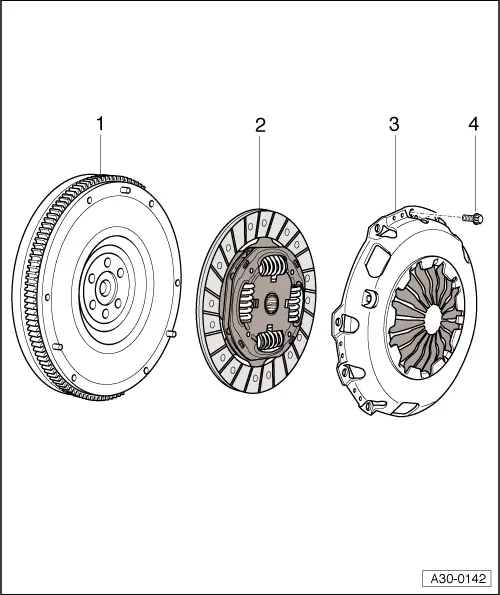
Exploded view - clutch unit
  Note
t  Refer to general repair instructions → Chapter.
t  Select the correct clutch plate and pressure plate according to the engine code → Electronic parts catalogue.
t  Renew clutch plate and pressure plate if riveted fastening is damaged or loose.
t  Clean input shaft splines and (in the case of used clutch plates) the hub splines. Remove corrosion and apply only a very thin coating of grease for clutch plate splines -G 000 100- to the splines. Then move clutch plate backwards and forwards on input shaft until hub moves freely on shaft. It is important to remove excess grease.
t  Clutch pressure plates have an anti-corrosion coating and are greased. With the exception of the friction surface for the clutch plate, the pressure plate must not be cleaned. Otherwise the service life of the clutch will be considerably reduced.
t  The friction surface of the pressure plate and the dual-mass flywheel must be cleaned (degreased) thoroughly.
t  If the clutch has burnt out, thoroughly clean the gearbox housing in area of clutch and parts of the engine facing the gearbox in order to prevent odours.
   
1 - Flywheel
q   Removing and installing → Rep. gr.13
q   Ensure that dowel pins fit tightly
q   Contact surface for clutch lining must be free of grooves, oil and grease
2 - Clutch plate
q   For correct version, refer to → Electronic parts catalogue
q   Removing and installing → Chapter
q   Installation position: spring cage faces pressure plate
3 - Pressure plate
q   Removing and installing → Chapter
q   Checking ends of diaphragm spring → Fig.
q   Checking spring connection and rivets → Fig.
q   For correct version, refer to → Electronic parts catalogue
4 - Bolt
q   M6 - 13 Nm
q   M7 - 20 Nm
q   Loosen and tighten gradually in diagonal sequence and in small steps

   
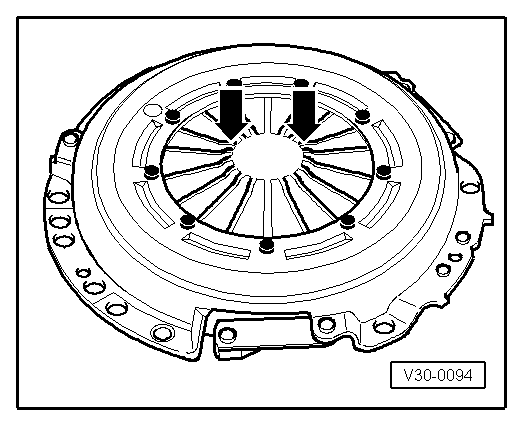
Checking ends of diaphragm spring
l  Wear up to half the thickness of the diaphragm spring -arrows- is permissible.
  Note
When performing repairs always match up clutch pressure plate and clutch plate by checking engine code → Electronic parts catalogue.
  V30-0094
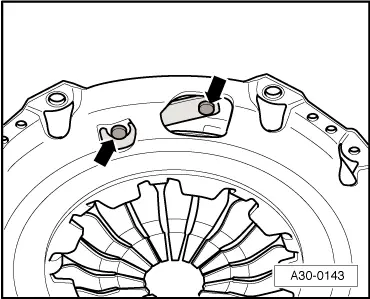
Checking spring connection and rivets
–  Check spring connection between pressure plate and cover for cracks and make sure riveted fastenings are seated tightly.
–  Renew pressure plate if springs are damaged or rivets are loose -arrows-.
  A30-0143

Parts & tools for this job For Audi A1

Links open Amazon search results in a new tab. As an Amazon Associate I earn from qualifying purchases.