audi Workshop Repair Guides

Audi Workshop Service and Repair Manuals

Checking delivery pressure of motor/pump unit > < Removing and installing motor/pump unit
Renewing reservoir for motor/pump unit
  Note
t  It is important to keep all parts clean when renewing the reservoir.
t  
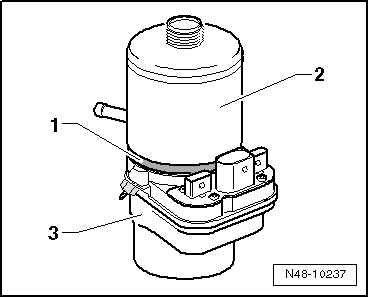
Before separating connections, thoroughly clean entire circumference between return line connection on reservoir and pressure line connection on motor/pump unit. Do not use aggressive cleaning agents such as brake cleaner, petrol, thinner or the like.
t  Place removed parts on a clean surface and cover them up.
t  If repairs cannot be completed immediately, carefully cover open components.
t  Do not use fluffy cloths.
t  Only remove replacement parts from packaging immediately prior to installation.
t  Only use genuine spare parts from original packaging.
t  The contact surface between the reservoir and motor/pump unit must not come into contact with sealants.
Special tools and workshop equipment required
t  Hot air blower, e.g. -V.A.G 1416-
t  Protective gloves (commercially available)
t  Rubber head hammer (commercially available)
Removing reservoir
–  Remove motor/pump unit → Chapter.
Residual amounts of fluid will remain in the motor/pump unit after the hydraulic fluid is extracted.
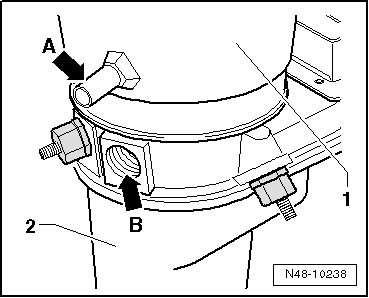
–  Seal off threaded union for pressure line on motor/pump unit.
–  Remove bracket from motor/pump unit.
   
–  Open clamp -1- and remove upwards.
  WARNING
Wear protective gloves when heating and pulling off the reservoir.
–  Heat all round bottom part of reservoir -2- evenly using hot air blower e.g. -V.A.G 1416-.
  Caution
The reservoir may only be heated to a maximum of 80 °C.
–  Pull reservoir -2- off motor/pump unit -3-.
Installing reservoir
  Note
t  Make sure that contact surfaces for seal and reservoir on motor/pump unit are clean and free of oil and grease.
t  No slip agent or lubricant may be used when fitting the reservoir on the motor/pump unit.
t  The contact surface between the reservoir and motor/pump unit must not come into contact with sealants.
–  Fit new seal → Electronic Parts Catalogue „ETKA“ into sealing surface of motor/pump unit.
–  Ensure that seal is seated correctly.
  WARNING
Wear protective gloves when heating and installing reservoir.
–  Heat all around bottom part of new reservoir evenly using hot air blower e.g. -V.A.G 1416-.
  Caution
The reservoir may only be heated to a maximum of 80 °C.
  N48-10237
–  Locate reservoir -1- on motor/pump unit -2-.
–  Position reservoir so that connecting piece for return line -arrow A- is vertically above threaded connection for pressure line -arrow B-.
–  Install reservoir -1- onto motor/pump unit -2- as far as stop.
–  Use rubber head hammer to tap evenly all round reservoir -1-; do NOT apply hammer blows to filler neck.
–  Make sure that reservoir is kept straight.
–  Secure reservoir to motor/pump unit with new clamp → Electronic Parts Catalogue „ETKA“.
–  Tighten bolt on clamp to specified torque.
–  Seal off connecting piece for return line on reservoir.
–  Fill reservoir approx 1/4 full with hydraulic fluid and check for leaks at joint between reservoir and motor/pump unit.
–  Re-tighten clamp if leaks are found.
–  Drain reservoir.
  N48-10238
The replacement of the reservoir must be marked for warranty purposes.
–  Mark an area of approx 15 x 30 mm with a permanent coloured marking -2- (e.g. anti-tamper paint) at the position illustrated.
l  The marking must cover the reservoir -1-, the clamp -3- and the motor/pump unit -4-.
–  Attach bracket to motor/pump unit.
–  Open connections for return line on reservoir and pressure line on motor/pump unit.
–  Install motor/pump unit → Chapter.
  N48-10239

Checking delivery pressure of motor/pump unit > < Removing and installing motor/pump unit