audi Workshop Repair Guides

Audi Workshop Service and Repair Manuals

Vehicles with 1.4 l TDI engine > < Vehicles with 1.6 l FSI engine
Vehicles with 1.2 l TDI engine
Special tools and workshop equipment required
   
t  Protective cover for bonnet Audi A2 -VAS 6011-
  W00-1119
t  Locking pin -T10060 A-
Removing
  Caution
On vehicles with telematics system, activate service mode of telematics control unit before disconnecting battery → Radio, telephone, navigation, self-diagnosis; Rep. Gr.01.
–  With the ignition switched off, disconnect the earth wire at the battery → Chapter.
  W00-10235
–  Remove the noise insulation -arrows-.
  Note
  A10-0684
Prior to removal, mark the direction of the poly V-belt with chalk or a felt-tip pen. Running a used belt in the opposite direction could destroy it.
–  Use a ring spanner to swivel the tensioner in -arrow direction- to slacken off the poly V-belt.
–  Lock the poly V-belt tensioner in position by inserting the locking pin -T10060 A- in the locating holes.
–  Detach the poly V-belt.
  A13-10121
–  Wash and rub dry the outside of the bonnet.
–  Release the service flap from inside.
–  Release the bonnet -arrows- and pull it forwards slightly.
  A10-0696
–  Fit the protective cover -VAS 6011- over the bonnet.
  Note
  A10-0685
Do not stand the bonnet on end.
–  Detach the bonnet and set it down on the protective cover -VAS 6011-.
  A10-0686
–  Remove the engine cover -arrows-.
–  Remove the noise insulation underneath. This involves detaching the crankcase breather hose.
  A10-1107
–  Unplug the connector -1- at the intake manifold pressure sender -G71-.
–  Lay bare the wire.
–  Remove the air hose -2- between the charge air cooler and intake manifold.
  A10-0830
–  Unscrew the poly V-belt tensioner -arrows-.
  A27-0080
–  Unscrew the wire for terminal 30/B+ -Item 2- at the alternator.
–  Unplug the connector -1-.
  A27-0079
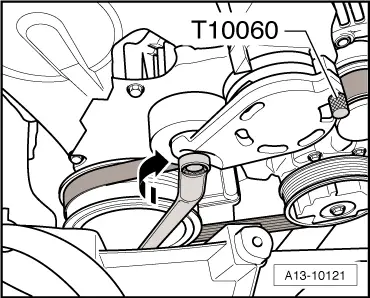
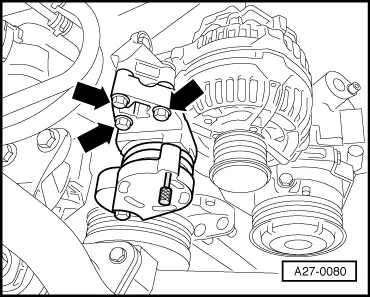
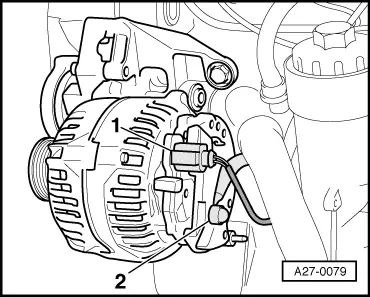
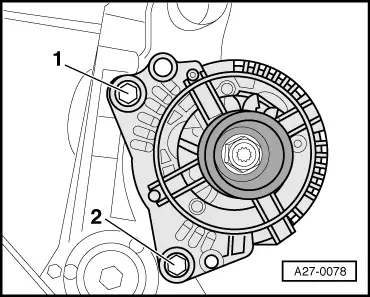
–  Screw out the alternator bolts -1- and -2-.
  Note
t  If the alternator sticks in its holder, screw the bolt back in again down to the last 2 turns.
t  Tap carefully on the bolt heads with the flat side of a hammer to release the threaded bushes of the alternator mount.
–  Take out the alternator downwards.
Installing
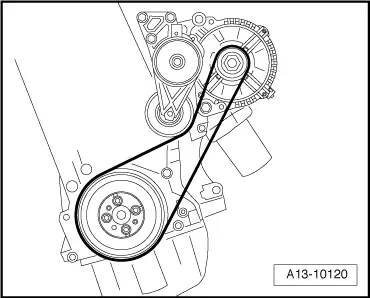
Install in reverse order, paying attention to the following:
–  To facilitate positioning of the alternator, drive back the bushings for the securing bolts slightly.
  Note
Stiff alternator mount bushes must be released as otherwise the clamping force of the bush will not be adequate even if tightened to the correct torque.
  A27-0078
–  Make sure the poly V-belt is properly positioned and correctly routed.
Poly V-belt routing on vehicles with no air conditioner:
–  Position the poly V-belt on the crankshaft and alternator pulleys.
  A13-10120
Poly V-belt routing on vehicles with air conditioner:
–  Position the poly V-belt on the crankshaft and alternator pulleys.
–  As a final step, position the poly V-belt on the air conditioner compressor pulley.
All models:
–  Slacken off the tensioner and pull the locking pin -T10060 A- out of the locating holes.
–  Make sure the poly V-belt is correctly positioned.
–  Connect the battery. Action to be taken → Anchor.
–  Start the engine and check belt running.
Tightening torques
  A13-10123
ComponentNm
Alternator to holder25
Poly V-belt tensioner to holder25
Terminal 30/B+ to alternator16


Vehicles with 1.4 l TDI engine > < Vehicles with 1.6 l FSI engine