audi Workshop Repair Guides

Audi Workshop Service and Repair Manuals

Protective strips > < Removing and installing -B- pillar trim, 3-door vehicles
General Body Assembly Exterior (Repair groups 50, 55, 57, 58, 60, 63, 64, 66)
Trims
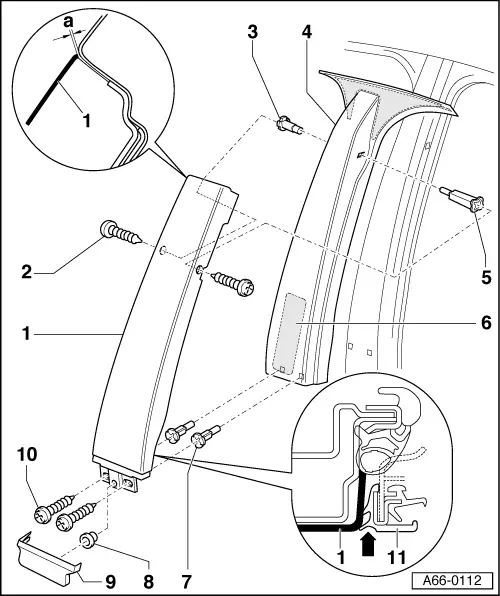
Removing and installing -B- pillar trim, 5-door vehicles
 
A66-0112
  • B-pillar trim
    • Removal:
    • ◆ Pull off cover strip -9- downwards.
    • ◆ Unscrew bolts -1-, -6- and -10- and pull off trim panel outwards.
    • Installation:
    • ◆ Position trim panel with rear door closed as shown in top and bottom detail drawings.
    • ◆ Tighten front combi bolt -1- to 1.5 Nm.
    • ◆ Gap of between 0.3 to 0.6 mm results from pushing up trim panel until it makes contact with cover strip.
 
A66-0112
    • ◆ The outer lip of rear side window seal must make full contact over entire trim panel area.

Note:

Avoid excessive compression of seal at trim panel -arrow- as otherwise projecting lip could cause wind noise.

    • ◆ Bolt in combi bolt -1- with rear door open.
    • ◆ Press grommet -8- into trim panel.
    • ◆ Push on cover strip -9- from underneath.
  • Combi bolt
    • ◆ 1.5 Nm
  • Front expanding nut
 
A66-0112
  • Cover
    • ◆ Secured to B-pillar with double-sided adhesive tape -6-.
    • ‒ Detach from B-pillar to remove.
    • ‒ Clean B-pillar with cleaning petrol before installing cover.
    • ‒ Remove protective paper from bonding surfaces.
    • ‒ Position the cover in the corner of the roof frame and press on the top or bottom of the B-pillar.
  • Rear expanding nut
 
A66-0112
  • Double-sided adhesive tape
    • ◆ Detach backing paper before installing
  • Expanding nut
  • Grommet
  • Cover strip for -B- pillar
    • ◆ Pull off downwards to remove.
  • Cross head screw
    • ◆ 1.5 Nm
  • Door seal
    • ◆ The outer lip of rear door window seal must make full contact over entire trim panel area -4-.

Protective strips > < Removing and installing -B- pillar trim, 3-door vehicles