Power transmissionGeneral repair instructions
| General repair instructions |
| Proper tools and the maximum possible care and cleanliness are essential for satisfactory gearbox repairs. The usual basic safety precautions also naturally apply when carrying out repair work. |
| A number of generally applicable instructions for the various repair procedures - which were previously repeated at numerous places in the Workshop Manual - are summarised here. They apply to the work described in this Manual. |
| t
| When installing, ensure that the dowel sleeves between the engine and gearbox are correctly located. |
| t
| When installing a new gearbox, check the oil level and fill up with oil if necessary → Chapter. |

Note | t
| If the oil level is topped up with the gearbox installed, check oil level as follows: |
| t
| Fill with oil to bottom lip of filler hole and refit screw plug. Start engine, engage a gear and allow gearbox to turn for approx. 2 minutes. Switch off engine and again top up oil to bottom lip of filler hole. |
| t
| Thoroughly clean joint surfaces on gearbox housing etc. before applying sealant. |
| t
| Apply sealant -AMV 188 200 03- evenly and not too thickly. |
| O-rings, oil seals and gaskets |
| t
| Always renew O-rings, oil seals and gaskets. |
| t
| After removing gaskets and seals, always inspect the contact surface on the housing or shaft for burrs resulting from removal or for other signs of damage. |
| t
| Thoroughly clean housing joint surfaces before assembling. |
|
|
|
| t
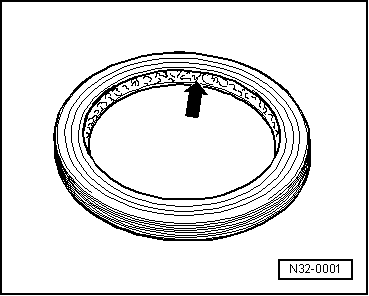
| Before installing oil seals, lightly oil the outer circumference of the seal and fill the space between the sealing lips -arrow- about half full with grease -G 052 128 A1-. |
| t
| The open side of the oil seals faces toward the side with fluid filling. |
| t
| When installing a new oil seal, position the seal in the housing so that the sealing lip does not contact the shaft in the same place as the old seal (make use of insertion depth tolerances). |
| t
| Lightly lubricate O-rings before installation to prevent them from being trapped and damaged during assembly. |
| t
| After renewing seals and gaskets, check and, if necessary, top up oil level in gearbox → Chapter. |
| t
| Do not over-stretch circlips. |
| t
| Always renew circlips which have been damaged or over-stretched. |
| t
| Circlips must be properly seated in the base of the groove. |
|
|
|
| t
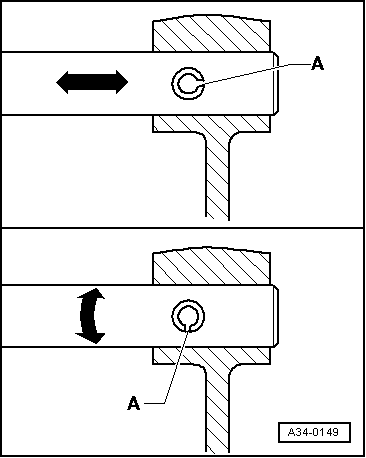
| Renew spring pins. Position: the slit -A- should be in line with the line of force -arrow-. |
| t
| Loosen the nuts and bolts in reverse sequence to the specified tightening sequence. |
| t
| Nuts and bolts which secure covers and housings should be loosened and tightened in diagonal sequence and in stages if no tightening sequence is specified. |
| t
| Especially delicate parts, such as clutch pressure plates, must not be distorted. Loosen and tighten bolts and nuts in stages in diagonal sequence. |
| t
| The tightening torques stated apply to non-oiled nuts and bolts. |
| t
| Always renew self-locking bolts and nuts. |
| t
| Use a wire brush to clean the threads of bolts which are secured with locking fluid. Then apply locking fluid -AMV 185 101 A1- to bolt threads before installing. |
| t
| Threaded holes which take self-locking bolts or bolts coated with locking fluid must be cleaned (using a tap or similar). Otherwise there is a danger of the bolts shearing off the next time they are removed. |
| t
| Install needle bearings so the lettering (side with thicker metal) faces towards the installing tool. |
| t
| Install new tapered roller bearings as supplied; do not lubricate additionally with oil. |
| t
| Lubricate all bearings (except new tapered roller bearings) with gear oil before installing in gearbox. |
| t
| Always renew the tapered roller bearings on one shaft together and use new bearings from a single manufacturer. |
| t
| Use inductive heater -VAS 6414- to heat inner races to approx. 100°C before installing. Press in onto stop when installing so there is no axial clearance. |
| t
| Do not interchange the outer or inner races of bearings of the same size (the bearings are paired). |
| t
| Measure shims at several points with a micrometer. Tolerance variations make it possible to obtain the exact shim thickness required. |
| t
| Check for burrs and damage. |
| t
| Install only shims which are in perfect condition. |
| t
| Do not interchange. When re-using synchro-rings, always fit to the same gear wheel. |
| t
| Check for wear; renew if necessary. |
|
|
|
| t
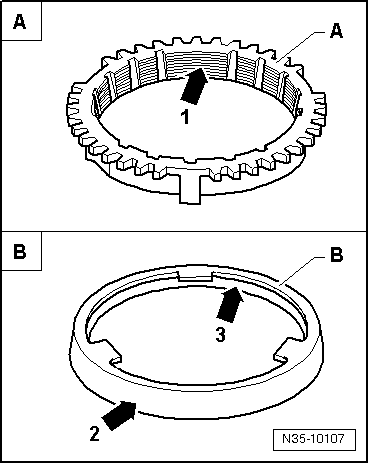
| Check the grooves -arrow 1- on synchro-ring -A- and on inner ring for wear (flattened sections in grooves). |
| t
| Make sure that the coating of coated synchro-rings is not damaged. |
| t
| If an intermediate ring -B- is fitted, check the outer contact surface -arrow 2- and inner contact surface -arrow 3- of the intermediate ring for scoring and visible traces of wear. |
| t
| Check chamfer on selector gear for scoring and visible traces of wear. |
| t
| Lubricate synchroniser rings with gear oil before installing. |
| t
| Note correct installation position. |
| t
| Before installing, clean and heat to 100°C (maximum) using inductive heater -VAS 6414-. |
| t
| After installing, check 1st to 5th selector gears for minimal axial play and freedom of movement. |
| t
| When removing gearbox, remove clutch slave cylinder without disconnecting pipes. |
| t
| Do not depress the clutch pedal after removing the slave cylinder if the hydraulic pipe is still connected. Otherwise the piston will be pressed out of the slave cylinder. |
| t
| Ensure that the pressure plate is kept straight: loosen and tighten bolts in a diagonal sequence and in several gradual stages. |
| t
| If the clutch has burnt out, thoroughly clean the bell housing, flywheel and parts of the engine facing the gearbox in order to prevent odours. |
|
|
|
04 Transmission