
A3 Mk1
 Note
Note
|
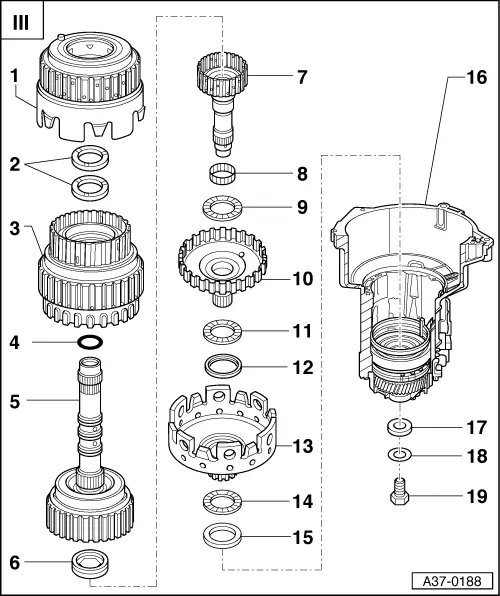
| 1 - | Reverse gear clutch “K2” |
| q | Dismantling and assembling → Chapter |
| q | When installing, rotate clutch until all the inner plates have meshed |
| 2 - | Shim |
| q | Determining thickness → Chapter |
| q | 1 or 2 shims can be installed |
| 3 - | 1st to 3rd gear clutch “K1” |
| q | Depending on version, clutches “K1” and “K3” may be pressed together |
| q | Pressing “K1” off “K3” → Chapter |
| q | Dismantling and assembling → Chapter |
| q | Pressing clutch “K1” onto “K3” → Chapter |
| q | Spare part is allocated according to gearbox code letters |
| 4 - | O-ring |
| q | Renew |
| q | Press “K1” off “K3” to renew O-ring → Chapter |
| 5 - | 3rd and 4th gear clutch “K3” with turbine shaft |
| q | Depending on version, clutches “K1” and “K3” may be pressed together |
| q | Pressing “K1” off “K3” → Chapter |
| q | Dismantling and assembling → Chapter |
| q | Pressing clutch “K1” onto “K3” → Chapter |
| q | When installing, rotate clutch until all the inner plates have meshed |
| q | There are two different versions of turbine shafts → Chapter |
| q | Spare part is allocated according to gearbox code letters |
| 6 - | Axial needle bearing |
| q | With washer |
| q | Lightly lubricate washer with ATF so that bearing sticks to 3rd and 4th gear clutch |
| q | Installation position: axial needle bearing must face small input shaft |
| 7 - | Small input shaft |
| 8 - | Needle bearing |
| 9 - | Axial needle bearing |
| 10 - | Large input shaft |
| 11 - | Axial needle bearing |
| 12 - | Washer |
| q | With shoulder |
| q | For axial needle bearing |
| q | Installation position: shoulder must face large sun gear |
| 13 - | Large sun gear |
| 14 - | Axial needle bearing |
| 15 - | Washer |
| q | For axial needle bearing |
| 16 - | Gearbox housing with freewheel and circlips installed |
| 17 - | Shim |
| q | For planet carrier |
| q | Determining thickness → Chapter |
| 18 - | Washer |
| 19 - | Bolt |
| q | For small input shaft |
| q | 30 Nm |