A3 Mk1
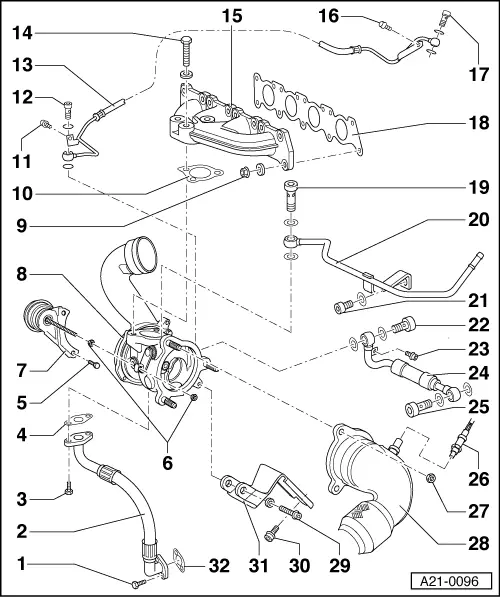
| Turbocharger - exploded view |

| 1 - | 10 Nm |
| 2 - | Oil return pipe |
| q | To sump |
| 3 - | 10 Nm |
| q | Install using locking fluid; for locking fluid refer to → Parts catalogue |
| 4 - | Gasket |
| q | Renew |
| 5 - | 10 Nm |
| 6 - | 10 Nm |
| q | Do not unscrew |
| 7 - | Vacuum unit for charge pressure control valve |
| q | Cannot be renewed separately |
| q | Do not remove |
| 8 - | Turbocharger |
| q | Checking → Chapter |
| q | Removing and installing → Chapter |
| 9 - | 25 Nm |
| q | Renew |
| 10 - | Gasket |
| q | Renew |
| q | Note installation position |
| 11 - | 10 Nm |
| 12 - | Banjo bolt, 30 Nm |
| 13 - | Oil supply pipe |
| q | From oil filter bracket → Item |
| 14 - | 30 Nm |
| q | Renew |
| q | Coat thread and contact surface of bolt head with high-temperature paste; → Parts catalogue |
| 15 - | Exhaust manifold |
| 16 - | 23 Nm |
| 17 - | Banjo bolt, 30 Nm |
| 18 - | Gasket |
| q | Renew |
| q | Note installation position |
| 19 - | Banjo bolt, 35 Nm |
| 20 - | Coolant return hose/pipe |
| 21 - | 20 Nm |
| 22 - | Banjo bolt, 30 Nm |
| 23 - | 10 Nm |
| 24 - | Coolant supply pipe |
| 25 - | Banjo bolt, 35 Nm |
| 26 - | Lambda probe -G39- (before catalytic converter) |
| q | The threads on the new Lambda probes are coated with a special assembly paste. |
| q | If re-installing old Lambda probe, coat thread with high-temperature paste: Refer to → Parts catalogue for high-temperature paste. |
| q | The assembly paste/high-temperature paste must not get into the slots on the probe body. |
| q | Tighten to 55 Nm |
| 27 - | 40 Nm |
| q | Renew |
| 28 - | Front exhaust pipe |
| q | With flexible joint |
| q | Do not bend flexible joint more than 10° – otherwise it can be damaged |
| q | Removing and installing → Chapter |
| 29 - | 30 Nm |
| q | Use only genuine bolt → Parts catalogue |
| 30 - | 20 Nm |
| 31 - | Bracket |
| q | For turbocharger |
| 32 - | Gasket |
| q | Renew |
