audi Workshop Repair Guides

Audi Workshop Service and Repair Manuals

Testing fuel system for leaks > < Removing and installing injection pump
Diesel Direct Injection and Glow Plug System (TDI 4 cyl.) >07.99
Servicing diesel direct injection system
Dynamically checking and adjusting commencement of injection

Notes:

  • ◆ The injection start must always be checked after renewing the toothed belt or loosening the injection pump bolts or toothed belt sprockets and adjusted if necessary.
  • ◆ The dynamic checking and correction of the commencement of injection is only possible in function 04 "Basic Engine Setting". This is because in function 04 the commencement of injection valve is activated continuously and therefore the injection timing control is set to "retarded".
  • ‒ Make basic settings .
 
→ Indicated on display:
(1...10 = display zones)
Basic setting 0    ⇒
1    2    3    4    5    6    7    8    9    10
  • ‒ Observe the display in display zone 7 (coolant temperature).
  • Specified value: less than 73 (corresponding to 85 °C)

Do not continue with the test until the coolant has reached the specified temperature.

 
N23-0014
  • ‒ → The commencement of injection in display zone 2 is determined by the fuel temperature value in display zone 9.
  • Specified value: => Range C illustration
  • A - Zone 2 Commencement of injection
  • B - Zone 9 Fuel temperature

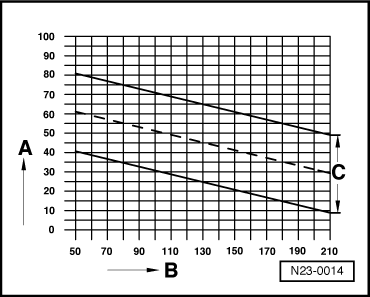
Note:

If injection start is within specified range C when tested, no adjustment is required.

If the commencement of injection is outside the specified range, adjust the injection pump as follows:

  • ‒ Switch ignition off.
  • ‒ Unscrew fuel pipes from injection pump.
  • ‒ Remove intake hose from between boost air cooler and intake manifold.
  • ‒ Remove upper toothed belt guard.
  • ‒ Check toothed belt tension.
  • The marks must be opposite each other.

If the markings are not aligned:

  • ‒ Adjust the toothed belt tension:

=> Repair group 13; Dismantling and assembling engine; Removing and installing toothed belt and adjusting tension

 
A23-0044
  • ‒ → Undo two injection pump sprocket attachment screws -1-.
  • ‒ Apply a ring spanner (22 mm A/F) to hub nut 2 to hold the pump shaft in position.
  • ‒ Loosen the third securing bolt on the injection pump sprocket and turn the pump shaft slightly.
  • anticlockwise => injection starts sooner
  • clockwise => injection starts later

Note:

Do not undo hub nut -2-. Otherwise the injection pump basic setting is maladjusted and cannot be corrected using workshop tools.

  • ‒ Tighten the new securing bolts for the injection pump sprocket to 20 Nm.

Note:

The securing bolts are stretch bolts and can therefore only be used once.

  • ‒ Re-check that injection start meets specified value.

If injection start is outside tolerance range:

  • ‒ Correct the setting at the injection pump sprocket.
  • ‒ Tighten injection pump sprocket securing bolts 1/4 by (90°) turns.
  • ‒ Install toothed belt guard and intake hose.

Testing fuel system for leaks > < Removing and installing injection pump