audi Workshop Repair Guides

Audi Workshop Service and Repair Manuals

Replacing components which can only be removed and installed after taking out air conditioning unit > < Removing air conditioning unit
Installing air conditioning unit
Install in reverse order → Chapter, paying attention to the following:
–  The assistance of a 2nd mechanic is required when installing the air conditioning unit.
  Note
t  Check all the seals at the air conditioning unit for damage prior to installation and replace damaged seals.
t  Check attachment of the coolant pipes to the heat exchanger.
   
–  Working from the passenger compartment, insert the moulded gasket -A- in the bulkhead -B-, paying attention to the correct position of the reinforcement -C- (wire clip) in the moulded gasket -A-.
–  Have a second person assist with installation of the air conditioning unit.
  A87-0682
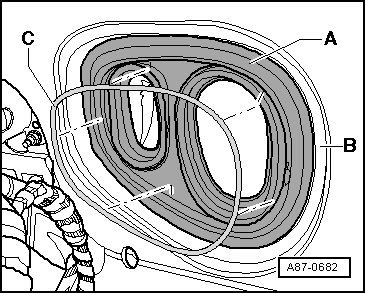
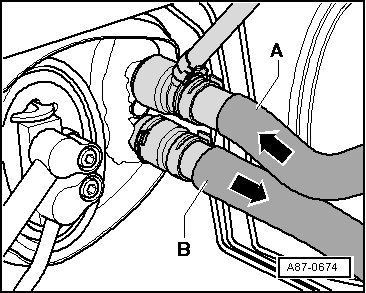
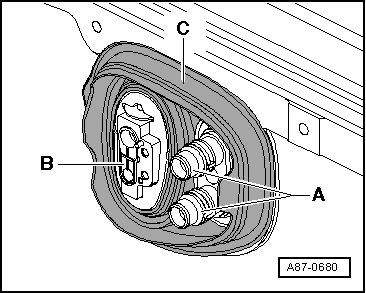
–  On inserting the air conditioning unit, have a second person (working from the engine compartment) feed both flanges for the coolant pipes to the heat exchanger -A- and for the expansion valve (to the evaporator) -B- through the lead-throughs of the grommet -C-.
  Note
t  On installing the air conditioning unit, pay attention to both coolant pipes to the heat exchanger to ensure that they do not catch on the opening to the plenum chamber or on the noise insulation mat and become bent or damaged.
t  Pay attention to the wiring harness. Pulling too firmly could damage individual wires.
–  Attach the condensation drain to the connection at the air conditioning unit and check proper positioning of the condensation drain hose → Chapter.
–  Re-install the components removed (with the exception of the driver's storage compartment) in reverse order.
  Note
t  When installing the dash panel, make sure the intermediate „defrost“ piece is properly positioned on the air conditioning unit on insertion and that the defroster vent does not squash the intermediate piece on fitting.
t  After installing the dash panel, check the exit direction and the distribution of the air flow from the defroster vent to the windscreen.
  A87-0680
–  Connect the coolant hoses to the heat exchanger correctly. Note the markings:
A - Supply from cylinder head
B - Return to coolant pump
–  Fit the refrigerant lines to the expansion valve → Chapter.
–  Check the installation position of the coolant hoses to the heat exchanger (they must not make contact with components which become warm) as well as the position and condition of the thermal insulation which may be attached to the coolant hoses (not fitted with all types of engine).
–  Bleed the coolant circuit: → Engine, mechanics; Rep. gr.19
–  Check the coolant circuit for leaks, paying particular attention to the connection between the coolant pipes and the heat exchanger → Chapter and → Engine, mechanics; Rep. gr.19.
  A87-0674
–  Check that the grommet -C- is correctly positioned in the bulkhead.
–  If necessary, apply silicone adhesive sealant to the flanges for the coolant pipes to the heat exchanger -A- and the expansion valve (to the evaporator) -B- at the lead-throughs of the grommet -C- (to prevent the ingress of water).
–  Evacuate and refill the refrigerant circuit. → Air conditioner with refrigerant R134a
–  Re-install the driver's storage compartment and the remaining components removed.
–  If applicable, check operation of the air conditioner → "Guided fault-finding" function of vehicle diagnostic, testing and information system VAS 5051.
–  Check the air outflow direction on vehicles with a manually controlled air conditioner. Depending on the switch position, the flexible shaft rotates twice with one turn of the switch due to the transmission mechanism at the air conditioning unit and the air conditioner control → Chapter.
–  Start up the air conditioner after charging the refrigerant circuit → Chapter.
  Note
Also heed the notes on start-up of the air conditioner after charging → Air conditioner with refrigerant R134a.
  A87-0680

Replacing components which can only be removed and installed after taking out air conditioning unit > < Removing air conditioning unit