audi Workshop Repair Guides

Audi Workshop Service and Repair Manuals

Transporting gearbox and securing to engine and gearbox support > < Removing gearbox (vehicles with 1.6 ltr. TDI engine)
Installing gearbox
Installing gearbox
Procedure
Installation is carried out in reverse sequence; note the following:
l  Tightening torques for installing gearbox → Anchor
  Note
t  Renew bolts which are tightened by turning through a specified angle.
t  Renew seals, gaskets and self-locking bolts and nuts.
t  Secure all hose connections with the correct hose clips (as original equipment); refer to → Electronic parts catalogue.
t  Hose connections and air pipes and hoses must be free from oil and grease before fitting.
t  Secure all hose connections with the correct hose clips (as original equipment); refer to → Electronic parts catalogue.
t  To ensure that the charge air hoses can be connected securely, you must spray the screws on used screw-type clips with rust remover prior to installation.
t  Re-attach all cable ties at the same locations when re-installing.
–  Clean input shaft splines and splines of torsion damper. Remove corrosion and lubricate splines with only a very thin coating of grease → Electronic parts catalogue. It is important to remove excess grease.
   
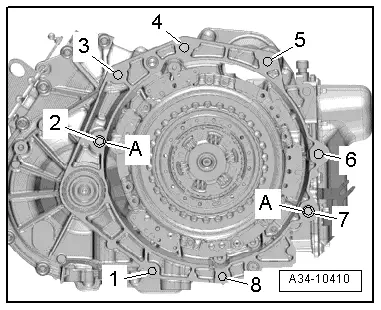
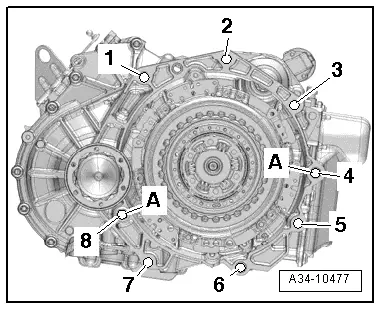
–  If not already fitted, install dowel sleeves -A- for centralising engine/gearbox in cylinder block.
t  Vehicles with 1.2/1.4 ltr. TFSI/1.6 ltr. TDI engine:
  A34-10410
t  Vehicles with 1.6 ltr. MPI/1.8 ltr. TFSI engine:
  A34-10477
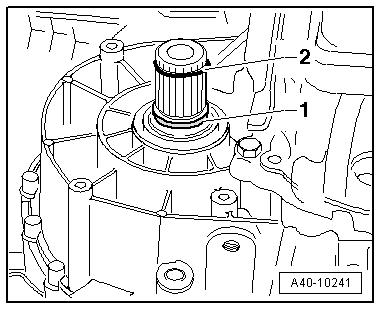
Gearbox with stub shafts:
If a new gearbox is not being installed:
–  Renew O-ring -1- on stub shaft.
–  Renew circlip -2- on stub shaft → Running gear, front-wheel drive and four-wheel drive; Rep. gr.40.
  A40-10241
Continued for all vehicles:
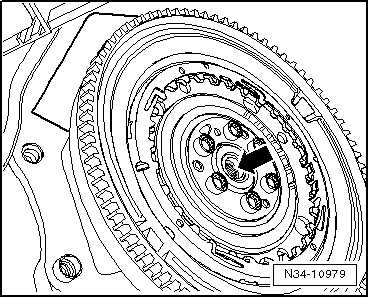
–  Check condition of needle bearing in crankshaft -arrow-; renew if necessary → Engine, mechanics; Rep. gr.13.
  Note
If the needle bearing in the crankshaft is damaged, the gears cannot be shifted correctly because the clutch is supported by this bearing.
  Note
  N34-10979
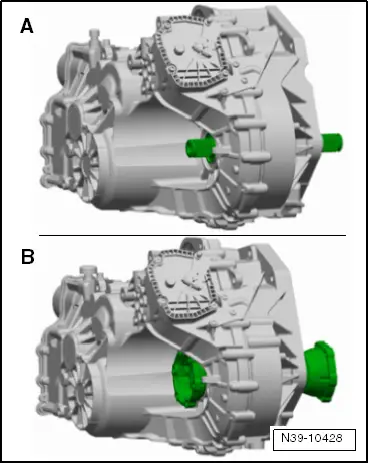
When installing a new gearbox, it may be necessary to change from the stub shaft version -A- to flange shaft version -B- → Electronic parts catalogue.
  N39-10428
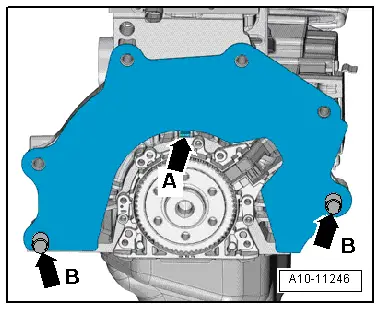
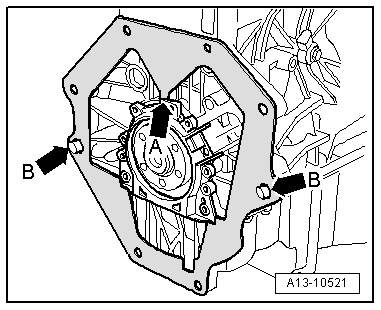
–  Make sure that the intermediate plate is engaged on the sealing flange -arrow A- and fitted on the dowel sleeves -arrows B-.
t  Vehicles with 1.2 ltr. TFSI engine:
  A10-11246
t  Vehicles with 1.4/1.8 ltr. TFSI engine, 1.6 ltr. MPI engine, 1.6 ltr. TDI engine:
–  Carefully raise gearbox using engine and gearbox jack -V.A.G 1383 A- and position correctly using gearbox support -3282-.
  Caution
Risk of damage to selector lever cable.
t  Carefully guide selector lever cable into cable support bracket when lifting gearbox.
t  Do not bend or kink the selector lever cable.
–  Secure gearbox to engine.
  A13-10521
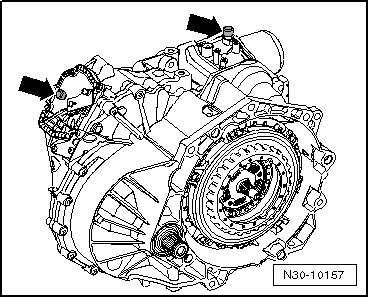
If the gearbox was sealed with oil-tight plugs, e.g. after a gearbox repair or when installing a replacement gearbox:
–  Remove both plugs from breathers -arrows- and install breather caps.
  N30-10157
Continued for all vehicles:
Install assembly mounting as follows:
–  Fit gearbox support -1- between gearbox and support arm of gearbox mounting.
–  Bolt gearbox support to gearbox.
–  Pull gearbox up to support arm of gearbox mounting using spindle of support bracket.
–  Hand-tighten bolts -arrow- securing gearbox mounting to gearbox support initially.
–  Detach gearbox support -3282- from gearbox.
Gearbox with stub shafts:
–  Press drive shafts onto stub shafts of gearbox until circlip snaps into place → Running gear, front-wheel drive and four-wheel drive; Rep. gr.40.
Gearbox with flange shafts:
–  Install flange shaft (right-side) → Chapter.
–  Secure drive shafts to flange shafts on gearbox → Running gear, front-wheel drive and four-wheel drive; Rep. gr.40.
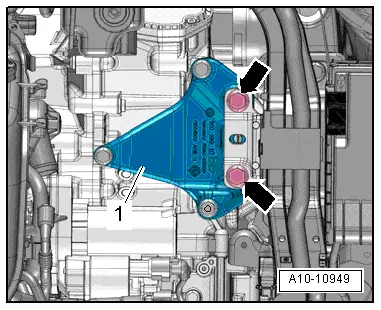
  A10-10949
Continued for all vehicles:
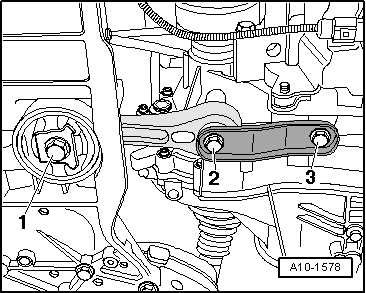
–  Install pendulum support → Chapter.
–  Install exhaust system so it is free of stress → Engine, mechanics; Rep. gr.26.
–  Install starter → Electrical system; Rep. gr.27.
  A10-1578
–  Check adjustment of assembly mountings → Engine, mechanics; Rep. gr.10.
–  Detach support bracket -10 - 222 A- from engine.
–  Check adjustment of selector lever cable and adjust if necessary → Chapter.
–  Install battery tray and battery → Electrical system; Rep. gr.27.
–  Fill cooling system → Engine, mechanics; Rep. gr.19.
Tightening torques (installing gearbox)
  Note
t  Tightening torques apply only to lightly greased, oiled, phosphated or black-finished nuts and bolts.
t  Additional lubricant such as engine or gear oil may be used, but do not use graphite lubricant.
t  Do not use parts which have been degreased.
t  Tolerance for tightening torques is ± 15%.
  A10-10949
Dual clutch gearbox to 1.2/1.4 ltr. TFSI engine:
  A34-10410
ItemBoltNm
1, 8M10x5040
2, 6, 7M12x6580
3, 4, 5M12x5580
ADowel sleeves for centralising

   
Dual clutch gearbox to 1.6 ltr. MPI engine:
  A34-10477
ItemBoltNm
1, 3M12x5580
2M12x17080
4M12x8080
5, 6, 7M10x5040
8M12x9080
ADowel sleeves for centralising

   
Dual clutch gearbox to 1.8 ltr. TFSI engine
  A34-10477
ItemBoltNm
1, 3M12x5580
2M12x15580
4, 8M12x6580
5M12x5080
6, 7M10x5040
ADowel sleeves for centralising

   
Dual clutch gearbox to 1.6 ltr. TDI engine:
  A34-10410
ItemBoltNm
1, 3, 10M12x5580
5, 9M12x7080
6 … 8M10x5040
ADowel sleeves for centralising

Additional tightening torques:
l  → Chapter „Exploded view - assembly mountings“.
   

Transporting gearbox and securing to engine and gearbox support > < Removing gearbox (vehicles with 1.6 ltr. TDI engine)