audi Workshop Repair Guides

Audi Workshop Service and Repair Manuals

Tightening torques > < Removing gearbox on vehicles with 2.0 ltr. FSI engine
Installing gearbox
Installing gearbox
Perform installation in reverse sequence of removal. Pay attention to the following:
  Note!
t  Renew self-locking nuts and bolts when performing assembly work.
t  Renew oil seals and gaskets, and bolts which are tightened by turning through a specified angle.
t  Secure all hose connections with the correct hose clips (as original equipment); refer to → Parts catalogue.
t  All cable ties which are released or cut open during removal must be fitted in the same position when installing.
–  Before installing the gearbox ensure that the torque converter has been correctly fitted in the gearbox → Chapter.
  Caution
If the torque converter is not fitted correctly, the torque converter drive lugs or the ATF pump will be seriously damaged when the gearbox is joined to the engine.
   
–  Before installing, ensure that dowel sleeves -A- are correctly located.
  A37-0751
To install automatic gearbox 09G set up gearbox support -3282- with adjustment plate -3282/36-.
–  Align arms of gearbox support according to holes in adjustment plate.
–  Secure support elements as illustrated on adjustment plate -3282/36-.
–  Secure gearbox to gearbox support -3282- with bolt -1-.
–  Raise gearbox carefully and move to installation position using gearbox support -3282-.
–  Install all engine/gearbox securing bolts which are accessible from below → Chapter „Tightening torques“.
  A37-0574
–  Use socket -V/175- (15 mm) to install the 6 nuts -arrow- securing torque converter to drive plate → Anchor.
–  The nuts must always be renewed.
–  To do so, turn crankshaft 60° further in each case.
  Caution
If a nut should fall into the opening of the torque converter it has to be removed. It may be necessary to separate the gearbox from the engine once more.
  A37-0678
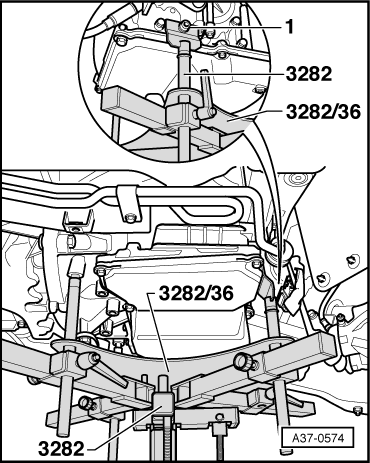
–  Install assembly mounting as follows:
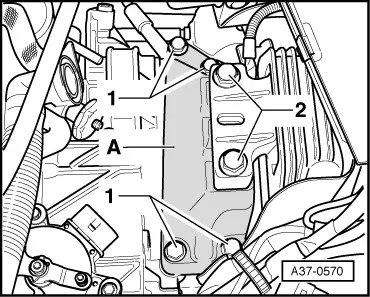
–  Place gearbox console -A- between gearbox and gearbox mounting.
–  Pull gearbox up to gearbox support with spindle on support bracket.
  Caution
Before tightening bolts -1- and -2- gearbox mounting and console must be aligned in an absolutely parallel position, otherwise the threads will be damaged. If necessary, push gearbox up at rear with trolley jack.
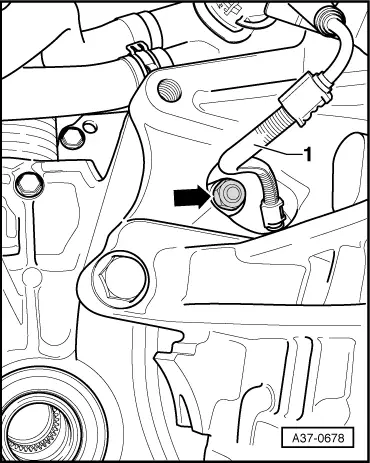
–  Use new bolts.
–  Install gearbox console -A- → Anchor.
  Caution
Support bracket -10-222 A- must not be removed until all bolts on left and right assembly mountings have been tightened to specified torque.
  A37-0570
–  Install pendulum support → Chapter.
–  Use new bolts.
–  Install the remaining bolts for securing engine/gearbox → Chapter „Tightening torques“.
–  Install drive shafts → Running gear, front-wheel drive and four-wheel drive; Rep. Gr.40.
–  Install starter → Electrical system; Rep. Gr.27.
  A10-1578
–  Install hoses on ATF cooler according to markings on cooler.
  Note!
Depending on the version, the vehicle may be fitted with a small plastic tube in the supply line to the ATF cooler. This tube has to be re-fitted as part of installation.
–  Install battery → Electrical system; Rep. Gr.27.
–  Check and top up ATF level → Chapter.
–  Check selector lever cable setting and adjust if necessary → Chapter.
–  Check coolant level in cooling system → Engine, mechanics; Rep. Gr.19.
  N37-0783

Tightening torques > < Removing gearbox on vehicles with 2.0 ltr. FSI engine