audi Workshop Repair Guides

Audi Workshop Service and Repair Manuals

Exploded view - propshaft (Audi Q3) > < Exploded view - propshaft (Audi TT RS and Audi RS 3)
Removing and installing propshaft (Audi TT RS and Audi RS 3)
Special tools and workshop equipment required
   
t  Engine and gearbox jack -V.A.G 1383 A-
  W00-0120
t  
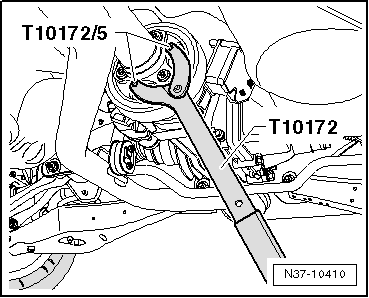
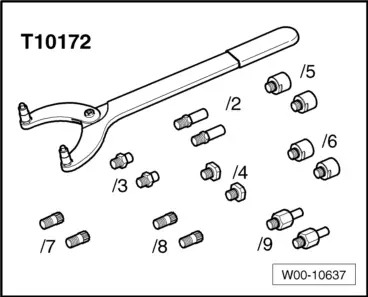
Counterhold tool -T10172- with adapters -T10172/5-
Removing
  Note
t  
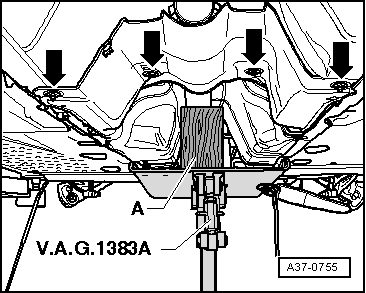
Repairs on the propshaft should preferably be carried out on a two-pillar hoist.
t  
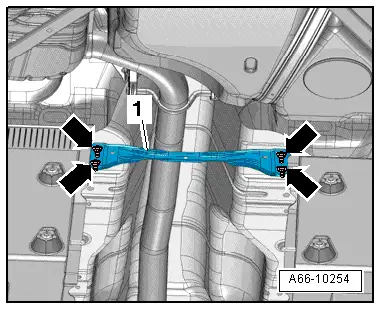
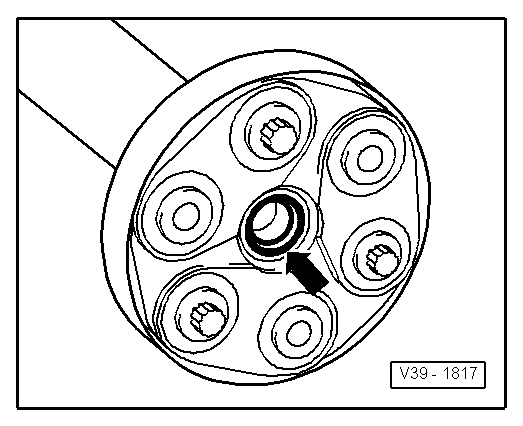
Before removing, mark the positions of all parts in relation to each other. Reinstall in the same position to avoid excessive imbalance, resulting in bearing damage and rumbling noise.
t  Do not bend propshaft; only store and transport fully extended.
t  Always support the propshaft during removal; it must not be suspended from one of the joints.
t  Always keep the propshaft horizontal while pulling it off or fitting it on the joint flange.
  W00-10637
–  Remove noise insulation panels -1- and -2- → Rep. gr.66.
  A10-11003
–  Remove catalytic converters → Rep. gr.26.
  A26-10872
–  Remove bolts -arrows- and detach cross piece -1- (if fitted).
–  Unscrew bolts -2- and detach bracket -3-.
  Caution
The flexible joint in the starter catalytic converter can be damaged.
The flexible joint must not be bent further than 10°.
  A26-10875
–  Detach cross member -1- on underbody (if originally fitted). To do so, remove nuts -arrows-.
–  Remove rear section of exhaust system → Rep. gr.26.
  A66-10254
–  When loosening and tightening propshaft bolts, counterhold at rear final drive using counterhold tool -T10172- and adapters -T10172/5-.
  N37-10410
–  Remove bolts -2, 3- for pendulum support.
  Note
-Item 1- can be disregarded.
  A10-1578
–  Check whether there is a factory marking (paint dot) on the flexible coupling and on the flange for the propshaft on the rear final drive -arrows-.
–  If there is no marking, mark position of flexible coupling relative to flange for propshaft on rear final drive.
  N39-0836
–  Remove bolts -arrows- securing propshaft to rear final drive, counterholding with counterhold tool -T10172-.
  A39-0281
–  Remove bolts -arrows- securing centre bearing and heat shield, detach heat shield.
  Note
-Item A- and -V.A.G 1383 A- can be disregarded.
  Note
  A37-0755
A 2nd mechanic is required for the next steps when removing the propshaft.
  Caution
Risk of damage to oil seal -arrow- in propshaft flange.
Pull off propshaft horizontally from centring pin.
  Note
If seal is damaged propshaft must be renewed.
–  First pull propshaft tube off centring pin on rear final drive, then pull carefully off centring pin on bevel box.
  Caution
Risk of damage to protective sleeve in centre propshaft bearing.
The propshaft should be kept as straight as possible during removal and installation and when it is stored.
Installing
Installation is carried out in reverse sequence; note the following:
l  Tightening torques → Chapter
  Note
Install all parts in the same relative positions, as marked before removal.
  V39-1817
–  Attach propshaft to rear final drive so that the markings -arrows- align.
  N39-0836
–  Fit bolts -1- for centre bearing, but do not yet tighten.
–  Tighten bolts securing propshaft flexible couplings to bevel box and rear final drive.
–  Align centre bearing within elongated holes so that neither propshaft nor centre bearing are under stress.
–  Tighten bolts -1-.
l  The bolts must be located inside the centring tabs on the heat shield.
–  Install pendulum support → Rep. gr.34.
  A37-10006
–  Install rear section of exhaust system → Rep. gr.26.
–  Secure cross member -1- on underbody (if originally fitted). Tightening torque: 23 Nm.
  A66-10254
–  Install catalytic converters, bracket -3- and cross piece -1- (if originally fitted) → Rep. gr.26.
–  Install noise insulation → Rep. gr.66.
  A26-10875

Exploded view - propshaft (Audi Q3) > < Exploded view - propshaft (Audi TT RS and Audi RS 3)