
A3 Mk2
| Timing chain covers - exploded view |
 Note
Note| -Items 1 ... 3- → Chapter. |
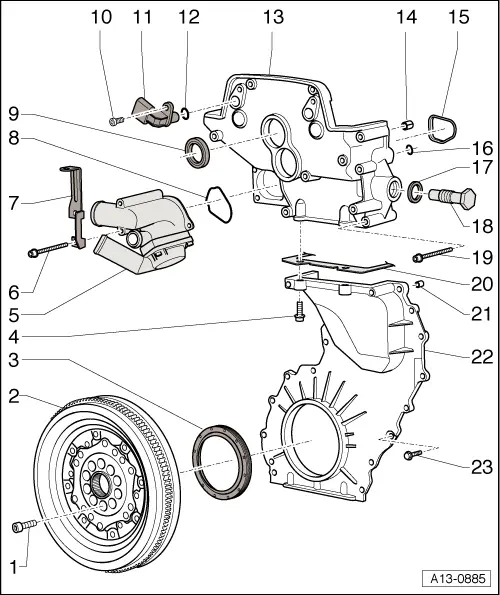
| 4 - | Bolt |
| q | Tightening torque → Fig. |
| 5 - | Thermostat housing |
| q | Removing and installing → Chapter |
| 6 - | Bolt |
| q | 10 Nm |
| 7 - | Bracket |
| q | Version fitted in vehicle may differ from illustration |
| 8 - | Gasket |
| q | Renew |
| 9 - | Seal |
| q | 2x |
| q | For inlet camshaft control valve 1 -N205- and exhaust camshaft control valve 1 -N318- |
| q | Renew if damaged or leaking |
| q | Renewing → Chapter |
| 10 - | Bolt |
| q | 10 Nm |
| 11 - | Hall sender |
| q | 2x |
| q | Mark electrical connector before disconnecting |
| 12 - | O-ring |
| q | 2x |
| q | Renew |
| 13 - | Timing chain cover (top) |
| q | Coat sealing surfaces with sealant when installing → Anchor |
| 14 - | Dowel sleeve |
| q | 2x |
| 15 - | Gasket |
| q | Renew |
| 16 - | O-ring |
| q | Renew |
| 17 - | Seal |
| q | Renew if damaged or leaking |
| 18 - | Chain tensioner for camshaft timing chain |
| q | Tightening torque → Chapter |
| 19 - | Bolt |
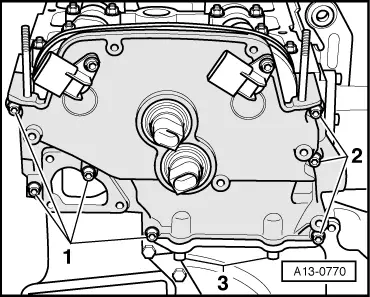
| q | Tightening torque and tightening sequence → Fig. |
| 20 - | Cylinder head gasket |
| q | Clean bores and fill with sealant → Anchor |
| 21 - | Dowel pin |
| 22 - | Timing chain cover (bottom) |
| q | Coat sealing surfaces with sealant when installing; for sealant refer to → Electronic parts catalogue |
| 23 - | Bolt |
| q | 10 Nm |
| q | Tighten in stages and in diagonal sequence |
|
|