A3 Mk2
| Poly V-belt drive - exploded view of components |

| 1 - | Poly V-belt |
| q | Check for wear |
| q | Do not kink |
| q | Before removing, mark direction of rotation with chalk or felt-tipped pen. If the belt runs in the opposite direction when it is refitted, this can cause breakage. |
| q | Removing and installing → Chapter |
| q | When installing, make sure it is properly seated on pulleys. |
| 2 - | Vibration damper |
| q | With poly V-belt pulley |
| q | Removing and installing → Chapter |
| 3 - | Bolt |
| q | Renew |
| q | 100 Nm + turn 180° further |
| q | Use counterhold tool -T10069- when loosening and tightening |
| 4 - | Bolt |
| q | 20 Nm |
| 5 - | Poly V-belt pulley for coolant pump |
| 6 - | 8 Nm |
| 7 - | Bolt |
| q | 50 Nm |
| 8 - | Tensioner for poly V-belt |
| q | Pivot with open-end spanner to slacken poly V-belt |
| q | Lock in position with locking pin -T10060 A-. |
| q | Removing and installing → Chapter |
| 9 - | Coolant pump |
| q | Removing and installing → Chapter |
| 10 - | Bracket for ancillaries |
| q | Removing and installing → Chapter |
| 11 - | Bolt |
| q | 23 Nm |
| 12 - | Alternator |
| q | Removing and installing → Rep. Gr.27 |
| 13 - | Bolt |
| q | 3 x |
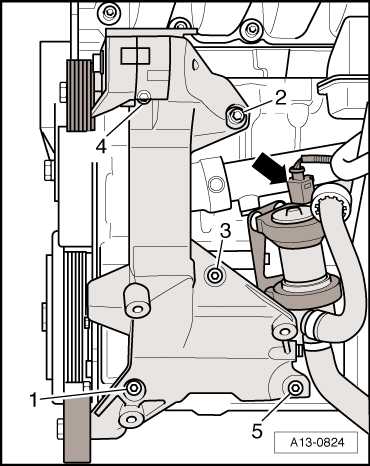
| q | Tightening torque and tightening sequence → Fig. |
| 14 - | Dowel sleeve for air conditioner compressor |
| 15 - | Air conditioner compressor |
| q | Do not unscrew or disconnect refrigerant hoses or pipes. |
| q | Removing and installing → Rep. Gr.87 |
| 16 - | 25 Nm |
| 17 - | Fitted bolt |
| q | 2x |
| q | Tightening torque and tightening sequence → Fig. |
| 18 - | Idler rollers |
| 19 - | Bolt |
| q | 40 Nm |
|

|
|
