audi Workshop Repair Guides

Audi Workshop Service and Repair Manuals

Removing and installing charge air cooler (right-side) > < Charge air cooling - exploded view
Removing and installing charge air cooler (left-side)
  Note
Check all hoses and pipes for correct fitting and leakage before carrying out tests or repairs.
   
Removing
–  Remove bumper cover (front) → Rep. Gr.63.
–  Remove left headlight → Rep. Gr.94.
–  Remove air duct in front of charge air cooler (left-side) -arrows-.
  A21-0199
–  Unplug electrical connector -3- at charge pressure sender -G31-/intake air temperature sender -G42-.
  WARNING
The air conditioner refrigerant circuit must not be opened.
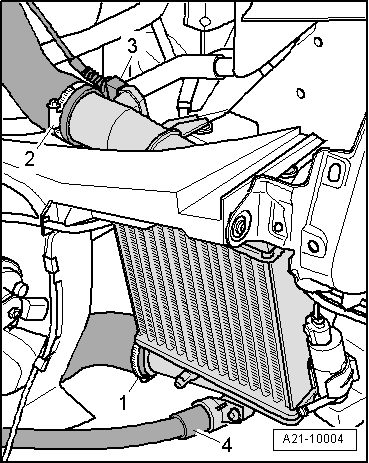
–  Disengage refrigerant line -4- at bracket.
–  Open hose clips -1- and -2- and disconnect air intake hoses.
–  Detach charge air cooler by pulling upwards.
Installing
Installation is carried out in the reverse order; note the following:
  Note
t  Hose connections and hoses for charge air system must be free of oil and grease before assembly.
t  Secure all hose connections with the correct type of hose clips (same as original equipment) → Electronic parts catalogue.
t  To ensure that the charge air hoses can be properly secured at their connections, spray rust remover onto the worm thread of used hose clips before installing.
–  Install headlight (left-side) → Rep. Gr.94.
–  Install bumper cover (front) → Rep. Gr.63.
–  Check headlight adjustment → Booklet803 or → Booklet805.
Tightening torque
  A21-10004
ComponentNm
Hose clips (13 mm wide)5.5


Removing and installing charge air cooler (right-side) > < Charge air cooling - exploded view