
A4 Cabriolet Mk2
| Sump (top section), oil filter, chain tensioner - exploded view |
 Note
Note| Oil spray jet for piston cooling → Fig.. |

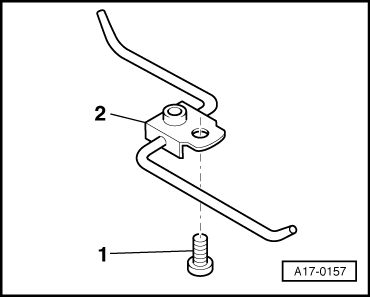
| 1 - | Torque reaction support |
| 2 - | 40 Nm |
| 3 - | Stop for torque reaction support |
| q | Adjustment: allow stop for torque reaction support to rest on rubber buffer for torque reaction support under its own weight, and tighten bolts. |
| 4 - | 28 Nm |
| 5 - | Seal |
| q | Renew |
| 6 - | Oil pressure switch -F1- |
| q | Black insulation |
| q | Checking → Chapter „Checking oil pressure and oil pressure switch -F1-“ |
| q | Renew seal |
| q | Tighten to 25 Nm |
| 7 - | 12 Nm |
| 8 - | Washer |
| 9 - | O-ring |
| q | Renew |
| 10 - | Seal |
| q | Renew |
| 11 - | Screw plug, 10 Nm |
| 12 - | Oil seal |
| q | For crankshaft |
| q | Renewing → Chapter |
| 13 - | 10 Nm |
| 14 - | 30 Nm |
| q | Self-locking |
| q | Renew |
| 15 - | Sealing flange (front) |
| q | Removing and installing → Chapter |
| 16 - | Chain tensioner |
| q | Removing and installing → Chapter |
| q | Lock with Ø 3 mm drill bit |
| 17 - | Gasket |
| q | Renew |
| 18 - | 20 Nm |
| 19 - | Guide tube for oil dipstick |
| 20 - | Panel bolt |
| 21 - | O-ring |
| q | Renew |
| 22 - | Oil filter |
| q | Intervals for changing filter → Booklet803 |
| q | Loosen with oil filter wrench -3417- |
| q | Observe installation instructions on oil filter |
| q | Tighten to 20 Nm |
| 23 - | 30 Nm |
| 24 - | Oil cooler |
| q | See note → Chapter |
| 25 - | Guide piece |
| q | With seal |
| q | Renew |
| 26 - | 10 Nm |
| q | Self-locking |
| q | Renew |
| 27 - | Baffle plate (top) |
| 28 - | 45 Nm |
| 29 - | M7 = 16 Nm; M8 = 22 Nm |
| 30 - | Sump (top section) |
| q | Removing and installing → Chapter |
|
|