
A4 Cabriolet Mk2
| Camshaft timing chains - exploded view of components |
| Camshaft timing chain (left-side) |
 Note
Note| Mark rotation direction of chain with paint before removing. If a used chain rotates in the opposite direction when it is refitted, this can cause breakage. |
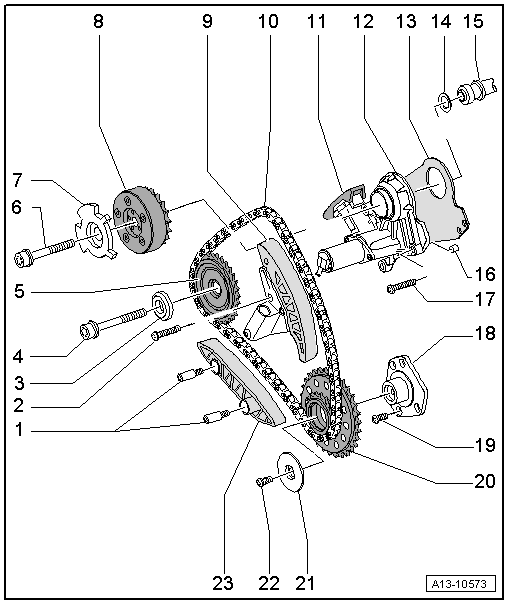
| 1 - | Mounting pin, 10 Nm |
| 2 - | 5 Nm + 90° (1/4 turn) further |
| q | Renew |
| 3 - | Washer |
| q | Note installation position |
| 4 - | Bolt for camshaft |
| q | Renew |
| q | Pre-tightening torque: 40 Nm |
| q | Final tightening torque: 100 Nm + 90° (1/4 turn) further |
| 5 - | Chain sprocket |
| q | For exhaust camshaft |
| 6 - | Bolt for camshaft |
| q | Renew |
| q | Pre-tightening torque: 40 Nm |
| q | Final tightening torque: 100 Nm + 90° (1/4 turn) further |
| 7 - | Rotor for Hall sender |
| q | When installing, adjust using setting tool -T40047- → Anchor |
| 8 - | Camshaft adjuster |
| q | For inlet camshaft |
| 9 - | Chain tensioner |
| q | For timing chain (left-side) |
| 10 - | Camshaft timing chain (left-side) |
| q | Removing and installing → Chapter |
| 11 - | Guide rail |
| q | Can be renewed individually |
| 12 - | Valve timing housing |
| q | For camshaft adjuster |
| 13 - | Gasket |
| q | Renew |
| 14 - | Diamond-coated washer |
| q | Renew |
| 15 - | Camshaft |
| 16 - | Dowel sleeve |
| q | 2x |
| 17 - | 5 Nm + 90° (1/4 turn) further |
| q | Renew |
| 18 - | Bearing bracket |
| q | For drive chain sprocket |
| 19 - | 10 Nm |
| 20 - | Drive chain sprocket |
| q | For timing chain (left-side) |
| 21 - | Thrust washer |
| q | For drive chain sprocket |
| 22 - | 5 Nm + 90° (1/4 turn) further |
| q | Renew |
| 23 - | Guide rail |
| Camshaft timing chain (right-side) |
Note| Mark rotation direction of chain with paint before removing. If a used chain rotates in the opposite direction when it is refitted, this can cause breakage. |

| 1 - | Chain tensioner |
| q | For timing chain (right-side) |
| 2 - | 5 Nm + 90° (1/4 turn) further |
| q | Renew |
| 3 - | Bearing mounting |
| q | For drive chain sprocket |
| 4 - | Washer |
| 5 - | 42 Nm |
| 6 - | Bolt for camshaft |
| q | Renew |
| q | Pre-tightening torque: 40 Nm |
| q | Final tightening torque: 100 Nm + 90° (1/4 turn) further |
| 7 - | Rotor for Hall sender |
| q | When installing, adjust using setting tool -T40047- → Anchor |
| 8 - | Camshaft adjuster |
| q | For inlet camshaft |
| 9 - | Mounting pin, 10 Nm |
| 10 - | Guide rail |
| 11 - | Thrust washer |
| q | For drive chain sprocket |
| 12 - | Camshaft timing chain (right-side) |
| q | Removing and installing → Chapter |
| 13 - | Valve timing housing |
| q | For camshaft adjuster |
| 14 - | Gasket |
| q | Renew |
| 15 - | Diamond-coated washer |
| q | Renew |
| 16 - | Camshaft |
| 17 - | Dowel sleeve |
| q | 2x |
| 18 - | Guide rail |
| q | Can be renewed individually |
| 19 - | 5 Nm + 90° (1/4 turn) further |
| q | Renew |
| 20 - | Chain sprocket |
| q | For exhaust camshaft |
| 21 - | Washer |
| q | Note installation position |
| 22 - | Bolt for camshaft |
| q | Renew |
| q | Pre-tightening torque: 40 Nm |
| q | Final tightening torque: 100 Nm + 90° (1/4 turn) further |
| 23 - | Drive chain sprocket |
| q | For timing chain (right-side) |
| 24 - | Guide rail |
| q | For chain tensioner |
| 25 - | Mounting pin, 10 Nm |