audi Workshop Repair Guides

Audi Workshop Service and Repair Manuals

2 - Anchorage point for belt buckle > < Seat belt attachment points (layout)
General Body Assembly, Interior (Repair groups 68, 69, 70, 72, 74)
Seat belts
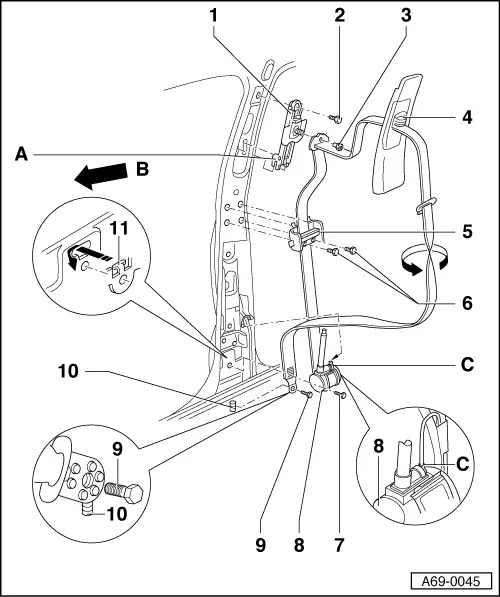
1 - Removing and installing three-point seat belt with belt height adjuster and belt tensioner
 
A69-0045
  • Belt height adjuster
  • ◆ Removing belt height adjuster
    • ‒ Remove upper B-pillar trim
    • ‒ Unscrew shouldered nut -3- and bolt -2-.
    • ‒ Lift out seatbelt height adjuster -1- from position -A-.
  • ◆ Installing belt height adjuster
    • ‒ Insert button for height adjuster -4- into height adjuster -1- => Fig.:1

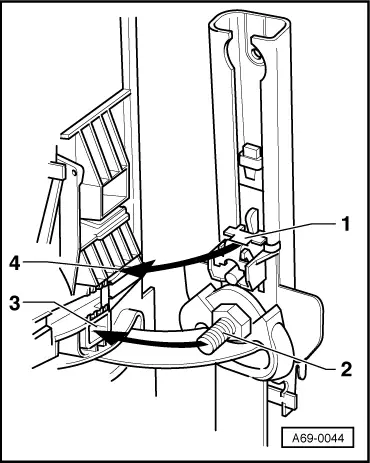
Notes:

Do not press button -4- when installing.

 
A69-0045

Check operation after installing trim:

Height adjuster must engage audibly in each of the 5 possible positions (including top position).

Each time the height adjustment fitting is pressed it should return automatically to the "up" position.

  • Bolt
    • ‒ Tightening torque 23 Nm
  • Shouldered nut
    • ‒ Tightening torque 50 Nm
  • Height adjustment button
  • Belt guide
    • ‒ Remove bolts -7- (2x).
    • ◆ Unclip belt guide at bottom swivel upwards and disengage.
 
A69-0045
  • Bolts (2x)
    • ‒ Tightening torque 2 Nm
  • Bolt
    • ‒ Tightening torque 50 Nm
  • Bolt
    • ‒ Tightening torque 50 Nm
  • Belt tensioner
  • ◆ Removing three-point seat belt
    • ‒ Disconnect battery.
    • ‒ Remove sill panel trims => Page 70-75
    • ‒ Remove bolt -9- (1x).
    • ‒ Remove upper B-pillar trim => Page 70-70
    • ‒ Pull webbing out of upper B-pillar trim.
 
A69-0045
    • ‒ Removing lower B pillar trim => Page 70-70
    • ‒ Unscrew shouldered nut -3-.
    • ‒ Pull connector -C- off belt tensioner.
    • ‒ Unscrew bolt -7-.
    • ‒ Lift belt tensioner -9- out of anti-twist element -11-.
  • ◆ Installing three-point seat belt.

Note:

Arrow -B- indicates direction of travel

    • ‒ Fit belt tensioner -9- with anti-twist element -11- as shown in magnified view.
    • ‒ Fit webbing turned through 180° -arrow- as shown in illustration.
 
A69-0045
    • ‒ Attachment point at bottom of webbing must be screwed to metal lug -10-, as shown in magnified view.
    • ‒ Remainder of installation is carried out in reverse order of removal.
    • ◆ After installing passenger's three-point seat belt check belt function for child seat => Page 69-32
    • ◆ Ensure three-point seat belt is not impeded by cables, wires, insulation etc.
  • Metal lug in floor panel
    • ◆ To prevent twisting of webbing holder.
  • Anti-twist element and fitting guide for three-point seat belt
 
A69-0044

Fig.:1    Installing upper B-pillar trim in belt height adjuster

  • ‒ Move slide with button -4- (do not press button) downwards to height adjuster release lever -1- and at the same time insert pin -2- in mount -3-.

2 - Anchorage point for belt buckle > < Seat belt attachment points (layout)