Power transmissionServicing clutch
|
Servicing clutch
Servicing clutch
Notes:
-
◆ Observe the general repair instructions .
-
◆ Before renewing the clutch plate and pressure plate
=> Fault-finding No. 9 - Defects on the clutch and clutch mechanism.
-
◆ Replace clutch plates and pressure plates with damaged or loose rivets.
-
◆ Select the correct clutch plate and pressure plate according to engine code:
=> Parts List
-
◆ Clean input shaft splines and (in the case of used clutch plates) the hub splines. Remove corrosion and apply only a very thin coating of grease G 000 100 to the splines. Then move clutch plate to and fro on input shaft until hub moves freely on shaft. Excess grease must be removed.
-
◆ Pressure plates are protected against corrosion and greased. Only the contact surface may be cleaned, otherwise the service life of the clutch will be considerably reduced.
-
◆ If the clutch has burnt out, thoroughly clean the bell housing, flywheel and parts of the engine facing the gearbox in order to reduce the smell.
|
| |
|
 |
- A - Coloured marking on dual mass flywheel
-
◆ If components are marked: white marking -A- on dual mass flywheel must coincide with white marking -B- on pressure plate.
- B - Coloured marking on pressure plate
-
◆ If components are marked: white marking -A- on dual mass flywheel must coincide with white marking -B- on pressure plate.
|
| |
|
|
- Detach clutch plate
-
‒ Spring pack (coil springs) towards pressure plate and gearbox
-
‒ Clutch lining must make full contact with flywheel
-
‒ Marking "Getriebeseite" (if present) goes towards pressure plate and gearbox
-
◆ Do not grease
-
◆ Clutch plate diameter => from Page 00-3
-
◆ Centring =>Fig.1
-
◆ Lightly grease splines
|
| |
|
 |
|
→ Fig.1 Centring clutch plate and removing and installing pressure plate
-
‒ Installation position of clutch plate: spring pack (coil springs) or marking "Getriebeseite" towards pressure plate and gearbox.
Notes:
-
◆ The clutch plate lining and the contact surface of the pressure plate must make full contact with the flywheel before the securing bolts are inserted.
-
◆ Tighten securing bolts evenly and in diagonal sequence to avoid damaging centring holes in pressure plate and centring pins on flywheel.
-
‒ When assembling, ensure that white marking (if provided) on dual-mass flywheel coincides with white marking on pressure plate.
-
‒ Loosen and tighten bolts gradually in several stages working diagonally. Tightening torque: 25 Nm.
-
‒ Reverse position of retainer 3067 when removing.
-
‒ Use mandrel 3176 to centre clutch plate.
|
| |
|
 |
|
→ Fig.2 Checking ends of the diaphragm spring
-
◆ Wear up to half the thickness of the diaphragm spring is permitted.
Note:
When performing repairs always match up clutch pressure plate and clutch plate by checking engine code (see Parts Catalogue).
|
| |
|
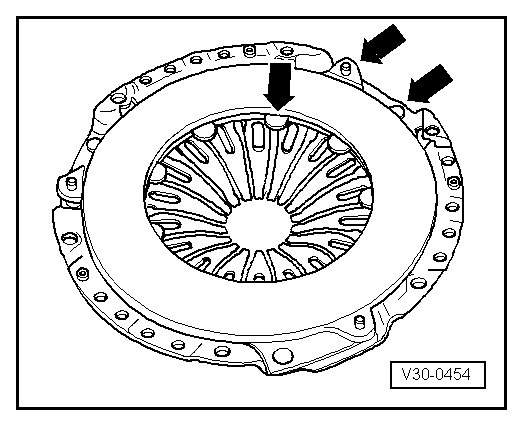 |
|
→ Fig.3 Checking spring connection and riveted fastenings
-
‒ Check spring connection between pressure plate and cover for cracks and make sure rivet fastenings are seated tightly.
-
‒ Renew clutches with damaged springs or loose riveted fastenings -arrows-.
|
04 Transmission