audi Workshop Repair Guides

Audi Workshop Service and Repair Manuals

Dismantling and assembling gearbox > < Checking oil level in gearbox
5-Speed Manual Gearbox 01A (4WD)
Removing and installing cover with Torsen differential
  • ● Gearbox installed

Special tools, testers and auxiliary equipment required

  • ◆ Set of ring spanners for lambda probe 3337 (only for vehicles with 6 cylinder engine)
  • ◆ Drip tray V.A.G 1306

Removing

Vehicles with 4-cylinder engine:

  • ‒ Remove rear section of exhaust system from clamp(s):

=> 4-cylinder Engine (5-valve), Mechanical Components; Repair Group 26; Removing and installing exhaust system parts

=> 4-cylinder Engine (5-valve turbo), Mechanics; Repair Group 26; Removing and installing parts of exhaust system

=> 4-cylinder Diesel Direct Injection Engine (TDI), Mechanics; Repair Group 26; Removing and installing exhaust system

Vehicles with 6-cylinder engine:

  • ‒ Unscrew lambda probes on right exhaust pipes with special tool 3337 and move clear to the side.
  • ‒ Detach heat shield above right drive shafts.
 
A34-0129
  • ‒ → Unbolt front exhaust pipes with catalytic converters from left and right exhaust manifolds (3 nuts on each side) -arrows-:

=> 6-cylinder Engine (2-valve), Mechanics; Repair Group 26; Removing and installing exhaust system

=> 6-cylinder Engine (5-valve), Mechanical Components; Repair Group 26; Removing and installing exhaust system parts

All models:

 
A34-0122
  • ‒ → Remove heat shield for propshaft from cover for Torsen differential -arrows-.
 
A34-0128
  • ‒ → Unscrew propshaft -1- from gearbox and place onto heat shield -2-.
  • ‒ Secure propshaft with wire -arrow- at bracket -3- of fuel lines.
  • ‒ Place drip tray V.A.G 1306 underneath and drain gearbox oil.

 
V34-2424
  • ‒ → Unbolt cover -A- with Torsen differential from gearbox cover -B-.

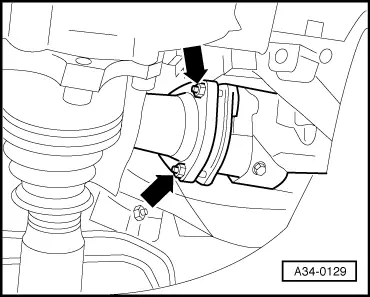
Note:

Shown in illustration with gearbox removed.

  • ‒ Detach spring -2- from drive pinion.

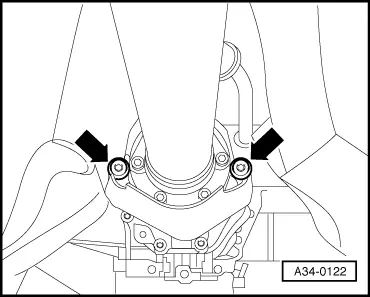
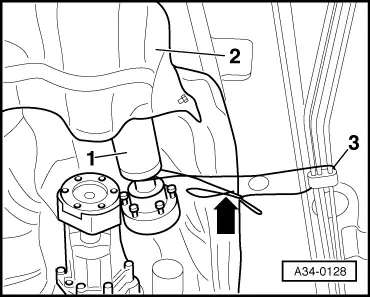
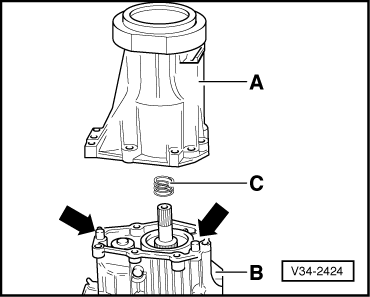
Removing and installing Torsen differential from cover

Servicing cover => Page 34-102

Installing

Installation is carried out in the reverse order, when doing this note the following:

  • ‒ Clean sealing surface and coat with AMV 188 001 02 or AMV 188 001 02.
 
V34-2424
  • ‒ → Check that dowel sleeves for cover -A- are fitted in gearbox cover -B- (arrows).
  • ‒ Fit spring -C- onto hollow shaft over drive pinion.
  • ‒ Bolt on propshaft => Page39-83
  • ‒ Top up oil in gearbox and check oil level in gearbox => Page 34-69.
  • ‒ Stress free alignment of exhaust system

=> 4-cylinder Engine (5-valve), Mechanics; Repair Group 26; Removing and installing exhaust system parts, Stress-free alignment of exhaust system

=> 4-cylinder Engine (5-valve turbo), Mechanics; Repair Group 26; Removing and installing exhaust system parts, Stress-free alignment of exhaust system

=> 4-cylinder Diesel Direct Injection Engine (TDI), Mechanics; Repair Group 26; Removing and installing exhaust system

=> 6-cylinder Engine (2-valve), Mechanics; Repair Group 26; Removing and installing exhaust system

=> 6-cylinder Engine (5-valve), Mechanics; Repair Group 26; Removing and installing exhaust system parts, Stress-free alignment of exhaust system

Tightening torque

Component

Nm

Cover with Torsen differential to gearbox


25

Propshaft on gearbox

55

Heat shield for propshaft on Torsen differential cover

25

Dismantling and assembling gearbox > < Checking oil level in gearbox