audi Workshop Repair Guides

Audi Workshop Service and Repair Manuals

Checking cooling system for leaks > < Removing and installing viscous fan
Removing and installing radiator
Special tools and workshop equipment required
   
t  Drip tray for workshop hoist -VAS 6208-
  W00-10228
Removing
  Note
If there are slight impressions on the fins, refer to → Chapter.
–  Remove front bumper → Rep. Gr.63.
–  Remove air duct in front of charge air cooler -arrows-.
  A10-0345
–  Detach cooling pipe for power steering hydraulic fluid -arrows-.
–  Place drip tray for workshop hoist -VAS 6208- beneath engine.
  WARNING
Hot steam/hot coolant can escape - risk of scalding.
t  The cooling system is under pressure when the engine is hot.
t  To allow pressure to dissipate, cover filler cap on expansion tank with cloth and open carefully.
–  Open filler cap on expansion tank.
  N19-0152
–  Turn drain plug -arrow- on radiator anti-clockwise, if necessary fit drain hose to connection.
  A10-0020
–  Lift retaining clip -arrow- and disconnect coolant hoses from radiator.
–  On vehicles with automatic gearbox, detach ATF pipes from radiator → Rep. Gr.37.
  N19-0148
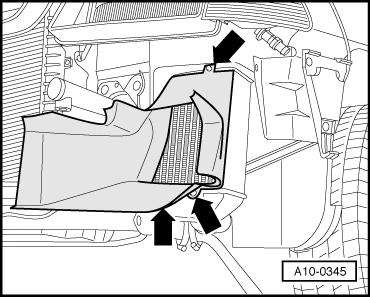
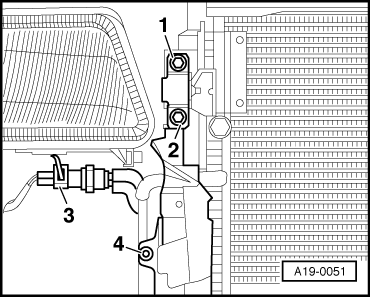
–  Detach air ducts (left and right) from radiator -4-.
  WARNING
Risk of injury caused by refrigerant.
The air conditioner refrigerant circuit must not be opened.
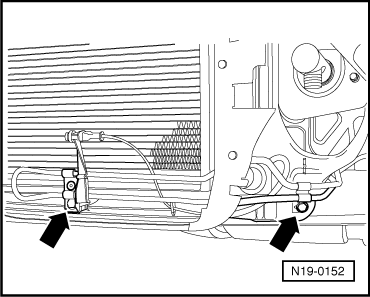
–  Remove bolts -1- and -2- for condenser.
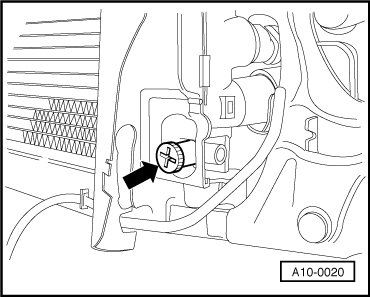
–  Unplug connector -3- at air conditioning system pressure switch -F129-.
  Caution
Make sure that condenser and refrigerant pipes and hoses are not damaged.
Do NOT stretch, kink or bend refrigerant lines and hoses.
–  Pull condenser up out of its bracket, pivot to side and secure to right-side front wheel with wire.
  Note
Protect wing panels from damage.
  A19-0051
–  Release two retaining pins for radiator and pull out upwards -arrows-.
–  Swivel radiator forwards and lift off.
Installing
Installation is carried out in the reverse order; note the following:
–  On vehicles with automatic gearbox, secure ATF pipes and check ATF level → Rep. Gr.37.
  A19-0050
–  Connect coolant hose to radiator with plug-in connector.
–  Remove old O-ring -2- from coolant hose -3-.
–  Lightly lubricate new O-ring with coolant and fit O-ring in coolant hose.
–  Press coolant hose onto radiator -1- until it engages with a click.
–  Press coolant hose in again and then pull to check that plug-in connector is correctly engaged.
–  Install front bumper → Rep. Gr.63.
–  Fill up with coolant → Anchor.
Tightening torques
  A19-10572
ComponentNm
Condenser to radiator10
Cooling pipe to radiator10


Checking cooling system for leaks > < Removing and installing viscous fan