audi Workshop Repair Guides

Audi Workshop Service and Repair Manuals

Servicing drive shaft > < Rear drive shaft
Running gear, Front-wheel drive and four-wheel drive
Rear drive shaft
Removing and installing drive shaft

Special tools and workshop equipment required

  • ◆ V.A.G 1331 Torque wrench
  • ◆ V.A.G 1332 Torque wrench
  • ◆ 3208 Suction grip
  • Differential
  • Gasket
    • ◆ Replace; pull off backing and bond into joint
  • Drive shaft
    • ◆ Servicing
  • Packing plate
 
A42-0079
  • Multi-point socket head bolt
    • ◆ Assignment

=> Parts List

    • ◆ Tightening torques:
    • M8 bolt: 40 Nm
    • M10 bolt: 70 Nm
  • Subframe
  • Hexagon socket-head collared bolt
    • ◆ Always replace
    • ◆ Switched from hexagon head to hexagon socket; combination is permitted
    • Vehicle must be standing on ground when tightening bolt
    • Tightening torque:
    • M14 bolt:
    • ◆ 115 Nm + further 180° turn
  • Self-locking nut
    • ◆ Always replace
    • ◆ 70 Nm + further 90° turn
 
A42-0079
  • Washer
    • ◆ Always replace
  • Hexagon bolt
    • ◆ Always replace
 
V44-0408

Removing drive shaft

  • ‒ → Detach wheel trim. In the case of light alloy wheels, use puller from vehicle tool kit or suction grip -3208- to remove trim cap.

 
A42-0248
  • ‒ → Slacken off collared bolt -arrow- by 90° only so as not to damage wheel bearing.
Attention:
Vehicle must be standing on its wheels when slackening off and tightening collared bolt.
-Danger of accident-
  • ‒ Remove wheel.
  • ‒ Hand-tighten all 5 wheel bolts again.
  • ‒ Firmly apply handbrake.
 
A42-0045
  • ‒ Screw out collared bolt -arrow-.
  • ‒ Pull ABS speed sensor out of axle support slightly.
  • ‒ Unscrew drive shaft from flange shaft/differential.
  • ‒ → Slacken off connecting link/wheel bearing housing bolted joint
    -arrow 2-.

 
A42-0045
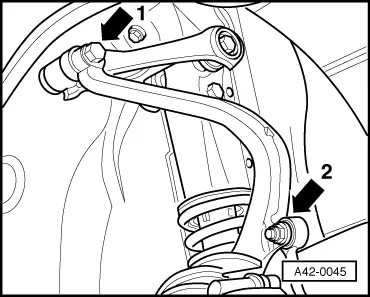
  • ‒ → Unscrew upper link/wheel bearing housing bolted joint -arrow 1-.

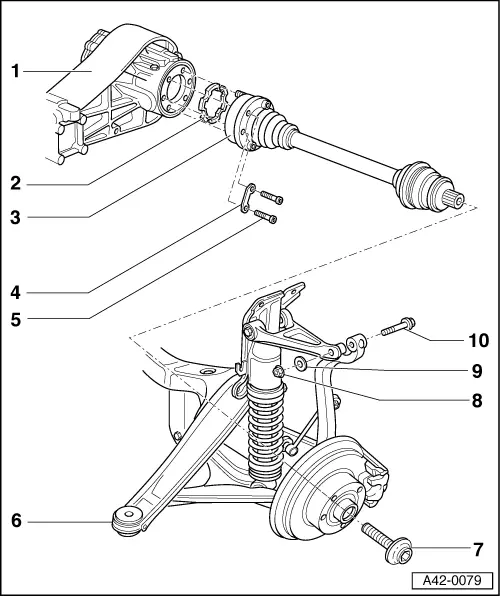
Removing left drive shaft:

  • ‒ Remove rear and centre exhaust system silencers.

=> Engine, Mechanics; Repair Group 26; Removing and installing exhaust system components

All vehicles (continued)

  • ‒ Lower drive shaft on inside of final drive and pull out of wheel bearing housing.

Installing drive shaft

Install in reverse order.

Bolted joints with bonded rubber bushes must be tightened when vehicle is standing on its wheels.

Otherwise, bonded rubber bush would be subject to torsion and its service life shortened.

  • ‒ Pre-tighten bolted joints with bonded rubber bushes to 20 Nm.
  • ‒ Screw in new collared bolt and tighten to prescribed torque without additional turn.
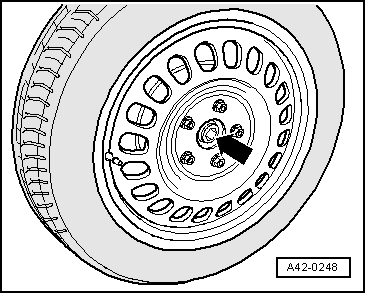
  • ‒ Fit and secure wheel => Page 44-1.
  • ‒ Slacken off bolted joints with bonded rubber bushes again.
  • ‒ Set vehicle down on its wheels.
  • ‒ Bounce vehicle several times.
  • ‒ Tighten bolted joints with bonded rubber bushes to prescribed torque.
  • ‒ Give collared bolt prescribed further turn.

Tightening torques

Component

Nm

Connecting link to wheel bearing housing


50 1)

Upper link to wheel bearing housing

70 + 90°2)

Collared bolt for drive shaft

115 + 180°3)

Drive shaft to flange shaft/differential - M8 bolt


40

Drive shaft to flange shaft/differential - M10 bolt


70

    1)    Replace nut

    2)    Replace bolt and nut

    3)    Replace bolt

Servicing drive shaft > < Rear drive shaft