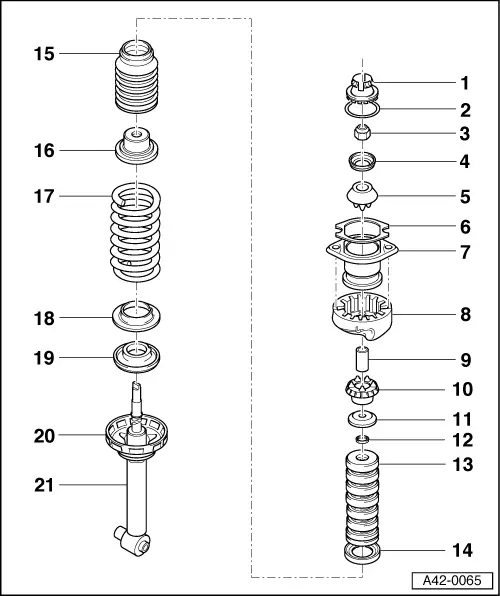
audi Workshop Repair Guides

Audi Workshop Service and Repair Manuals

Vehicle level senders for vehicles with automatic headlight range control > < Removing and installing suspension strut
Running gear, Front-wheel drive and four-wheel drive
Suspension strut
Servicing suspension strut

Special tools and workshop equipment required

  • ◆ 3079 Counterhold
  • ◆ 3118 Thrust pad
  • ◆ 3379 Socket attachment
  • ◆ VW 401 Pressure plate
  • ◆ VW 402 Pressure plate
  • ◆ VW 412 Press tool
  • ◆ V.A.G 1331 Torque wrench
  • ◆ V.A.G 1752/1 Spring tensioner
  • ◆ V.A.G 1752/2 Suspension strut holder
  • ◆ V.A.G 1752/3 Spring holder
  • ◆ V.A.G 1752/8 Suspension strut adjustment gauge
 
A42-0065
  • Cap
  • O-ring
    • ◆ Coat with silicone grease G 000 405 A2
  • Lock nut, 25 Nm
    • ◆ Always replace
  • Dished washer
  • Bearing ring
    • ◆ Pay attention to correct installation position
  • Seal (foam)
    • ◆ Always replace
  • Upper spring plate
  • Spring support
  • Spacer
  • Bearing ring
    • ◆ Pay attention to correct installation position
 
A42-0065
  • Lower washer
    • ◆ Assignment

=> Parts List

  • Ring
    • ◆ Different versions

=> Parts List

  • Additional spring
  • Bellows support ring
  • Bellows
  • Protective cap
    • ◆ Different versions

=> Parts List

 
A42-0065
  • Spring
    • ◆ Note different coil spring versions
      , vehicle data sticker
    • ◆ Replace only as a pair
    • ◆ Fit with colour code facing downwards
  • Packing ring
  • Spring seat
  • Lower spring plate
  • Gas-filled shock absorber
    • ◆ Checking => Page 00-10
    • ◆ Assignment

=> Parts List

    • ◆ Can be replaced separately
    • ◆ Replacement part supplied with pressed-on lower spring plate
    • ◆ Before scrapping defective shock absorbers, always ensure gas release and draining => Page 00-7

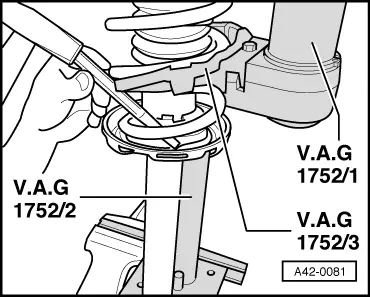
Dismantling and assembling suspension strut

Dismantling

 
A42-0052

Note:

Pay attention to differences in component design between "standard, sports and heavy-duty running gear".

  • ‒ Clamp suspension strut holder -V.A.G 1752/2- in vice.
  • ‒ → Insert suspension strut in suspension strut holder V.A.G 1752/2.
  • ‒ Use screwdriver to prise out cap => Page 42-33, -Item 1-.

 
A42-0053
  • ‒ → Position coil spring with tensioner -V.A.G 1752/1- on spring seat.
  • ‒ Pay attention to correct positioning of coil spring in adapter V.A.G 1752/3.
 
A42-0067
  • ‒ → Pre-tension coil spring with tensioner -V.A.G 1752/1- until upper spring plate is free.
  • ‒ Unscrew hexagon nut from piston rod whilst providing support with Allen key.
  • ‒ Detach appropriate components.

 
A42-0052

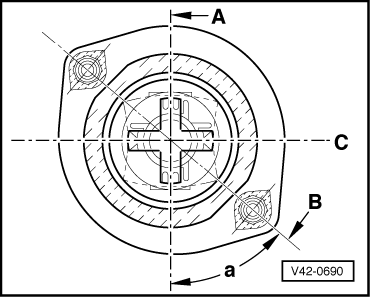
Assembling

Note:

Left and right suspension strut are identical.

  • ‒ → Clamp shock absorber in suspension strut holder -V.A.G 1752/2-.
 
A42-0055
  • ‒ → Roughly align spring seat and packing ring as shown in direction of shock absorber eye.
  • ‒ Fit pre-tensioned coil spring. End of spring winding must make contact with packing ring stop provided.
  • ‒ Insert protective cap, bellows, bellows support ring, additional spring, ring, lower washer, bearing ring and spacer.

 
V42-0623
  • ‒ → Fit spring support.
  • End of spring winding must make contact with stop -arrow-.
 
A42-0051
  • ‒ → Fit upper spring plate.
  • ‒ Stamped nuts of spring plate must be positioned in recesses of spring support -arrows-.

  • ‒ Fit bearing ring, dished washer and new lock nut.
  • ‒ Attach adjustment gauge V.A.G 1752/8 to suspension strut holder V.A.G 1752/2.
 
A42-0068
  • ‒ → Position adjustment gauge V.A.G 1752/8 on upper spring plate and secure with hexagon bolts.
  • ‒ Lock upper locking levers of suspension strut holder V.A.G 1752/2.
 
A42-0056
  • ‒ → Release lower locking levers and turn upper spring plates until reading on scale of suspension strut holder -V.A.G 1752/2- is 0°.
  • ‒ Make sure spring ends are in contact with stops of spring support and spring seat.
  • ‒ Lock levers.

 
A42-0068
  • ‒ → Tighten lock nut with socket attachment 3379 and counterhold 3079 to 25 Nm.
 
A42-0081
  • ‒ → Turn spring seat => Page 42-35, -Item 18 until stop is at end of spring.

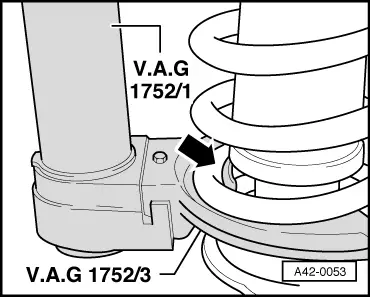
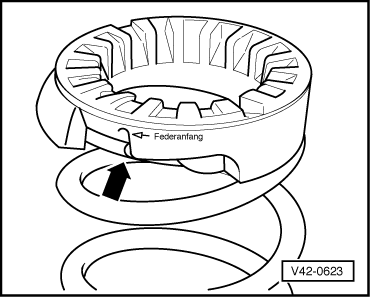
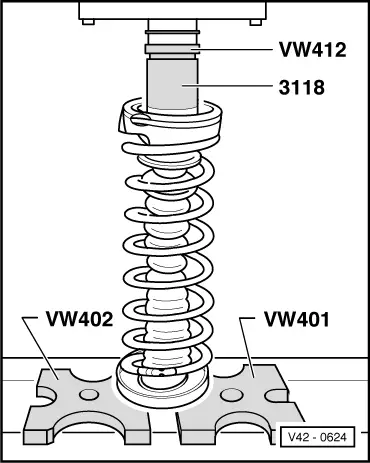
Note:

In doing so, take care not to damage surface of spring.

  • ‒ Carefully slacken off coil spring, paying attention to correct positioning of coil spring and top and bottom spring plates.
  • ‒ As soon as tensioner V.A.G 1752/1 is free, stop slackening off and detach tensioner.
  • ‒ Detach adjustment gauge -1752/8-.
  • ‒ Take suspension strut out of suspension strut holder V.A.G 1752/2.
 
V42-0690
  • ‒ → Axis -C- of cap offset by 90° with respect to axis -A- of shock absorber eye; position cap on upper spring plate.

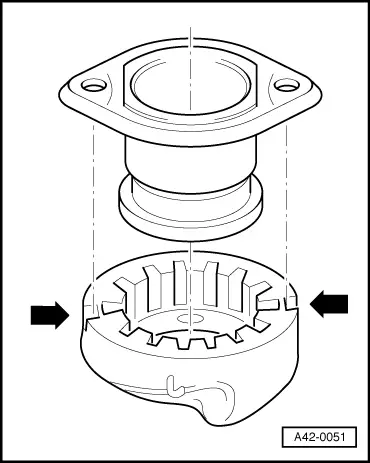
Note:

Coat O-ring with silicone grease G 000 405 A2 before fitting cap.

 
V42-0624
  • ‒ → Use special tools shown to press in cap.

Explanatory notes on factory codes (PR numbers)

PR numbers are used to facilitate running gear/spring/shock absorber assignment.

 
A44-0066

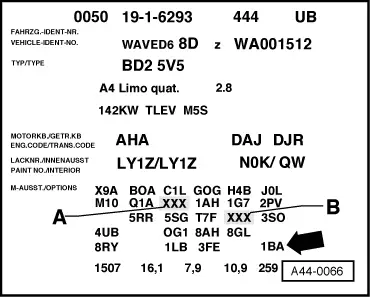
The spring/shock absorber assembly installed in the vehicle can be seen from the corresponding PR number on the vehicle data sticker.

→ Example of vehicle data sticker

    • ‒ - A - indicates PR no. for front axle
    • ‒ - B - indicates PR no. for rear axle

The vehicle data sticker can be found in the spare wheel well and in the Service booklet.

The PR no. can be used to find the correct spring/shock absorber combination in the Parts List.

 
A44-0066

→ The PR no. for the different running gear versions can be seen from the Fig. - arrow -.

1BA = Standard running gear

1BB = Heavy-duty running gear (approx. 20 mm higher)

1BC = Special-purpose vehicles

1BD =Sports running gear (Audi S4)

RS4 = Sports running gear (RS4)

1BE = Sports running gear

1BV = Sports running gear (quattro GmbH)

1BQ = Sports running gear (South Africa)

1BT = Heavy-duty running gear (approx. 7 mm higher)

1BP = Heavy-duty running gear (trim position as for 1BA, however with limited bump travel)

Vehicle level senders for vehicles with automatic headlight range control > < Removing and installing suspension strut