| Preparations before installing a new window |

Note | If window flange is damaged on removal, re-establish paintwork structure as stipulated in „Vehicle Paintwork“ manual and take anti-corrosion measures if necessary in line with instructions given in „surface treatment/chemical materials“ binder. |
| If you are reusing an undamaged window |
| –
| When reusing an undamaged window, use a carpet knife to cut back the remaining adhesive sealant on the window and body flange for an even surface, but do not remove completely. |
| –
| The remaining sealant is required as a base for better adhesion of the new adhesive sealant. |

WARNING | t
| Keep bonding surface clean and free from grease. |
| t
| Do not cut back bonding surface until shortly before installation. |
| t
| Do NOT apply primer to bonding surface and do NOT use cleaning solution. |
|
| –
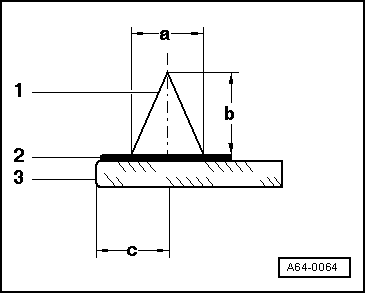
| Apply adhesive bead to remaining adhesive material. |
| t
| Width of bead = 8 ± 2 mm |
| t
| Height of bead = 13.5 ± 1.5 mm |
Note | We recommend the use of adhesive sealant D 009 100 03 (small cartridge) for bonding on a single window or D 004 300 05 (2-component adhesive) for more than one window. |
| If installing a new window: |
| –
| Clean window in bonding area using D 009 401 04 and apply glass/paint primer D 009 200 02. |
| –
| Note 10-minute flash-off time for primer. |
|
|
|