Audi Workshop Service and Repair Manuals
HOME
FEATURES
MENU
INDEX
ABOUT US
Replacing pulley (compressor version "2”) >
< Preparation for pulley removal
A4 Mk2
Heating, ventilation, air conditioning system
Air conditioning
Air conditioner
Replacing pulley/compressor drive unit / taching_pulley_from_compressor/re-attaching_(compressor_version_quot;1)/">Detaching pulley from compressor/re-attaching (compressor version "1”)
Detaching/attaching version "1” pulley
Detaching/attaching version “1” pulley
Detaching/attaching version “1” pulley
–
Screw out bolt
-A-
(tightening torque 20 Nm).
Note
t
Should it not be possible to detach pulley with compressor in position, separate compressor from engine
→ Chapter
.
t
When slackening off and tightening bolt
-A-
, provide support with commercially available pin wrench
-C-
(pin diameter 5.0 mm) at drive plate
-B-
.
t
Bolt
-A-
is to be replaced (on account of locking fluid).
–
Carefully and evenly prise off drive plate
-A-
using 2 screwdrivers
-B-
.
Note
t
When prising off drive plate
-A-
, take care not to damage collar of pulley
-C-
.
t
There are different types of pulley
-C-
and drive plate
-A-
. Attention must therefore be paid to precise assignment.
→ Parts List
–
Remove circlip
-A-
.
–
Detach pulley
-B-
.
Note
t
Replace circlip
-A-
.
t
On fitting circlip
-A-
, take care not to bend it open more than necessary.
t
Ensure correct insertion of circlip
-A-
. Bevelled side
-C-
faces away from compressor (flat side faces compressor).
t
Make sure circlip is properly positioned in groove at compressor flange.
t
Clean compressor flange before fitting pulley. Pulley must be easy to fit (without having to exert force).
Heating, ventilation, air conditioning system
Air conditioning
Air conditioner
Replacing pulley/compressor drive unit / taching_pulley_from_compressor/re-attaching_(compressor_version_quot;1)/">Detaching pulley from compressor/re-attaching (compressor version "1”)
Detaching/attaching version "1” pulley
Replacing pulley (compressor version "2”) >
< Preparation for pulley removal
 Note
Note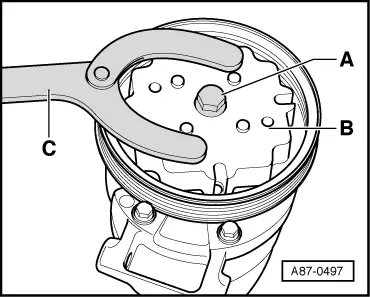 Note
Note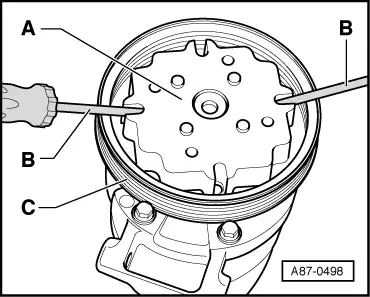 Note
Note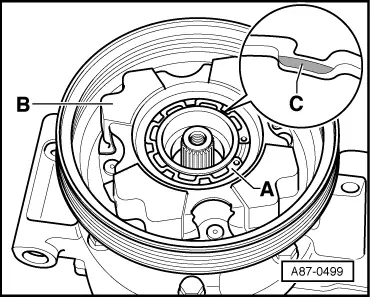
 Note
Note
Note
Note
Note
Note