audi Workshop Repair Guides

Audi Workshop Service and Repair Manuals

Checking heat output > < Removing and installing front footwell vent
Heating
Removing and installing heating system heat exchanger

Special tools, testers and other items required

  • ◆ Hose clamps 3093/3094
  • ◆ Commercially available compressed-air gun
  • ◆ Hand pump V.A.G 1274 (and appropriate adapters)

Removing

  • ‒ Remove plenum chamber cover.
  • ‒ Disconnect and remove battery.

=> Electrical System; Repair Group 27

Notes:

  • ◆ If applicable, obtain radio anti-theft code before disconnecting battery.
  • ◆ On vehicles with electrically adjustable seats, move seats to rearmost position before disconnecting battery.
  • ‒ Dissipate pressure in coolant circuit by opening cap at coolant expansion tank.

=> Relevant Engine, Mechanics Workshop Manual; Repair Group 19

 
A87-0215
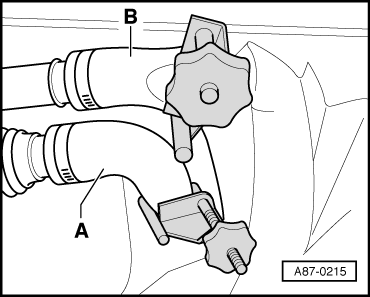
  • ‒ → Mark positions of coolant hoses -A- and -B-.
  • ‒ Pinch off both coolant hoses to heating system heat exchanger (e.g. using V.A.G 3094) and detach hoses.

Notes:

  • ◆ Take care to connect coolant hoses correctly:
    • ‒ Coolant hose A - supply from cylinder head
    • ‒ Coolant hose B - return to water pump
  • ◆ Bleeding coolant circuit

=> Relevant Engine, Mechanics Workshop Manual; Repair Group 19

 
A87-0216
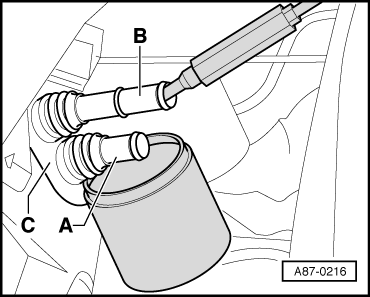
  • ‒ → Place vessel beneath connection -A-.
  • ‒ Attach piece of tubing to connection -B- and use compressed-air gun to carefully blow coolant out of heat exchanger (into vessel).
  • ‒ Remove grommet -C-.
  • ‒ Remove driver's storage compartment.
 
A87-0447

=> General Body Repairs, Interior; Repair Group 68; Shelves/Trim

  • ‒ Remove accelerator pedal module.

=> Relevant Fuel System Workshop Manual; Repair Group 20

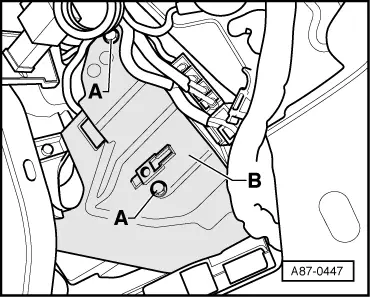
  • ‒ → Remove bolts -A- and detach cover -B- from coolant pipes.
  • ‒ Unplug connectors from additional heating heater element -Z35 (only applies to vehicles with diesel engine).
  • ‒ Use absorbent paper to cover carpet beneath connections to heat exchanger.

 
A87-0448
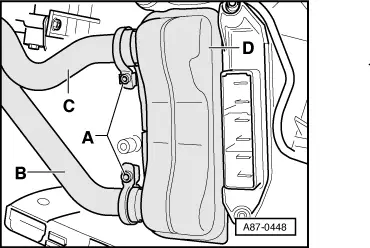
  • ‒ → Unfasten clips -A- and pull the two coolant pipes -B- and -C- out of heat exchanger connections.
  • ‒ Pull heat exchanger -D- out of heater.

Installing

 
A87-0449
  • ‒ With heat exchanger removed, check for contamination of heater (by way of heat exchanger duct).
  • ‒ Remove any dirt or remnants of escaped coolant from heater (e.g. after removing leaking heat exchanger).
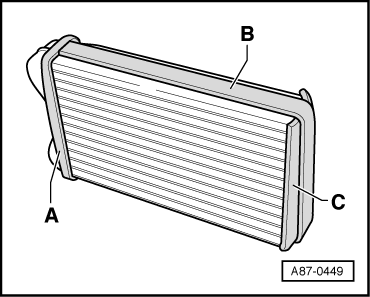
  • ‒ → Check seals -A-, -B- and -C- attached to heat exchanger. Only install heat exchangers with intact seals.

 
A87-0450
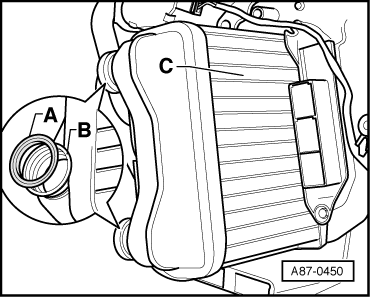
  • ‒ → Slightly moisten new seals -A- with coolant.
  • ‒ Insert the new seals -A- (included in scope of delivery of heat exchanger) into connections of heat exchanger -B-.
  • ‒ Slide heat exchanger -C- into heater.
 
A87-0451
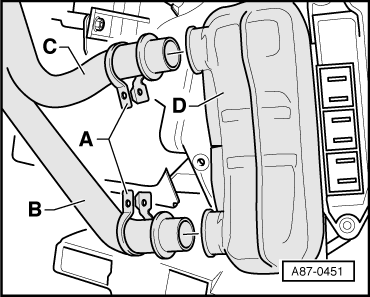
  • ‒ → Remove old clips -A- from both coolant pipes -B- and -C-.
  • ‒ Attach new clips -A- (included in scope of delivery of heat exchanger) to both heat exchanger coolant pipes as shown.
  • ‒ Press the two coolant pipes -B- and -C- into connections of heat exchanger -D-.
  • ‒ Re-check position of seals between coolant pipes and heat exchanger.

 
A87-0448
  • ‒ → Attach the two coolant pipes -B- and -C- with clips -A- to heat exchanger.
  • ‒ Check position of both clips -A-. They must completely surround flange at heat exchanger and coolant pipe and not make contact with other components.
  • ‒ Tighten bolts at clips -A- to 2.5 Nm.
 
A87-0215
  • ‒ → Connect coolant hoses to heat exchanger in proper manner, paying attention to markings:
  •     A -    Supply from cylinder head
  •     B -    Return to water pump
  • ‒ Re-install components removed (with the exception of driver's storage compartment) in reverse order.
  • ‒ Bleed coolant circuit.

=> Relevant Engine, Mechanics Workshop Manual; Repair Group 19

Note:

Heat exchanger also has to be bled on account of layout of coolant pipes to heating system heat exchanger. Proceed as follows:

  • ‒ Bleed coolant circuit.
  • ‒ Switch off ignition.
  • ‒ Carefully open cap at coolant expansion tank (heed relevant safety precautions).

=> Relevant Engine, Mechanics Workshop Manual; Repair Group 19

 
A87-0215
  • ‒ → Unfasten clip at coolant hose -B-.
  • ‒ Push back hose -B- such that hole in hose is no longer covered by pipe.
  • ‒ Use hand pump V.A.G 1274, for example, to increase pressure in coolant circuit.
  • ‒ Bleed heat exchanger by way of hose -B- until there are no bubbles in coolant emerging.
  • ‒ Slip on coolant hose -B- and secure it with clip.
  • ‒ Top up coolant if necessary.
 
A87-0448
  • ‒ → Check coolant circuit for leaks, paying particular attention to connection between coolant pipes and heat exchanger.

=> Relevant Engine, Mechanics Workshop Manual; Repair Group 19

  • ‒ Re-install driver's storage compartment and remaining components removed.

Checking heat output > < Removing and installing front footwell vent