audi Workshop Repair Guides

Audi Workshop Service and Repair Manuals

Removing and installing charge pressure senderG31 with intake air temperature senderG42 > < Charge air cooling - exploded view
Removing and installing charge air cooler
  Note
Check all hoses and pipes for correct fitting and leakage before carrying out tests or repairs.
Removing
–  Move lock carrier to service position → Chapter.
   
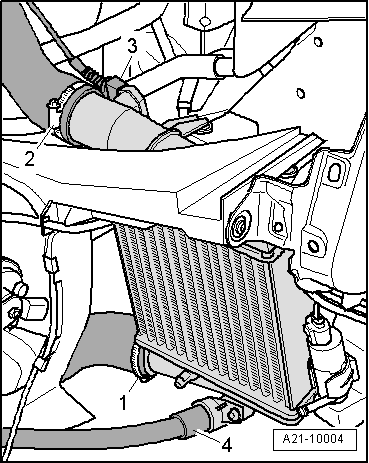
–  Open hose clips -1- and -2- and disconnect air intake hoses.
  WARNING
The air conditioner refrigerant circuit must not be opened.
–  Disengage refrigerant line -4- at bracket.
–  Detach electrical connector -3- at charge pressure sender -G31- / intake air temperature sender -G42-.
–  Detach charge air cooler by pulling upwards.
Installing
Installation is carried out in the reverse order; note the following:
  Note
t  Hose connections and hoses for charge air system must be free of oil and grease before assembly.
t  Secure all hose connections with the correct type of hose clips (same as original equipment) → Parts catalogue.
  A21-10004
–  Install lock carrier with attachments → General body repairs, exterior; Rep. gr.50.
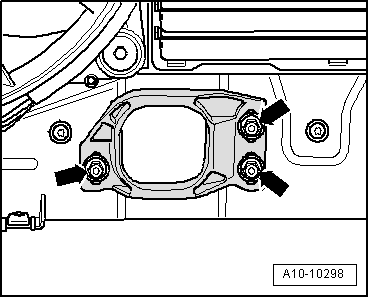
–  Allow stop for torque reaction support to rest on rubber buffer for torque reaction support under its own weight and tighten nuts -arrows-.
–  Install front bumper cover → General body repairs, exterior; Rep. gr.63.
–  Check headlight adjustment → Booklet8E.
Tightening torques
  A10-10298
ComponentNm
Stop for torque reaction support to lock carrier28
Hose clips (9 mm wide)3
Hose clips (13 mm wide)5.5


Removing and installing charge pressure senderG31 with intake air temperature senderG42 > < Charge air cooling - exploded view