audi Workshop Repair Guides

Audi Workshop Service and Repair Manuals

Removing and installing viscous fan - vehicles up to 05.2003 > < Removing and installing coolant pipe (top)
Removing and installing coolant pipe (bottom)
Special tools and workshop equipment required
   
t  Hose clip pliers -VAS 6362-
  W00-10427
Removing
–  Drain off coolant → Chapter.
–  Unclip cover caps.
–  Unscrew nuts -arrows- and detach engine cover panel. Also pull out dipstick if necessary.
–  Remove insulation beneath cover panel (if fitted).
  A10-10348
–  Unplug electrical connector -1-.
–  Move aside fuel hoses at air pipe.
–  Remove bolt -2-.
–  Remove air pipe -arrows-.
  A10-1035
–  Unclip fuel pipe brackets -1- at bottom coolant pipe.
–  Detach coolant hoses -2- and -3-.
–  Move wiring clear of bottom coolant pipe.
  A19-0223
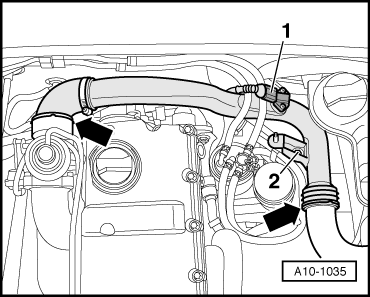
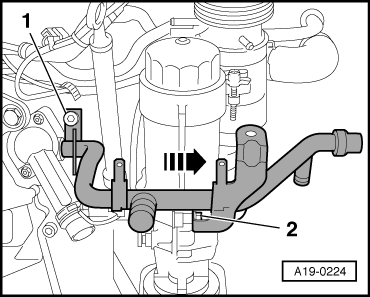
–  Unscrew bolts -1- and -2- and pull coolant pipe out of cylinder block -arrow-.
Installing
Installation is carried out in the reverse order; note the following:
  Note
t  Renew O-ring.
t  Hose connections and hoses for charge air system must be free of oil and grease before assembly.
t  Secure all hose connections with the correct type of hose clips (same as original equipment) → Electronic parts catalogue.
t  To ensure that the charge air hoses can be properly secured at their connections, spray rust remover onto the worm thread of used hose clips before installing.
–  Clean and smoothen sealing surface for O-ring as required.
–  Lubricate new O-ring -1- with coolant additive and slide onto coolant pipe.
–  Push coolant pipe into bore on cylinder block.
  A19-0224
–  When installing air intake hoses with plug-in connectors, ensure that the securing clip -arrow- engages audibly on the retaining lug -A-.
–  Fill cooling system → Anchor.
Tightening torques
  N21-0184
ComponentNm
Coolant pipeOil filter bracket10
to:Cylinder block40


Removing and installing viscous fan - vehicles up to 05.2003 > < Removing and installing coolant pipe (top)