audi Workshop Repair Guides

Audi Workshop Service and Repair Manuals

Removing and installing camshaft > < Checking axial clearance of camshaft
Renewing camshaft oil seal
   
Renewing camshaft oil seal
Special tools and workshop equipment required
t  Fitting tool -10 - 203-
t  Oil seal extractor -3240-
t  Counterhold tool -T10051-
t  Puller -T10052-
t  Bolt M12x65

   
Procedure
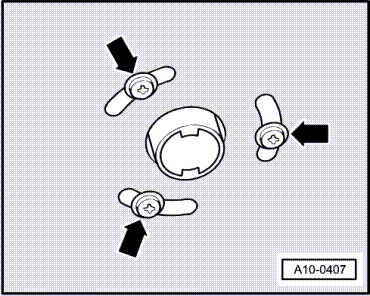
–  Vehicles with auxiliary heater: remove bolts -arrows- securing exhaust pipe for auxiliary/additional heater to noise insulation.
  A10-0407
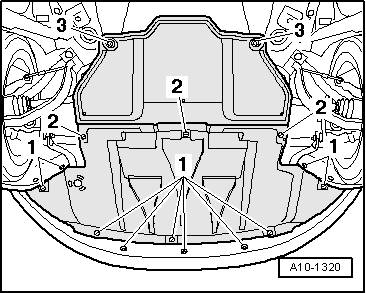
–  Release quick-fasteners -1- and -2- and take off front noise insulation. Leave rear noise insulation in position.
–  Remove bumper cover (front) → Rep. Gr.63.
–  Move lock carrier to service position → Rep. Gr.50.
  A10-1320
–  Remove toothed belt:
t  Vehicles with hydraulically damped tensioning roller - engine codes AVB, AVF, AWX → Chapter.
t  Vehicles with friction-damped tensioning roller - engine codes AVB, AVF, AWX → Chapter.
t  Engine codes BKE, BPW, BRB, BRC → Chapter.
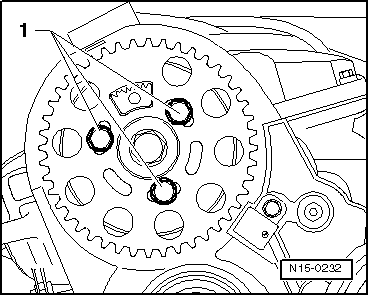
–  Remove camshaft sprocket securing bolts -1-.
–  Detach camshaft sprocket from hub.
  N15-0232
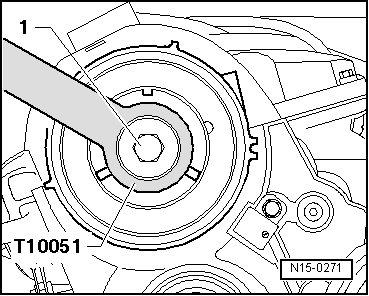
–  Loosen securing bolt -1- for hub; use counterhold tool -T10051-.
–  Then unscrew bolt approx. 2 turns.
  N15-0271
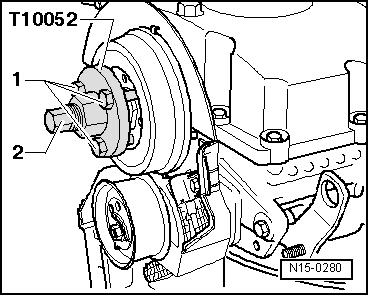
–  Apply puller -T10052- and align it with holes in hub.
–  Screw bolts -1- into hub.
–  Apply tension to hub by evenly tightening centre bolt -2- until hub separates from taper of camshaft.
  Note
Use 30 mm spanner to hold puller.
–  Detach hub from taper of camshaft.
  N15-0280
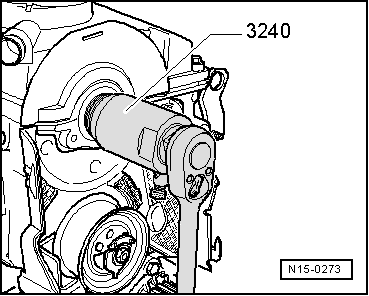
–  Adjust inner part of oil seal extractor -3240- so that it is level with the outer part and lock in position with knurled screw.
–  Lubricate threaded head of oil seal extractor, place it in position and, exerting firm pressure, screw it into camshaft oil seal as far as possible.
–  Loosen knurled screw and turn inner section against camshaft until oil seal is pulled out.
–  Clamp flats of oil seal extractor in vice.
–  Remove oil seal with pliers.
  N15-0273
–  Clean running surface and sealing surface.
–  Remove oil residue on camshaft journal with a clean cloth.
–  Tape off groove on taper of camshaft with adhesive tape.
  Note
The sealing lip of the oil seal must not be additionally oiled or greased.
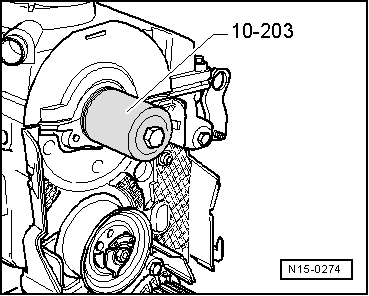
–  Carefully position oil seal on camshaft.
–  Press in oil seal with press piece of fitting tool -10 - 203- and bolt M12×65 as far as the stop.
  N15-0274
–  Attach hub to camshaft.
–  Tighten securing bolt -1- (use counterhold -T10051-).
  N15-0271
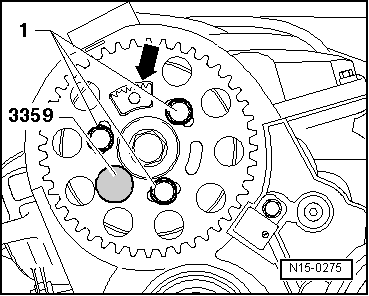
–  Push camshaft sprocket onto hub.
l  Toothed segment -arrow- of camshaft sprocket must be at top.
–  Screw in bolts -1- finger-tight.
–  Lock hub with locking pin -3359-.
The remaining installation steps are carried out in the reverse sequence.
–  Fit toothed belt (adjust valve timing):
t  Vehicles with hydraulically damped tensioning roller - engine codes AVB, AVF, AWX → Anchor.
t  Vehicles with friction-damped tensioning roller - engine codes AVB, AVF, AWX → Anchor.
t  Engine codes BKE, BPW, BRB, BRC → Anchor.
–  Install viscous fan → Chapter.
–  Install poly V-belt: vehicles up to 05.2003 → Anchor, vehicles from 06.2003 onwards → Anchor.
–  Install lock carrier with attachments → Rep. Gr.50.
–  Install bumper cover (front) → Rep. Gr.63.
Tightening torque
  N15-0275
ComponentNm
Hub to camshaft100


Removing and installing camshaft > < Checking axial clearance of camshaft