audi Workshop Repair Guides

Audi Workshop Service and Repair Manuals

Removing and installing particulate filter - vehicles with multitronic gearbox > < Removing and installing front exhaust pipe - vehicles with multitronic gearbox
Removing and installing particulate filter - vehicles with manual gearbox
   
Removing
  Note
All cable ties which are released or cut open when removing must be fitted in the same position when installing.
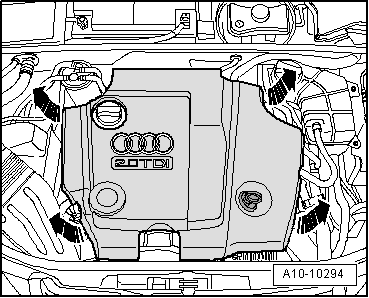
–  Pull off engine cover panel -arrows-.
  A10-10294
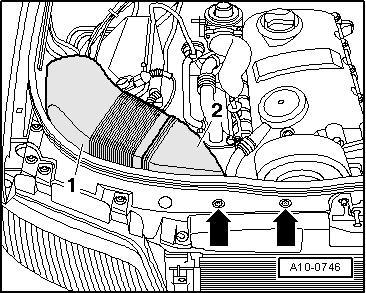
–  Remove bolts -arrows-.
–  Remove air ducts -1- and -2-.
  A10-0746
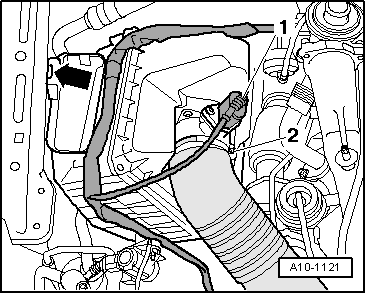
–  Unplug electrical connector -1- at air mass meter -G70-.
–  Loosen hose clip -2- to remove air intake hose.
–  Move clear wiring harness at air cleaner housing and remove air cleaner housing -arrow-.
  A10-1121
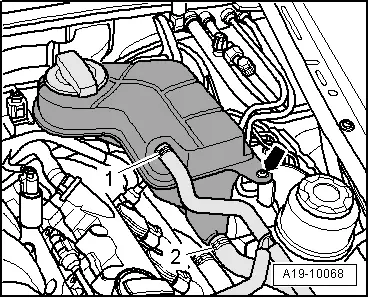
–  Unbolt coolant expansion tank -arrow-.
–  Unplug electrical connector for coolant shortage indicator switch -F66- at bottom of expansion tank and move coolant expansion tank to one side with coolant hoses -1- and -2- attached.
  A19-10068
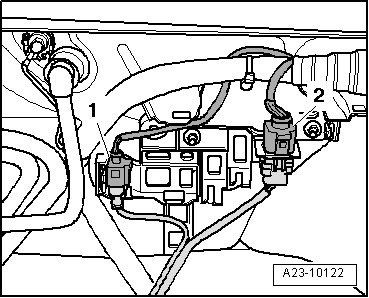
–  Remove electrical connector -2- for Lambda probe from bracket.
–  Unplug electrical connector and move wiring clear.
  Note
Disregard -item 1-.
  A23-10122
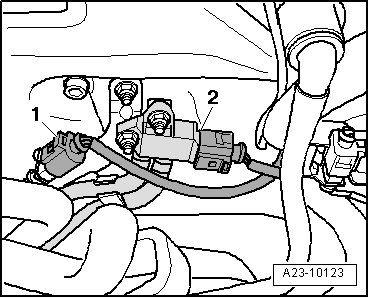
–  Remove electrical connector -1- for temperature sender before particulate filter -G506- from bracket (left-side) on bulkhead.
–  Unplug electrical connector and move wiring clear.
–  Unplug electrical connector at exhaust gas pressure sensor 1 -G450--item 2-.
–  Unscrew nuts and detach -G450- from bracket.
–  Leave hoses connected and move -G450- clear towards bottom of vehicle.
  A23-10123
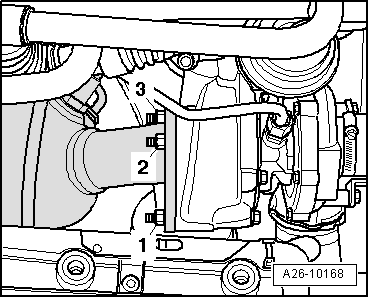
–  Unscrew top nuts -2- and -3- securing turbocharger to particulate filter.
–  Loosen bottom securing nut -1- only a few turns to prevent particulate filter from falling.
–  Remove front exhaust pipe → Chapter.
–  Unbolt drive shaft (right-side) from flange shaft on gearbox.
–  Move drive shaft to the side.
–  Unscrew bottom nut -1- securing turbocharger to particulate filter by hand.
–  Detach particulate filter.
Installing
Installation is carried out in the reverse order; note the following:
  Note
t  Renew gaskets and self-locking nuts.
t  Hose connections and hoses for charge air system must be free of oil and grease before assembly.
t  Secure all hose connections with the correct type of hose clips (same as original equipment) → Electronic parts catalogue.
t  To ensure that the charge air hoses can be properly secured at their connections, spray rust remover onto the worm thread of used hose clips before installing.
t  Fit all cable ties in the original positions when installing.
–  Install temperature sender before particulate filter -G506- → Chapter.
–  Install front exhaust pipe → Chapter.
–  Install drive shaft → Rep. Gr.40.
–  Align exhaust system so it is free of stress → Chapter.
–  After renewing particulate filter, perform "Adaption" in “Guided Functions” mode → Vehicle diagnosis, testing and information system VAS 5051.
Tightening torques
  A26-10168
ComponentNm
Particulate filter to front exhaust pipe25 1)2)
Bracket for front exhaust pipe to gearbox25
Hose clips (9 mm wide)3
Hose clips (13 mm wide)5.5
l  1) Renew nuts.
l  2) Coat threads and contact surface with high-temperature paste; for high-temperature paste refer to → Electronic parts catalogue.


Removing and installing particulate filter - vehicles with multitronic gearbox > < Removing and installing front exhaust pipe - vehicles with multitronic gearbox