audi Workshop Repair Guides

Audi Workshop Service and Repair Manuals

Removing and installing steering lock with ignition/starter switch (without lock cylinder) > < Checking steering column for damage
Removing and installing steering column
Special tools and workshop equipment required
t  Torque wrench -V.A.G 1331-
Removing
–  Remove driver's airbag unit. → Rep. Gr.69
   
–  Detach lever for steering column adjustment.
–  Remove steering wheel with airbag → Chapter.
–  Remove trim for steering column switch. → Rep. Gr.70
–  Remove steering column switch → Electrical system; Rep. Gr. 94; Steering column switch module; Removing and installing steering column switch module
An assembly aid is required to stop the top and bottom sections of the steering column pulling apart when they are detached from the steering box.
The splines will separate if the top and bottom sections of the steering column are pulled apart or telescoped together too far.
Rattling can occur when the vehicle is driven if the splines are not in their original installation position.
  A48-0367
Securing steering column prior to removal
–  Pull a cable tie or length of wire through hole in bottom section of steering column -arrow- and spring.
–  Wire or cable tie can also be pulled through spring and universal joint.
–  Detach connectors from ignition/starter switch and reader coil.
On vehicles with automatic gearbox the locking cable must be disengaged:
–  Move selector lever to Park position
  A48-0075
–  Ignition key in position “B” (ignition on).
–  Lift locking piece -1- slightly and pull locking cable -2- out of ignition lock housing.
  A48-0076
–  Slacken off bolt -arrow-.
–  Pull bottom section of steering column off power steering box.
  A48-0368
–  Remove bolts -1-.
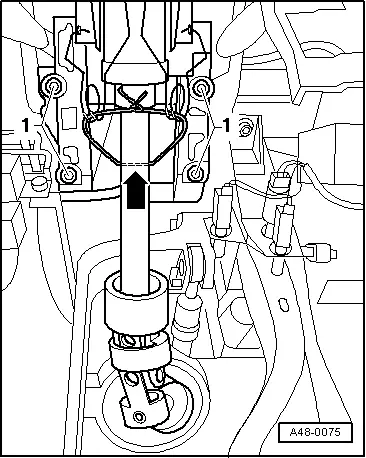
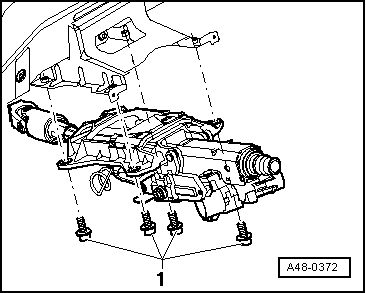
–  Take out steering column.
Installing
Installation is carried out in the reverse sequence.
When installing, please note the following points:
New replacement steering columns are fitted with a transport lock.
This transport lock must be removed after installing the steering column in the vehicle.
  A48-0372
–  Install steering column and bolts -1-, but do not tighten.
  A48-0372
–  Fit steering column joint on power steering box and screw in bolt -arrow-.
–  Align steering column with steering rack pinion so it is free of tension.
–  Tighten bolts securing steering column to retaining plate → Item.
–  Tighten bolt securing joint at power steering box → Item.
–  Remove transport lock or assembly aid.
On vehicles with automatic gearbox, engage the locking cable:
  A48-0368
–  To engage locking cable, first move ignition key to position “B” (ignition on).
–  Move selector lever to Park position.
–  Insert locking cable -2- in ignition lock housing. Make sure that locking piece -1- engages.
  A48-0077
Checking operation of locking cable:
Ignition key in position “B” (ignition on).
–  It should be possible to move the selector lever freely out of Park position.
–  It should only be possible to remove the ignition key when the selector lever is in the Park position.
Move selector lever to Park position.
–  The ignition lock should operate freely.
–  With the ignition key in position “A” (ignition off) it should not be possible to move the selector lever out of Park position. The ignition key can be removed.
–  Basic setting and routing of locking cable: → Automatic gearbox 01V, front-wheel drive and four-wheel drive; Rep. Gr. 37; Servicing selector mechanism
–  Attach connectors for reader coil and ignition/starter switch.
–  Fit steering column switch. → Electrical system; Rep. Gr. 94; Steering column switch module; Removing and installing steering column switch module
–  Fit trim for steering column switch. → Rep. Gr.70
–  Install steering wheel with airbag → Chapter.
–  Install lever for steering column adjustment.
–  Install driver's airbag unit. → Rep. Gr.69
  A48-0076

Removing and installing steering lock with ignition/starter switch (without lock cylinder) > < Checking steering column for damage