
A4 Mk3
| Removing and installing rear lid |
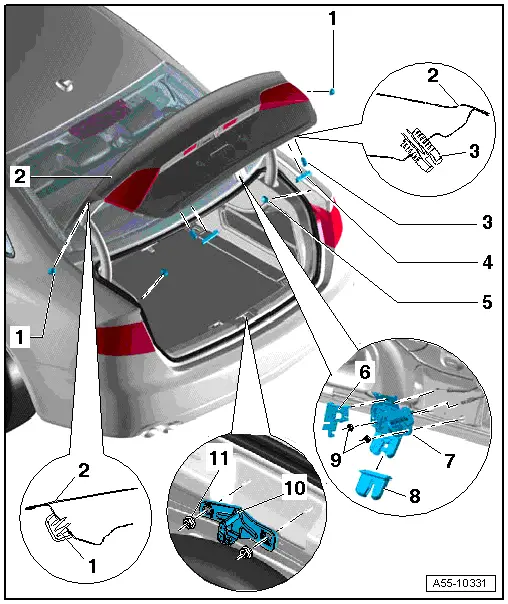
| 1 - | Stop |
| q | On rear lid |
| 2 - | Rear lid |
 Note
Note| On vehicles with a rigid back panel, the Bowden cable for manual release on the rear lid lock must first be detached and pulled out of the rear lid → Chapter. |
| l | When removing or installing the rear lid, a 2nd mechanic is required to support and hold the rear lid. |
| q | Removing: |
| – | Remove lining for rear lid → Rep. gr.70. |
| – | Disconnect wiring and pull out of rear lid. |
| – | Only loosen rear nut on rear lid hinge and unscrew the two nuts on the side → Chapter. |
| – | Remove rear lid. |
| q | Installing: in reverse order of removal |
| q | Adjusting: |
| – | Adjust height of rear lid at front and adjust lengthwise via rear lid hinge. |
| – | Adjust height of rear lid at rear via rear lid lock. |
| – | Align rear lid centrally with equal gaps on both sides / to specified gap widths → Fig.. |
| – | Adjust bump stops. |
| q | Removing and installing rear lid seal → Chapter |
| 3 - | Adjusting buffer |
| 4 - | Stop |
| q | On rear lid |
| 5 - | Stop |
| q | On body |
| 6 - | Cover |
| q | Attached to rear lid lock |
| 7 - | Rear lid lock |
| q | To remove, unscrew bolts with washers and disengage cable. |
| 8 - | Cover for rear lid lock |
| q | Detach before removing rear lid trim |
| q | When installing, cover must engage securely in rear lid lock. |
| 9 - | Nuts |
| q | 21 Nm |
| 10 - | Striker plate |
| q | Adjusting: |
| – | Hand-tighten bolts with washers → Item (it must still be possible to move striker plate). |
| – | Carefully close rear lid until it is flush with rear side panels. |
| – | Carefully open rear lid and tighten bolts → Item. |
| 11 - | Nuts |
| q | 21 Nm |
Note
|
|