audi Workshop Repair Guides

Audi Workshop Service and Repair Manuals

Removing/installing, checking and cleaning plenum chamber water drain > < Removing and installing air quality sensorG238 / humidity sender in fresh air intake ductG657
Checking, removing and installing passenger compartment forced air extractor
  Note
t  The following describes checking of the passenger compartment forced air extractor for an Audi A5 Coupé. The layout of the components may differ on other vehicles (Audi A5 Sportback, Audi A4, Audi Q5 etc.). Functional testing and component removal and installation are however to be performed in the same manner.
   
t  On the Audi A4 Saloon, the air extracted from the passenger compartment is routed via the openings between the rear window -B- and the rear shelf -A- (of the body) into the luggage compartment for example. From the luggage compartment, the air is guided through vent openings -C- and the area between the body and the luggage compartment lining to the vent frames -D-.
  A87-10597
t  On the Audi A4 Avant and the Audi Q5 the air is routed via the vent grilles -A- in the side trim on the left and right into the area behind the luggage compartment side trim. From there the air flows to the vent frame -B-.
  A87-10598
t  On the Audi A5 Cabrio, the air is routed out for example by way of openings in the area of the rear shelf -A- (behind the head restraints -B-), the guides of the seat belts -C- and the convertible top trim -D- when the convertible top is closed.
  A87-10619
t  With the convertible top closed, the passenger compartment of the Audi A5 Cabrio is vented in the same manner as on other vehicles. For this purpose, the luggage compartment lining -B- is provided with vent openings -C-, via which the air is routed to the forced air extraction vent frames -A-.
  A87-10620
t  One vent frame -A- each is fitted on the left and right in the body vent opening -C- for forced air extraction.
t  The vent frames of the forced air extractor -A- are removed and installed from the outside (with the bumper cover removed).
  A87-10419
t  
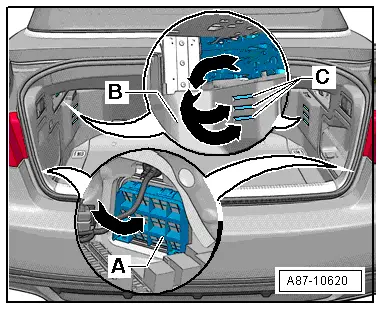
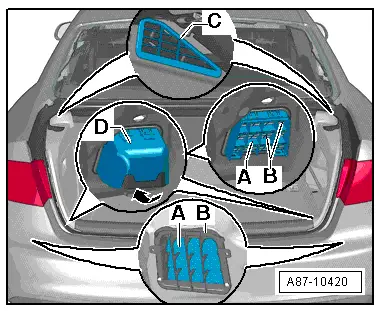
There are different versions of the forced air extraction vent frames -A- for vehicles with and without noise insulation cover -D-. Installation of the noise insulation cover -D- depends on the vehicle model → Electronic parts catalogue.
t  On vehicles with a high-voltage system (hybrid vehicles) it may be necessary to remove the second battery -A1- to gain access to the left noise insulation cover -D- → Electrical system; Rep. gr.27.
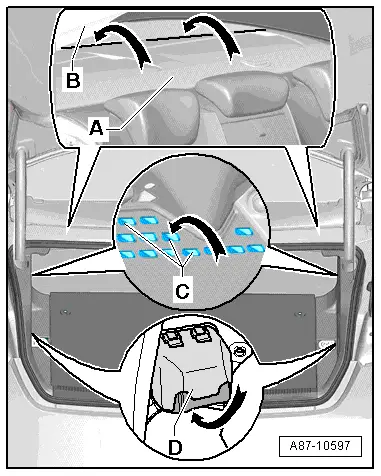
Checking vent openings in luggage compartment lining
–  Check for blockage of the air duct through the vent frames in the luggage compartment lining on the left and right -C- and behind the luggage compartment lining to the two vent frames -A- in the luggage compartment (on the left and right).
  Note
t  To ensure proper functioning of passenger compartment ventilation, the vent frames -C- in the left and right luggage compartment lining are never to be sealed off.
t  The windows may mist up if the vent frames in the luggage compartment linings -C- are sealed off or the air ducts to the vent frames -A- are blocked.
t  This illustration shows the luggage compartment of an Audi A5 Coupé. The layout of the components may differ on the Audi A5 Sportback, Audi A4, Audi Q5 etc.
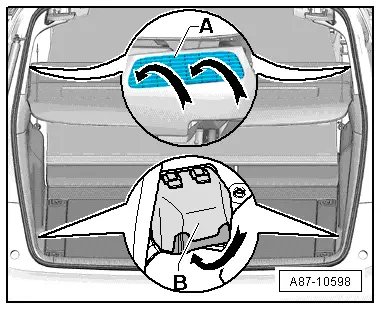
Checking vent frame of forced air extractor from inside:
–  Remove the (left and right) luggage compartment side trim cover panels → General body repairs, interior; Rep. gr.70.
–  Check for blockage of the left and right vent frame -A-.
  Note
t  The sealing lips -B- in the vent frame -A- must move freely and close automatically. Gummed up sealing lips -B- could cause the windows to mist up.
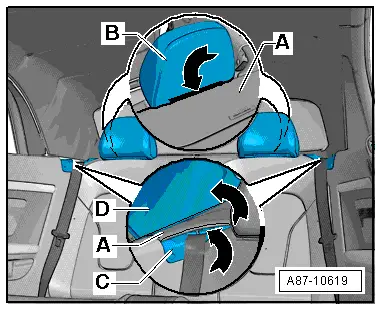
t  On vehicles with a noise insulation cover -D-, make sure the air duct beneath the noise insulation cover -arrow- to the vent frames -A- is not obstructed.
t  If the air ducts to the vent frames -A- are sealed off or blocked, the windows may mist up.
t  The sealing lips -B- only close properly if the vent frame -A- has been installed correctly.
Checking, removing and installing vent frame of forced air extractor from outside:
–  Remove the rear bumper cover → General body repairs, exterior; Rep. gr.63.
  A87-10420
–  Check for blockage of the left and right vent frame -A- and proper operation of the sealing lips -B-.
  Note
t  Gummed up sealing lips -B- could cause the windows to mist up.
t  The sealing lips -B- only close properly if the vent frame -A- has been installed in the correct position.
t  This illustration shows the vent frame -A- with the rear bumper cover removed.
t  On installation, press the vent frame -A- into the opening at the rear cross panel until all retainer tabs are properly engaged.
  A87-10419

Removing/installing, checking and cleaning plenum chamber water drain > < Removing and installing air quality sensorG238 / humidity sender in fresh air intake ductG657