audi Workshop Repair Guides

Audi Workshop Service and Repair Manuals

Operation of air flow flap control motorV71 > < Detaching air intake housing from air intake box
Removing and installing air flow flap control motorV71
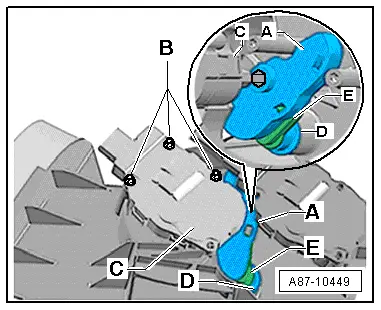
Removing and installing air flow flap control motor -V71-
  Note
t  After fitting the control motor, perform air conditioner basic setting. → "Guided fault-finding" function of vehicle diagnostic, testing and information system VAS 5051.
t  If necessary, actuation of the electrical components of the air conditioner can be checked by way of the „Final control diagnosis“ and „Basic setting“ functions (e.g. to check for interchange) → "Guided fault-finding" function of vehicle diagnostic, testing and information system VAS 5051.
t  At present all the control motors on this vehicle are identical. During basic setting, control motor assignment and adaption are implemented on the basis of the arrangement in the series connection of the wiring. If the sequence is not as specified, the matching of the control motors and thus flap control will not be correct → Chapter (block diagram of air conditioner control motors).
t  After installing a new control motor, check actuation by the air conditioner operating and display unit, Climatronic control unit -J255- and operation of the control motor (correct position of air recirculation flap and air flow/fresh-air flap). → "Guided fault-finding" function of vehicle diagnostic, testing and information system VAS 5051.
t  Operation of air flow flap control motor -V71- → Chapter
Removing
–  Move the front passenger's seat to the rearmost position.
–  Switch off the ignition.
–  Remove the air intake box → Chapter.
–  Detach the air intake housing from the air intake box → Chapter.
   
–  Remove the bolts -B-.
–  Provide support at the cam plate -A- and detach the control motor -C- from the cam plate -A-.
Installing
Install in reverse order; paying attention to the following:
–  Check the levers to the air flow flap -D- and the fresh-air flap -E-. They must have been properly inserted in the cam plate -A-.
–  Insert the shaft of the control motor -C- in the mount of the cam plate -A-.
  Note
The control motor has no stop. The shaft of the control motor -C- can thus be inserted in any position in the mount of the cam plate -A-.
–  Fit the bolts -B-.
–  Re-install all the parts removed in reverse order.
–  Perform air conditioner basic setting and final control diagnosis → "Guided fault-finding" function of vehicle diagnostic, testing and information system VAS 5051.
  Note
t  The control motors on this vehicle are equipped with electronics. A new control motor only learns its position at the air conditioning unit in the course of basic setting and can then be actuated by the air conditioner operating and display unit, Climatronic control unit -J255- (all control motors are identical at present) → "Guided fault-finding" function of vehicle diagnostic, testing and information system VAS 5051.
t  During basic setting, control motor assignment and adaption are implemented on the basis of the arrangement in the series connection of the wiring. If the sequence is not as specified, the matching of the control motors and thus flap control will not be correct → Chapter (block diagram of air conditioner control motors).
–  Interrogate the event recorder of the air conditioner operating and display unit, Climatronic control unit -J255- and erase any faults displayed → "Guided fault-finding" function of vehicle diagnostic, testing and information system VAS 5051.
  A87-10449

Operation of air flow flap control motorV71 > < Detaching air intake housing from air intake box