
A4 Mk3
|
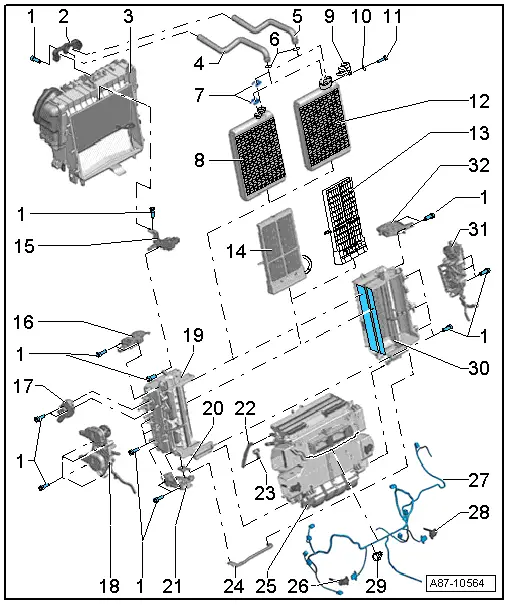
| 1 - | Bolt |
| 2 - | Holder for coolant pipes |
| 3 - | Evaporator housing |
| q | Dismantling and assembling → Chapter |
| q | Different versions depending on production period and vehicle model → Chapter and → Electronic parts catalogue |
| q | Detaching evaporator housing from air conditioning unit/attaching → Chapter „Removing and installing evaporator housing“ |
| 4 - | Coolant pipe |
| q | Detaching from heat exchanger/attaching → Chapter |
| q | For coolant supply from engine |
| 5 - | Coolant pipe |
| q | Detaching from heat exchanger/attaching → Chapter |
| q | For coolant return to engine |
| 6 - | O-ring |
| q | Replace |
| q | Moisten slightly with coolant before fitting → Chapter |
| 7 - | Clip |
| q | These clips are fitted at the factory to hold the coolant pipes in position in the factory-fitted heat exchanger → Item. |
| 8 - | Heating system heat exchanger |
| q | This is the factory-fitted version. |
| q | Removing and installing → Chapter |
| 9 - | Holder for coolant pipes in replacement heat exchanger |
| q | Included in scope of delivery of replacement heat exchanger → Electronic parts catalogue |
| q | Removing and installing → Chapter |
| 10 - | Packing plate |
| q | Included in scope of delivery of replacement heat exchanger → Electronic parts catalogue |
| 11 - | Bolt |
| q | Included in scope of delivery of replacement heat exchanger → Electronic parts catalogue |
| q | Tightening torque 2.5 Nm |
| 12 - | Replacement heating system heat exchanger |
| q | Removing and installing with air conditioning unit fitted → Chapter |
| q | This version is available as replacement part → Electronic parts catalogue. |
| q | The scope of delivery of the replacement heat exchanger includes → Item and → Item to → Item → Electronic parts catalogue |
| q | Affix foam seals to the heat exchanger in line with the air conditioner and vehicle version → Chapter (removing and installing heat exchanger) |
| 13 - | Honeycomb element |
| q | Intended for vehicles with a petrol engine without supplementary air heater element -Z35- and vehicles with a diesel engine on which an auxiliary heater installed as optional extra is also actuated as supplementary heater (no -Z35- fitted) → Chapter. |
| q | Removing and installing with air conditioning unit fitted → Chapter |
| q | Affix foam seals to the honeycomb element in line with the air conditioner version → Chapter (removing and installing supplementary air heater element -Z35-) |
| 14 - | Supplementary air heater element -Z35- |
| q | Intended for vehicles with a diesel engine (also for vehicles on which an auxiliary heater installed as optional extra is not actuated as supplementary heater) and with certain petrol engines → Chapter. |
| q | Function, checking → Chapter. |
| q | Removing and installing with air conditioning unit fitted → Chapter |
| q | Affix foam seals to the supplementary air heater element -Z35- in line with the air conditioner version → Chapter (removing and installing supplementary air heater element -Z35-). |
 Note
Note| In Model Year 2009, a modified version of the supplementary air heater element -Z35- (slightly slimmer heating element design) was gradually introduced. Pay attention the correct version and assignment → Electronic parts catalogue. |
| 15 - | Holder |
| 16 - | Mounting plate with left temperature flap control motor -V158- |
| q | Removing and installing, dismantling and assembling → Chapter |
| 17 - | Defroster flap control motor -V107- |
| q | Removing and installing → Chapter |
| 18 - | Left mounting plate with left footwell flap control motor -V108- and left centre vent control motor -V110- |
| q | With cam plates, actuating arms and connecting rods |
| q | Removing and installing left footwell flap control motor -V108- → Chapter |
| q | Removing and installing left centre vent control motor -V110- → Chapter |
| q | Removing and installing left mounting plate with control motors -V108- and -V110- → Chapter |
| q | Dismantling and assembling mounting plate with control motors -V108- and -V110- → Chapter |
| q | Moisten the guides of the cam plate, the shaft bearings and the pins at the flap levers with a small quantity of grease (e.g. lubricating paste -G 000 150- → Electronic parts catalogue). |
| 19 - | Left heater housing (with temperature flaps) |
| q | Actuation of the temperature flaps and thus the left heater housing differ for vehicles with an air conditioner of the „Deluxe“ or „Basic“ type. With an air conditioner of the „Deluxe“ type, the temperature flaps (for front left and rear) are actuated by different control motors → Chapter and → Electronic parts catalogue. |
| q | Different versions (with one or two attachment points at the bottom → Chapter and → Electronic parts catalogue). |
| q | Removing and installing with air conditioning unit fitted → Chapter |
| q | Moisten the guides of the cam plate, the shaft bearings, the toothed segments and the pins at the flap levers with a small quantity of grease (e.g. lubricating paste -G 000 150- → Electronic parts catalogue). |
| 20 - | Toothed segment |
| 21 - | Mounting plate with rear temperature flap control motor -V137- |
| q | Removing and installing mounting plate with rear temperature flap control motor -V137-, detaching control motor from mounting plate → Chapter. |
| q | Actuation of the left and right temperature flaps differs on vehicles with an air conditioner of the „Deluxe“ or „Basic“ type. With an air conditioner of the „Deluxe“ type, the shaft of the rear left temperature flap is actuated by way of a toothed segment → Item by the rear temperature flap control motor -V137-. The rear right temperature flap is also actuated via the connecting rod → Item engaged in this toothed segment by the rear temperature flap control motor -V137- → Chapter. |
| q | Moisten the shaft bearings, the toothed segments and the pins at the flap levers with a small quantity of grease (e.g. lubricating paste -G 000 150- → Electronic parts catalogue). |
| 22 - | Connecting rod to defrost flap |
| 23 - | Actuating arm for defroster flap control motor -V107- |
| 24 - | Connecting rod for rear temperature flaps |
| 25 - | Air conditioner air distribution housing, „Deluxe“ version |
| q | Not to be further dismantled |
| q | Different versions for vehicles with an air conditioner of the „Deluxe“ and „Basic“ type → Electronic parts catalogue |
| q | Moisten the guides of the cam plate, the shaft bearings, the toothed segments and the pins at the flap levers with a small quantity of grease (e.g. lubricating paste -G 000 150- → Electronic parts catalogue). |
Note| t | The version for the „Deluxe“ air conditioner is fitted with one partition each (for left and right and front and rear separation). There is also one vent each with a separate flap for indirect ventilation on the left and right and for the air duct to the vent in the rear left and right centre console. The various flaps (e.g. for the dash panel vents and footwell vents on the left and right) are each actuated by a control motor. The flaps for the centre dash panel vents and the air duct to the vent in the rear left and right centre console are each inter-linked by a connecting rod and are actuated by the left centre vent control motor -V110- and the right centre vent control motor -V111-. |
| t | Air conditioning units with an air distribution housing with optimised air routing were gradually introduced as of 08.2007 (types „1“ and „2“) → Chapter |
| 26 - | Left footwell vent temperature sender -G261- |
| q | Removing and installing → Chapter |
| q | The left footwell vent temperature sender -G261- is installed in the left footwell vent. |
| 27 - | Air conditioner wiring harness, „Deluxe“ version |
| q | Different versions → Electronic parts catalogue |
| q | Mark assignment before unplugging connectors (identical connectors for different control motors and temperature sensors, danger of interchange). |
| q | Fasten the wiring harness to the attachment points provided on the housing or at the mounts with cable ties → Item such that the harness cannot come into contact with moving parts. |
| 28 - | Right footwell vent temperature sender -G262- |
| q | Removing and installing → Chapter |
| q | The right footwell vent temperature sender -G262- is installed in the right footwell vent. |
| 29 - | Cable tie |
| 30 - | Right heater housing (with temperature flaps) |
| q | Actuation of the temperature flaps and thus the right heater housing differ for vehicles with an air conditioner of the „Deluxe“ or „Basic“ type. With an air conditioner of the „Deluxe“ type, the temperature flaps (for front right and rear right) are actuated by different control motors → Chapter and → Electronic parts catalogue. |
| q | Different versions (with one or two attachment points at the bottom → Chapter and → Electronic parts catalogue). |
| q | Removing and installing with air conditioning unit fitted → Chapter |
| q | Moisten the guides of the cam plate, the shaft bearings, the toothed segments and the pins at the flap levers with a small quantity of grease (e.g. lubricating paste -G 000 150- → Electronic parts catalogue). |
| 31 - | Right mounting plate with right footwell flap control motor -V109- and right centre vent control motor -V111- |
| q | With cam plates, actuating arms and connecting rods |
| q | Removing and installing right footwell flap control motor -V109- → Chapter |
| q | Removing and installing right centre vent control motor -V111- → Chapter |
| q | Removing and installing right mounting plate with control motors -V109- and -V111- → Chapter |
| q | Dismantling and assembling right mounting plate with control motors -V109- and -V111- → Chapter |
| q | Moisten the guides of the cam plate, the shaft bearings and the pins at the flap levers with a small quantity of grease (e.g. lubricating paste -G 000 150- → Electronic parts catalogue). |
| 32 - | Mounting plate with right temperature flap control motor -V159- |
| q | Removing and installing, dismantling and assembling → Chapter |