audi Workshop Repair Guides

Audi Workshop Service and Repair Manuals

Removing and installing air conditioner compressor (vehicles with 6-cyl. petrol engine) > < Removing and installing electrically driven air conditioner compressor
Removing and installing air conditioner compressor (vehicles with 6-cyl. TDI engine)
Special tools and workshop equipment required
   
t  Torx T 60 socket -T40087-
Removing
–  Switch off the ignition.
–  Drain the refrigerant circuit → Air conditioner with refrigerant R134a.
  Note
Depending on the position of the service connection at the refrigerant line and the vehicle model, it may be necessary to remove the additional body brace stiffener on the left to permit connection of the service coupling of the air conditioner service station (e.g. on the Audi Q5) → Running gear; Rep. gr.40 and → Air conditioner with refrigerant R134a
  W00-10244
–  Detach the engine cover -arrows-.
  A10-10890
–  Remove the dipstick -1- (if fitted).
–  Unfasten the hose clamp -3- and remove the air hose.
–  Unplug the connector -4-.
–  Screw out the bolts -2- and detach the throttle valve module -J338-.
  A23-10165
–  Detach the coolant hose -3- from the coolant expansion tank.
–  Screw out the bolts -arrows- and lay aside the coolant expansion tank with the coolant hoses -1- and -2- connected.
  A10-10850
–  Unplug the connector -1- for the air conditioner compressor regulating valve -N280-.
  Caution
Danger of damaging refrigerant lines and hoses.
Take care not to strain, kink or bend refrigerant lines and hoses.
–  Screw out the bolts -2- and -3- and detach the refrigerant lines from the air conditioner compressor → Chapter (detaching refrigerant lines at air conditioner compressor/attaching).
  Note
Seal open lines and the connections at the air conditioner compressor with suitable caps (to prevent the ingress of dirt and moisture).
–  Remove the front noise insulation → General body repairs, exterior; Rep. gr.66.
  Note
Depending on the vehicle model, removal of the front noise insulation may involve detaching the bumper cover (e.g. on the Audi A4 allroad) → General body repairs, exterior; Rep. gr.66
  Caution
Running a used poly V-belt in the opposite direction could destroy it.
Before removing the poly V-belt, mark the direction with chalk or a felt-tipped pen for renewed installation.
  A87-10396
–  To slacken off the poly V-belt, swivel the tensioner with a Torx T 60 socket -T40087- in -arrow direction- .
–  Detach the poly V-belt from the poly V-belt pulley of the air conditioner compressor and slacken off the tensioner.
  A13-10498
–  On the left, screw out the bolt -1-, unscrew the nut -3- and detach the longitudinal member -2-.
–  If fitted, detach the power steering vane pump from the holder (not always necessary on vehicles with a flexible pressure pipe to the pump) → Running gear; Rep. gr.48, swivel aside and attach to the engine, e.g. with a piece of wire.
  Note
  A10-10844
t  The pressure pipe to the vane pump -C- is attached to the air conditioner compressor by way of the holder with the bolt. When detaching the air conditioner compressor, take care not to bend the pressure pipe to the vane pump -C- more than absolutely necessary (max. 5 mm).
t  If removal of the air conditioner compressor necessitates bending the pressure pipe to the vane pump -C- for the power steering -A- by more than max. 5 mm, unfasten the vane pump with the holder from the engine, pull it forwards → Running gear; Rep. gr.48, swivel it aside and attach it to the engine with a piece of wire for example. When swivelling aside the vane pump, take care not to bend, kink or strain the pipes to the vane pump.
t  There are different versions of the pressure pipe to the vane pump (rigid or flexible).
t  The pressure pipe and vane pump are only fitted on vehicles without electromechanical power steering → Running gear; Rep. gr.48.
  A87-10577
–  Screw out the bolts -arrows- and detach the air conditioner compressor.
  A87-10474
Installing
Install in reverse order, paying attention to the following:
  Note
The air conditioner compressor removed contains an indeterminate amount of refrigeration oil. Attention is therefore to be paid to the notes on air conditioner compressor replacement → Air conditioner with refrigerant R134a.
–  If necessary, remove the dowel sleeves -A- from the air conditioner compressor.
–  Thoroughly clean the contact surfaces at the air conditioner compressor.
–  Fit the dowel sleeves -A- in the air conditioner compressor.
  Note
t  Pay attention to correct positioning of the dowel sleeves as well as to clean contact surfaces. Incorrectly fitted dowel sleeves or dirty/damaged contact surfaces could lead to misalignment between the air conditioner compressor and engine. In the course of operation, misalignment results in poly V-belt, drive shaft or air conditioner compressor damage.
  A87-10404
t  There are different versions of the dowel sleeves -A- (different length). Attention is therefore to be paid to the correct version → Electronic parts catalogue.
t  Pay attention to correct positioning of the bushings -A- as well as to clean contact surfaces. Incorrectly fitted bushings and dirty or damaged contact surfaces -C- at the holder or air conditioner compressor can lead to misalignment between the air conditioner compressor and engine. In the course of operation, misalignment may result in poly V-belt or air conditioner compressor damage.
  A87-10573
–  Tighten the bolts -arrows-.
l  Tightening torque: 25 Nm
  A87-10474
–  Attach the refrigerant lines to the air conditioner compressor. For the tightening torque of the bolts -B-, the dimensions of the O-rings -C- and additional information, refer to → Chapter and → Electronic parts catalogue.
–  Crank the air conditioner compressor 10 times by way of the pulley in the direction of rotation before fitting the poly V-belt (to prevent compressor damage on initial activation).
  A87-10404
–  To fit the poly V-belt, swivel the tensioner with a Torx T 60 socket -T40087- in -arrow direction- → Engine, mechanics; Rep. gr.13.
–  Install the throttle valve module -J338- → Engine, mechanics; Rep. gr.23.
–  Fit the longitudinal member → General body repairs, exterior; Rep. gr.50.
  Note
t  Secure all hose connections with standard clamps → Electronic parts catalogue.
t  To ensure reliable attachment of the charge air hoses to their connections, spray the screws of already used screw-type clamps with rust remover before fitting.
t  
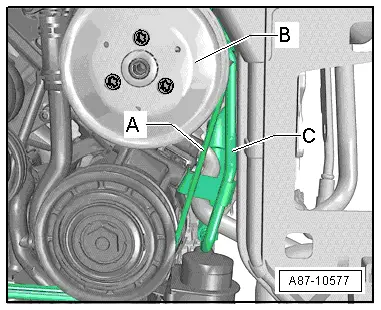
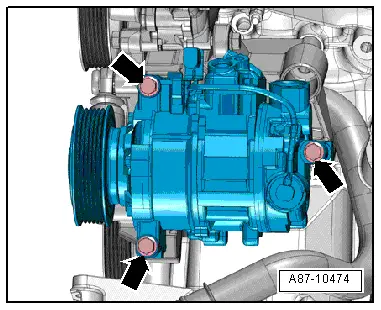
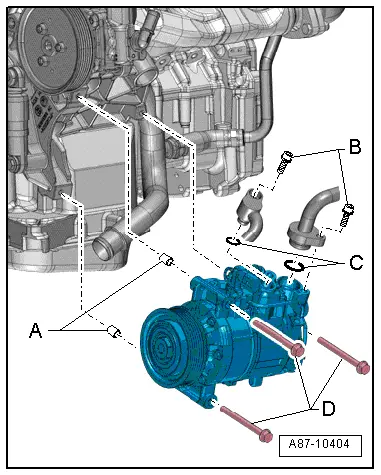
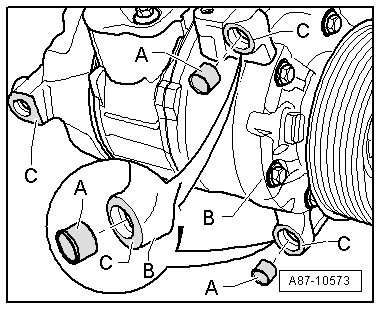
After attaching the air conditioner compressor and the refrigerant line, check the routing of the refrigerant lines. They must be inserted in the holders provided (if fitted, depends on engine).
t  Check the refrigerant lines and the corresponding holders for adequate clearance with respect to the other components, ensuring a sufficient distance between the belt, holder and pulley.
–  Evacuate and charge the refrigerant circuit → Air conditioner with refrigerant R134a.
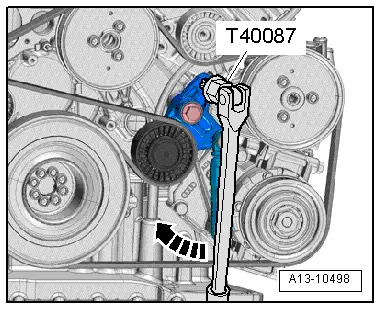
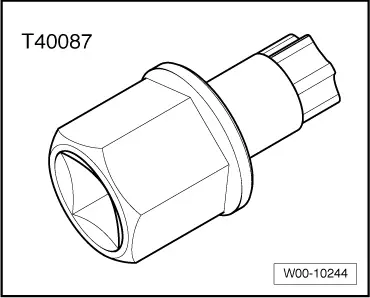
–  Re-install the remaining components removed.
–  Interrogate the event recorder of the operating and display unit, Climatronic control unit -J255- and erase any faults displayed → "Guided fault-finding" function of vehicle diagnostic, testing and information system VAS 5051.
–  Start up the air conditioner after charging the refrigerant circuit → Chapter.
  Note
Also heed the notes on start-up of the air conditioner after charging → Air conditioner with refrigerant R134a.
  A13-10498

Removing and installing air conditioner compressor (vehicles with 6-cyl. petrol engine) > < Removing and installing electrically driven air conditioner compressor