audi Workshop Repair Guides

Audi Workshop Service and Repair Manuals

Installing auxiliary heater > < Removing and installing auxiliary heater
Removing auxiliary heater
Special tools, testers and other items required
   
t  
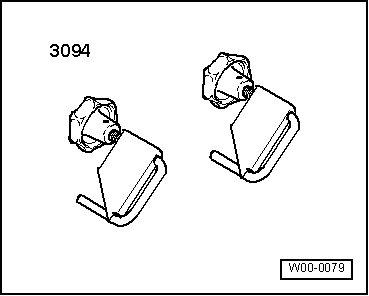
Hose clamps up to Ø 25 mm -3094-
  Note
If the engine is warm, the cooling system is pressurised. Dissipate the pressure if necessary before starting repair work → Engine, mechanics; Rep. Gr.19.
–  Interrogate the encoding and adaption of the supplementary heater control unit -J364- by way of the “Control unit replacement” function of the guided fault-finding routine → Vehicle diagnostic, testing and information systemVAS 5051/, “Guided fault-finding function”.
–  Switch off ignition (and auxiliary heater).
–  Dissipate the pressure in the coolant circuit by opening the cap at the coolant expansion tank → Engine, mechanics; Rep. Gr.19.
–  Remove the front right wheel housing liner → General body repairs, exterior; Rep. Gr.63.
–  Detach the front noise insulation → General body repairs, exterior; Rep. Gr.66.
  Note
Depending on the vehicle model, removal of the front noise insulation may involve detaching the bumper cover (e.g. on the Audi A4 allroad) → General body repairs, exterior; Rep. Gr.66
–  Remove the right fog light trim → Electrical system; Rep. Gr.94.
–  Remove the right fog light (vehicles with adaptive cruise control unit -J428- only) → Electrical system; Rep. Gr.94.
Operations not required for all vehicles, e.g. not necessary on Audi Q5:
–  Remove the air cleaner housing → Injection and ignition system; Rep. Gr.23 / → Injection and glow plug system; Rep. Gr.24.
–  Remove the right headlight → Electrical system; Rep. Gr.94.
–  Remove the wheel housing liner brace → General body repairs, exterior; Rep. Gr.50.
Operations only required for vehicles with turbo engine:
–  Detach the air hose to the charge air cooler → Engine, mechanics; Rep. Gr.21.
All vehicles (continued):
  Note
t  
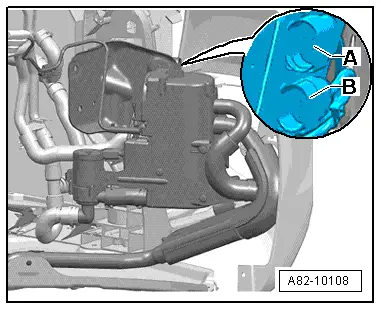
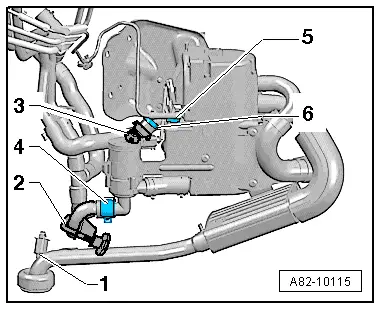
The following illustration shows the position of the auxiliary heater on an Audi A5 Coupé. The layout differs slightly on the Audi A4 and Audi Q5. On these other vehicles the work is however to be performed in the same manner as described for the Audi A5 Coupé.
t  
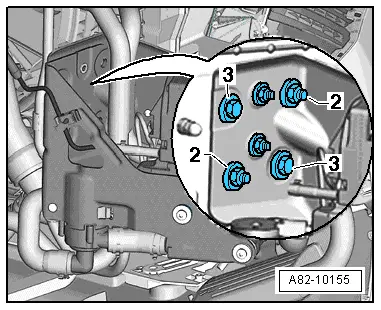
The holders for the auxiliary heater were gradually modified on the Audi Q5 in Model Year 2009. Pay attention to the correct assignment when replacing the auxiliary heater and holders → Electronic parts catalogue and → Anchor.
  W00-0079
–  Detach the nut -1-.
–  Pinch off the coolant hoses at -2- (coolant supply to auxiliary heater) and -3- (coolant supply to heat exchanger in air conditioner unit) e.g. with hose clamps up to Ø 25 mm -3094-.
–  Unfasten the clamps at the auxiliary heater coolant pipes -4- and -6- and detach the coolant hoses.
  Note
Make sure that coolant can only escape from the auxiliary heater and that the coolant circuit in the other components (engine, heat exchanger in air conditioner unit etc.) remains full, so that only the auxiliary heater has to be bled following installation → Chapter.
–  Unfasten the clamp -5- and detach and seal off the fuel pipe.
  WARNING
Observe the applicable rules for cleanliness, take the appropriate precautions and heed the relevant safety measures when working on open fuel systems → Rep. Gr.20.
  A82-10115
–  Release the 6-pin connector -A- and the 2-pin connector -B- (press towards left side of vehicle and unfasten the catches whilst pressing the connector) and unplug.
  Note
t  Depending on the vehicle model, both connectors may be accessible by way of the opening for the fog light trim removed.
t  As of 10.2010 auxiliary heaters with part number 4xx xxx  xxx are gradually to be introduced. Service installation of this version of the auxiliary heater is also possible in vehicles originally fitted with an auxiliary heater with part number 8R0 xxx xxx or 8K0 xxx xxx. As however there are differences between certain components of the various auxiliary heater versions (e.g. the 2-pin connector for the power supply to the auxiliary heater control unit -J364--B-), attention must be paid to correct assignment when replacing individual components of the auxiliary heater → Electronic parts catalogue.
–  Unfasten (e.g. on Audi A5 Coupé and Audi A4) the earth wire at the earth point of the longitudinal member (in the area of the holder for the auxiliary heater).
  Note
On the Audi A5 Coupé and Audi A4, for example, the auxiliary heater cannot be removed without bending the holder if the earth wire is screwed on.
–  Unscrew the nut -1- (not fitted on Audi Q5).
–  Unscrew the nuts -2-, screw out the bolt -3- and take out the auxiliary heater with holder.
  Note
  A82-10108
The Audi Q5 is fitted with a different holder, which is additionally attached to the longitudinal member by means of a second bolt -3-.
  A82-10155

Installing auxiliary heater > < Removing and installing auxiliary heater