audi Workshop Repair Guides

Audi Workshop Service and Repair Manuals

Renewing ball bearing for input shaft > < Removing and installing flywheel
Removing and installing dual clutch
   
Removing and installing dual clutch
Special tools and workshop equipment required
t  Hook -10 - 222 A /2-
t  Workshop hoist -VAS 6100-
t  Extractor tool -T20143/2-
t  Puller for ATF supply unit -T40123 A-
t  Centring tool -T40199-

   
Removing
l  Gearbox is secured to engine and gearbox support -VAS 6095- → Chapter.
–  Remove flywheel → Chapter.
–  Drain ATF → Chapter.
–  Prise out oil seal for input shaft with extractor tool -T20143/2-.
  A39-10190
–  Remove bolts -1 … 5-.
  A30-10130
–  Turn gearbox into a vertical position on engine and gearbox support -VAS 6095-.
–  Slide sleeve -T40123 A/1- onto input shaft.
–  Position puller for ATF supply unit -T40123 A- on input shaft.
l  Lip -arrow- of puller for ATF supply unit must reach underneath sleeve -T40123 A/1-.
–  Close puller for ATF supply unit and tighten knurled nut -1- (to approx. 20 Nm).
–  Check that puller for ATF supply unit is securely seated on input shaft.
  A34-10434
–  Connect puller for ATF supply unit -T40123 A- to hook -10 - 222 A /2- and attach to workshop hoist -VAS 6100-.
–  Carefully pull dual clutch out of gearbox housing.
  A34-10432
–  Place dual clutch (with cover) down on a soft surface so that the thin collar -arrow A- is not damaged.
  A30-10198
–  Remove circlip -arrow- using circlip pliers.
  A30-10131
–  Detach clutch cover -2- from dual clutch -1-.
  Note
  A30-10093
t  
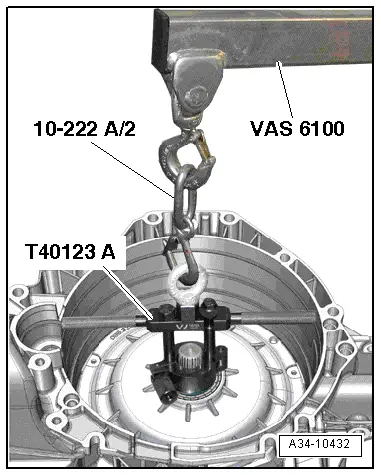
If the clutch cover cannot be detached, knock lightly on the input shaft with a plastic hammer while a second mechanic lifts the clutch cover by hand.
t  
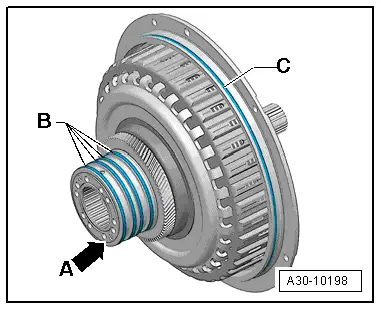
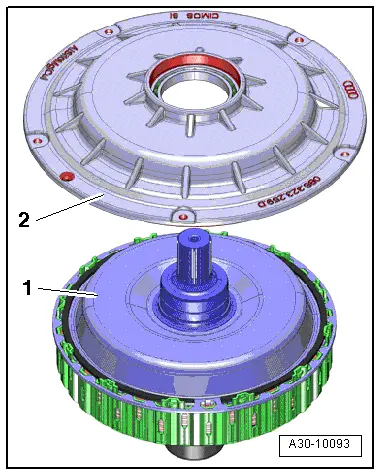
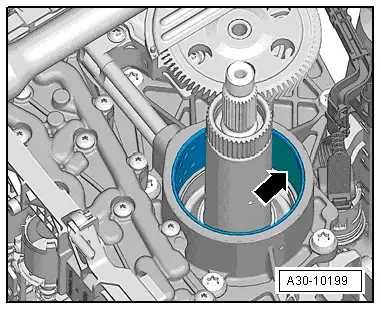
Take care not to damage the thin collar -arrow A-.
Installing
Installation is carried out in reverse sequence; note the following:
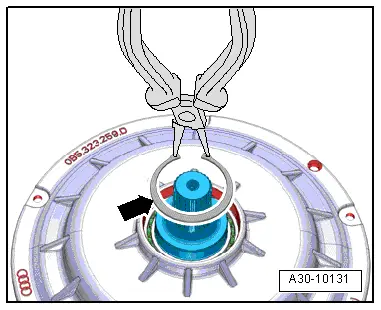
  Note
Renew O-ring and circlip.
–  Clean sealing surface on clutch cover.
–  Turn rectangular section seals -B- on hub and check for freedom of movement and axial play.
  Note
If any of the rectangular section seals do not move freely, the dual clutch must not be fitted.
  A30-10198
–  Clean gearbox housing in area of dual clutch and clean sealing surface.
  Note
Make sure that no particles of dirt fall into the gearbox when cleaning the housing.
–  Screw centring tool -T40199- into threaded holes in gearbox housing, as shown in illustration.
  A34-10433
–  Check rotating port -arrow- in gearbox for scoring.
  A30-10199
–  Lightly lubricate O-ring -C- and hub -B- of dual clutch with ATF before installation.
  A30-10198
–  Insert dual clutch into gearbox housing, as shown in illustration (lift and rotate dual clutch slightly so that input shaft engages in splines on ATF pump and gearbox shafts).
l  Dual clutch is installed correctly if contact can be felt between O-ring of clutch cover and edge of gearbox housing.
  A34-10432
  Caution
t  The new O-ring must not be crushed during installation.
t  It is important to tighten the bolts for the dual clutch and clutch cover in the correct sequence → Fig..
–  Renew oil seal for input shaft → Chapter.
–  Install flywheel → Chapter.
–  Fill up with ATF after installing gearbox → Chapter.
l  After renewing dual clutch, run appropriate „Guided Function“ using vehicle diagnostic tester → Chapter
  A30-10130

Renewing ball bearing for input shaft > < Removing and installing flywheel