audi Workshop Repair Guides

Audi Workshop Service and Repair Manuals

Removing and installing wiring harness in gearbox > < Removing and installing ATF strainer
Removing and installing mechatronic unit
Removing
  Note
t  Rules for cleanliness when working on the automatic gearbox → Chapter.
t  General repair instructions → Chapter.
t  Always renew mechatronic unit if contaminated or defective.
–  Disconnect battery → Electrical system; Rep. Gr.27.
–  Remove ATF oil pan → Chapter.
–  Remove ATF strainer → Chapter.
  Caution
The gearbox control unit (mechatronic unit) can be damaged by electrostatic discharge.
Before touching or removing the mechatronic unit, always discharge any static electricity by touching an earthed object with your hand.
–  Touch an earthed object with your hand (without gloves) to discharge any static electricity.
  Note
   
t  Connector -C- and wiring harness -B- must be detached from the mechatronic unit before removing the mechatronic unit. The wiring harness connector -A- remains in the gearbox housing.
t  If the tab -arrow- on the reverse side of the wiring harness breaks off, the wiring harness must be renewed.
  A38-10194
t  The following illustrations show the mechatronic unit removed from the gearbox. The wiring harness connector -A- remains in the gearbox housing.
t  On some versions, connector -C- does not have retainer catches -1- and -2-.
  A38-10208
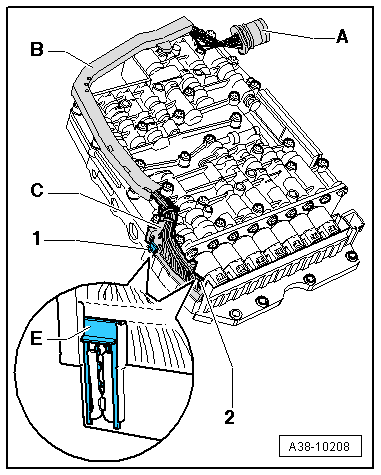
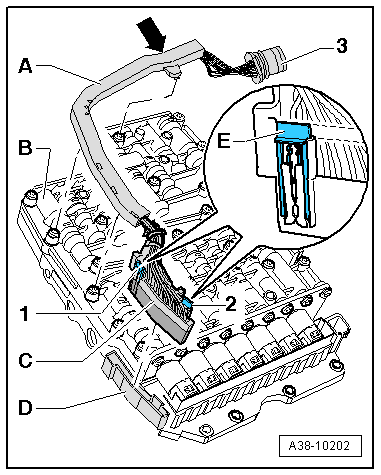
–  If fitted, pull out both retainer catches -1- and -2- on connector -C-.
–  Carefully detach connector -C- from socket -D- of mechatronic unit.
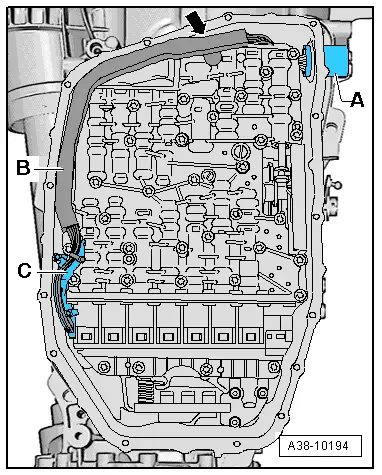
–  Carefully detach wiring harness -A- from mechatronic unit -B-. At the same time, detach tab -arrow- on reverse side of wiring harness from mechatronic unit.
  Note
If the tab -arrow- on the reverse side of the wiring harness breaks off, the wiring harness must be renewed.
–  Carefully move wiring harness clear to one side.
  Note
The wiring harness connector -3- remains in the gearbox housing, so the attached harness cannot be removed.
  A38-10202
–  Unscrew securing bolts for mechatronic unit in reverse order (i.e. first bolt -14-, then -13-, ... etc. until -1-).
  Note
t  Only loosen the securing bolts indicated in the illustration -14 ... 1-.
t  If other bolts are loosened, this may affect the operation of the mechatronic unit or the mechatronic unit could come apart.
–  Detach mechatronic unit from gearbox.
  A38-10193
Installing
l  Tightening torques → Chapter
–  Make sure that seal -B- is properly inserted and secured.
  A38-0112
–  Install mechatronic unit without using force, and at the same time fit pin on gearbox selector lever -arrow- into slot on selector slide -A- (move selector slide backwards and forwards if necessary).
  A38-0111
–  Tighten securing bolts -1- and -2- for mechatronic unit to 2 Nm.
–  Tighten securing bolts for mechatronic unit in specified order to specified torque (i.e. first bolt -1-, then -2-, ... etc. until -14-).
  A38-10193
–  Clip wiring harness -A- onto mechatronic unit. To do so, first attach tab -arrow- on reverse side of wiring harness to mechatronic unit.
  Note
If the tab on the reverse side of the wiring harness breaks off, the wiring harness must be renewed.
–  If fitted, pull out both retainer catches -1- and -2- on connector -C-, as illustrated.
–  Carefully insert connector -C- in connector socket on mechatronic unit.
  A38-10202
–  If fitted, push in both retainer catches -1- and -2- to lock connector -C-.
The remaining installation steps are carried out in reverse sequence; note the following:
–  Install ATF strainer → Chapter.
–  Install ATF oil pan → Chapter.
–  Fill up with ATF → Chapter.
  A38-10208

Removing and installing wiring harness in gearbox > < Removing and installing ATF strainer