audi Workshop Repair Guides

Audi Workshop Service and Repair Manuals

Vehicle electrics > < Removing and installing centre differential housing and centre differential - bolted propshaft
Removing and installing centre differential housing and centre differential - propshaft with splines on gearbox end
Special tools and workshop equipment required
   
t  Used oil collection and extraction unit -V.A.G 1782-
t  For sealant, refer to → Electronic parts catalogue
Removing with gearbox in vehicle
The centre differential housing can also be removed when the gearbox is in the vehicle.
–  Make preparations according to specific model → 7-speed dual clutch gearbox 0B5 (S tronic); Rep. gr.39.
Removing with gearbox removed
–  Secure gearbox to engine and gearbox support -VAS 6095- → Chapter.
Continued for gearbox removed or installed
  W00-10211
–  Place used oil collection and extraction unit -V.A.G 1782- below gearbox.
–  Remove bolts -1 … 4- and carefully detach centre differential housing; gear oil (MTF) will drain off.
  A34-10435
  Caution
Risk of damage to the centre differential.
t  Pull the centre differential housing slowly and carefully towards the rear off the gearbox. The centre differential may otherwise fall out of the gearbox.
t  A centre differential which has fallen to the ground can no longer be installed.
–  Remove assembly sleeve -4- and spring -3-.
–  Detach centre differential -2- towards rear.
  A34-10689
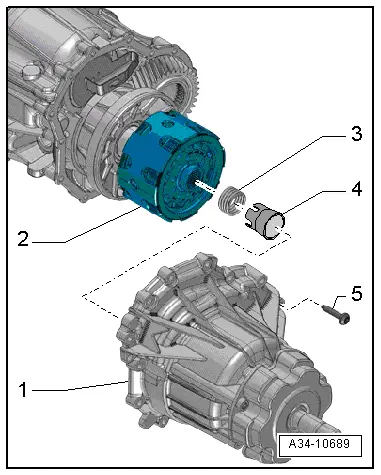
If bearing plate -1- remains behind in centre differential housing, proceed as follows:
  Caution
Risk of damage to the sealing surface of the centre differential housing.
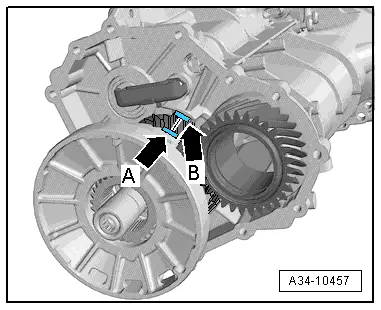
Carefully tap the housing in several places with a hammer.
  Note
In this case, the centre differential is detached together with the centre differential housing.
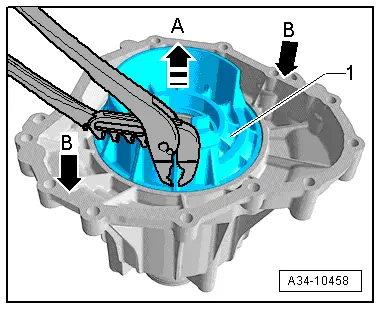
–  Grip one of the side ribs on bearing plate -1- with pliers and pull off in direction of -arrow A-.
–  While doing so, carefully tap alternate sides of housing -arrows B- with a rubber-headed hammer.
Installing
Installation is carried out in reverse sequence; note the following:
l  Tightening torques → Chapter „Exploded view - centre differential housing“
  Note
Renew the bolts for the centre differential housing.
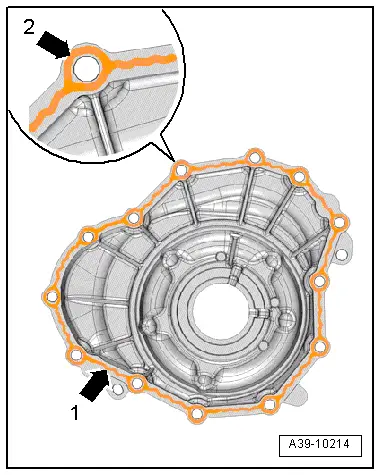
–  Thoroughly clean both housing joint surfaces; they must be free from oil and grease.
  A34-10458
–  Apply bead of sealant -arrow 1- evenly and not too thick on housing joint surface; for sealant refer to → Electronic parts catalogue.
–  To avoid contact corrosion, apply a ring of sealant around each bolt hole -arrow 2-.
–  Lightly lubricate fitting surfaces for bearing plate with gear oil (MTF).
  A39-10214
–  Lightly lubricate surfaces of both races on outside of bearing plate with a small quantity of gear oil (MTF).
–  Insert bearing plate.
l  Installation position: shoulder of bearing plate -arrow A- must engage in recess on intermediate gearbox housing -arrow B-.
  A34-10457
–  Fit centre differential -2- onto gearbox -1-.
–  Fit assembly sleeve -4- on centre differential.
–  Insert spring -3- in centre differential.
  A34-10689
–  Press centre differential housing fully onto intermediate gearbox housing, keeping it centred, and hold in place.
–  Tighten bolts for centre differential housing → Fig..
  Note
Please refer to the vehicle data sticker or the identification on the rear final drive to find out which type of rear final drive is installed in the vehicle. Then select the appropriate Workshop Manual for the rear final drive.
–  Install propshaft (version with splines on gearbox end) → Rear final drive 0BC; Rep. gr.39 or → Rear final drive 0BD; Rep. gr.39.
–  Fill up with gear oil (MTF) → 7-speed dual clutch gearbox 0B5 (S tronic); Rep. gr.39.
  A34-10435

Vehicle electrics > < Removing and installing centre differential housing and centre differential - bolted propshaft