audi Workshop Repair Guides

Audi Workshop Service and Repair Manuals

Auxiliary drives > < Drive chain for valve gear - exploded view
Removing and installing drive chain for valve gear
Special tools and workshop equipment required
t  Drill bit, Ø 3.3 mm
Removing
l  Gearbox removed.
–  Remove drive plate → Chapter.
–  Remove timing chain covers: left-side → Chapter, right-side → Chapter, bottom → Chapter.
–  Remove timing chains → Chapter.
–  Remove chain for auxiliary drives → Chapter.
   
–  Wrap insulating tape around tip and shaft of 3.3 mm Ø drill bit to avoid cuts.
–  Press guide rail of drive chain tensioner in direction of -arrow- and lock chain tensioner by inserting 3.3 mm Ø drill bit -item 4-.
  Caution
If a used drive chain rotates in the opposite direction when it is refitted, this can cause breakage.
Mark running direction of drive chain with coloured arrows for re-installation.
–  Remove bolts -2- and -3- and detach chain sprockets with drive chain and guide rail -1-.
  A13-0608
Installing
Installation is carried out in the reverse order; note the following:
l  Tightening torque → Chapter „Drive chain for valve gear - exploded view“
l  Crankshaft -1- locked in TDC position with locking pin -3242-.
  A13-10046
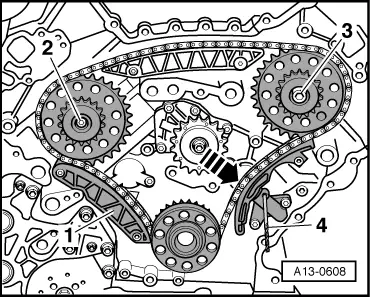
–  First install camshaft chain sprocket -2- for camshaft timing chain (left-side).
–  Install guide rail -1- with drive chain fitted.
–  Install camshaft chain sprocket for camshaft timing chain (right-side) -3-.
–  Press guide rail of drive chain tensioner in direction of -arrow- and pull drill bit -4- out of chain tensioner.
–  Install chain for auxiliary drives → Chapter.
–  Install timing chain covers: left-side → Chapter, right-side → Chapter, bottom → Chapter.
–  Install drive plate → Chapter.
–  Fill up with engine oil and check oil level → Booklet811, → Booklet812 or → Booklet818.
  A13-0608

Auxiliary drives > < Drive chain for valve gear - exploded view