Audi Workshop Service and Repair Manuals
HOME
FEATURES
MENU
INDEX
ABOUT US
Removing and installing particulate filter - A4 (all), A5 from vehicle identification no. 8T-8-009 999 onwards >
< Silencers - exploded view
A4 Mk3
Power unit
6-cylinder TDI engine (2.7 ltr.; 3.0 ltr. 4-valve common rail), mechanics
Exhaust system / Silencers
Removing and installing particulate filter - A5 up to vehicle identification no. 8T-8-009 998
Removing and installing particulate filter - A5 up to vehicle identification no. 8T-8-009 998
Removing and installing particulate filter - A5 up to vehicle identification no. 8T-8-009 998
Removing
Note
Fit all cable ties in the original positions when installing.
–
Remove body brace
→ Rep. gr.40
.
–
Remove plenum chamber partition panel
→ Rep. gr.50
.
–
Remove turbocharger
→ Chapter
.
–
Remove front exhaust pipe
→ Chapter
.
–
Remove bolt
-2-
.
–
Press retainer
-1-
in direction of
-arrow B-
and pivot to the rear
-arrow A-
.
–
Unplug electrical connectors:
1 -
For temperature sender after particulate filter -G527-
3 -
For exhaust gas pressure sensor 1 -G450-
Note
t
Disregard item
-2-
.
t
The illustration shows the installation position with the air pipe installed.
–
Lift out particulate filter.
Installing
Installation is carried out in the reverse order; note the following:
l
Tightening torques
→ Chapter „Silencers - exploded view“
,
→ Fig. „„Mounting components for particulate filter - A5 up to vehicle identification no. 8T-8-009 998““
Note
Renew seals, gaskets and self-locking nuts.
–
Install turbocharger
→ Chapter
.
–
Install front exhaust pipe
→ Chapter
.
–
Install plenum chamber partition panel
→ Rep. gr.50
.
–
Install body brace
→ Rep. gr.40
.
–
After renewing particulate filter, perform "Adaption" in „Guided Functions“ mode
→ Vehicle diagnostic tester
.
Power unit
6-cylinder TDI engine (2.7 ltr.; 3.0 ltr. 4-valve common rail), mechanics
Exhaust system / Silencers
Removing and installing particulate filter - A5 up to vehicle identification no. 8T-8-009 998
Removing and installing particulate filter - A4 (all), A5 from vehicle identification no. 8T-8-009 999 onwards >
< Silencers - exploded view
 Note
Note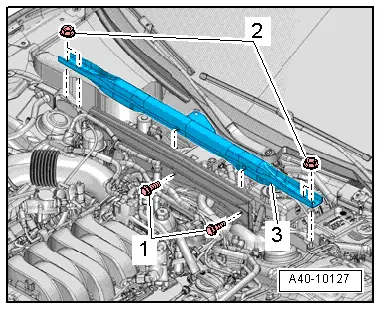
 Note
Note
Note
Note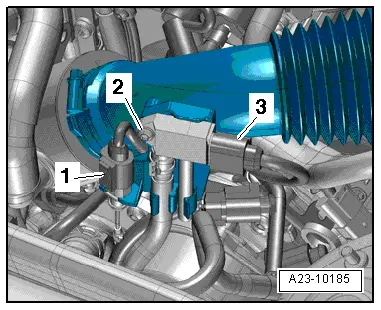
 Note
Note
Note
Note
Note
Note