audi Workshop Repair Guides

Audi Workshop Service and Repair Manuals

Exploded view - clutch hydraulics > < Exploded view - clutch module
Tightening sequence - clutch module to drive plate (4-cylinder and 6-cylinder engine)
Special tools and workshop equipment required
   
t  Ring spanner insert, 16 mm -V.A.G 1332/14-
l  Use new bolts.
l  Tightening torque → Item
l  Tighten bolts using ring spanner insert, 16 mm -V.A.G 1332/14-.
l  Operate electromechanical parking brake or counterhold propshaft using counterhold tool -T10172- and adapters -T10172/5-.
  Note
  W00-1329
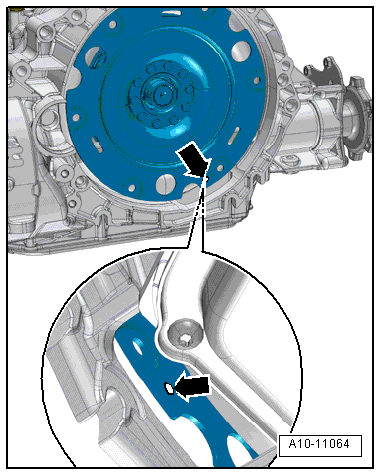
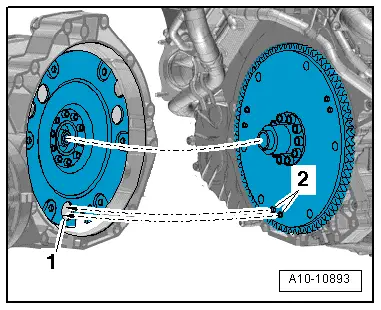
The next step is only required if a drive plate with locating pins -2- is installed.
  Caution
An incorrectly installed clutch causes functional problems.
If the locating pins on the drive plate -2- are not located in the holes on the clutch module -1-, this will lead to considerable functional problems of the clutch.
–  In addition, align drive plate with clutch module so that locating pins -2- (if provided) on drive plate can engage in large holes -1- on clutch module.
  A10-10893
–  Engage 6th gear by pulling out selector shaft -1- and shifting gearbox selector lever -2- forwards in direction of -arrow-.
  Note
  A34-10577
The following step is essential to ensure that the clutch module makes even and proper contact on the drive plate and does not cant.
–  Turn both front wheels together in one direction until the clutch module has turned through one complete revolution (360°).
l  The inspection hole -arrow- should be visible again in the recess on the gearbox housing.
  A10-11064
Vehicles with 4-cylinder engine
–  Install first bolt -arrow- and tighten hand-tight (2 Nm).
–  Turn both front wheels so that clutch module turns 120° further in direction of engine rotation and install second bolt hand-tight (2 Nm).
–  Turn clutch module 120° further in direction of engine rotation.
–  Then screw in and tighten third bolt.
–  Now tighten the remaining two bolts to specified torque.
  A10-10629
Vehicles with 6-cylinder engine
–  Install first bolt -arrow- and tighten hand-tight (2 Nm).
–  Turn both front wheels so that clutch module turns 180° further in direction of engine rotation.
–  Now install third bolt and tighten to specified torque → Item.
–  Now install remaining bolts all round, and tighten immediately to specified torque (also tighten the first bolt installed).
  A10-10629

Exploded view - clutch hydraulics > < Exploded view - clutch module