
A5
| Poly V-belt drive - exploded view |

| 1 - | Bolt |
| q | 22 Nm |
| 2 - | Bolt |
| q | 55 Nm |
| 3 - | Tensioner for poly V-belt |
| q | Removing and installing → Chapter |
| 4 - | Poly V-belt |
| q | Check for wear |
| q | Before removing, mark direction of rotation with chalk or felt-tip pen |
| q | Removing and installing → Chapter |
| q | Do not kink |
| q | When installing, make sure it is properly seated on pulleys |
| 5 - | Bolt |
| q | 22 Nm |
| 6 - | Alternator |
| q | Removing and installing → Electrical system; Rep. gr.27 |
| 7 - | Bolt |
| q | Tightening torque → Electrical system; Rep. gr.27 |
| 8 - | Bolt |
| q | 46 Nm |
| 9 - | Bracket for alternator |
| 10 - | Dowel sleeve |
| q | For bracket for alternator |
| q | 2x |
| 11 - | Cover for idler roller |
| 12 - | Bolt |
| q | 9 Nm |
| 13 - | Bearing bracket |
| q | For idler roller |
| 14 - | Idler roller for poly V-belt |
| 15 - | Bolt |
| q | 22 Nm |
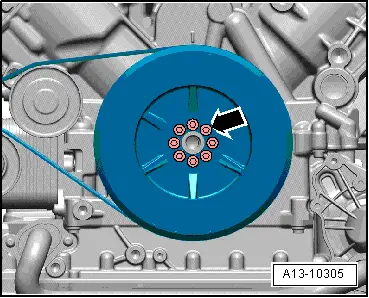
| 16 - | Vibration damper |
| q | With poly V-belt pulley |
| q | Removing and installing → Chapter |
| 17 - | Bolt |
| q | Renew |
| q | Threaded holes for bolts must be cleaned using a thread tap or similar |
| q | Apply locking fluid when installing; refer to → Electronic parts catalogue |
| q | Tightening torque and sequence → Fig. |
| 18 - | Thrust washer |
 Note
Note
|
|
| Stage | Bolts | Tightening torque/angle specification |
| 1. | -arrow- | 15 Nm in diagonal sequence |
| 2. | -arrow- | 22 Nm in diagonal sequence |
| 3. | -arrow- | Turn 90° further in diagonal sequence |