
CTS V6-3.2L VIN N (2003)
-
If a learned master key is available, refer to Adding Keys (Domestic)Adding Keys (Export) in Theft Deterrent.
-
If a learned master key is not available, refer to Replacing Keys in Theft Deterrent.
LOCK CYLINDER TUMBLER OPERATION
Each of the 4 cut depths on the key has corresponding double-throw tumbler, sometimes referred to as plates or wafers. The tumbler depth number is
stamped on the tumblers for identification. The ignition lock cylinder and front side door lock cylinder share common tumblers that are not
self-retaining. The IP compartment door lock cylinder uses unique tumblers that are self-restraining. The IP compartment door lock cylinder also
requires a retaining tumbler that does not move when the key is inserted. Its function is to retain the lock cylinder in the corresponding latch assembly.
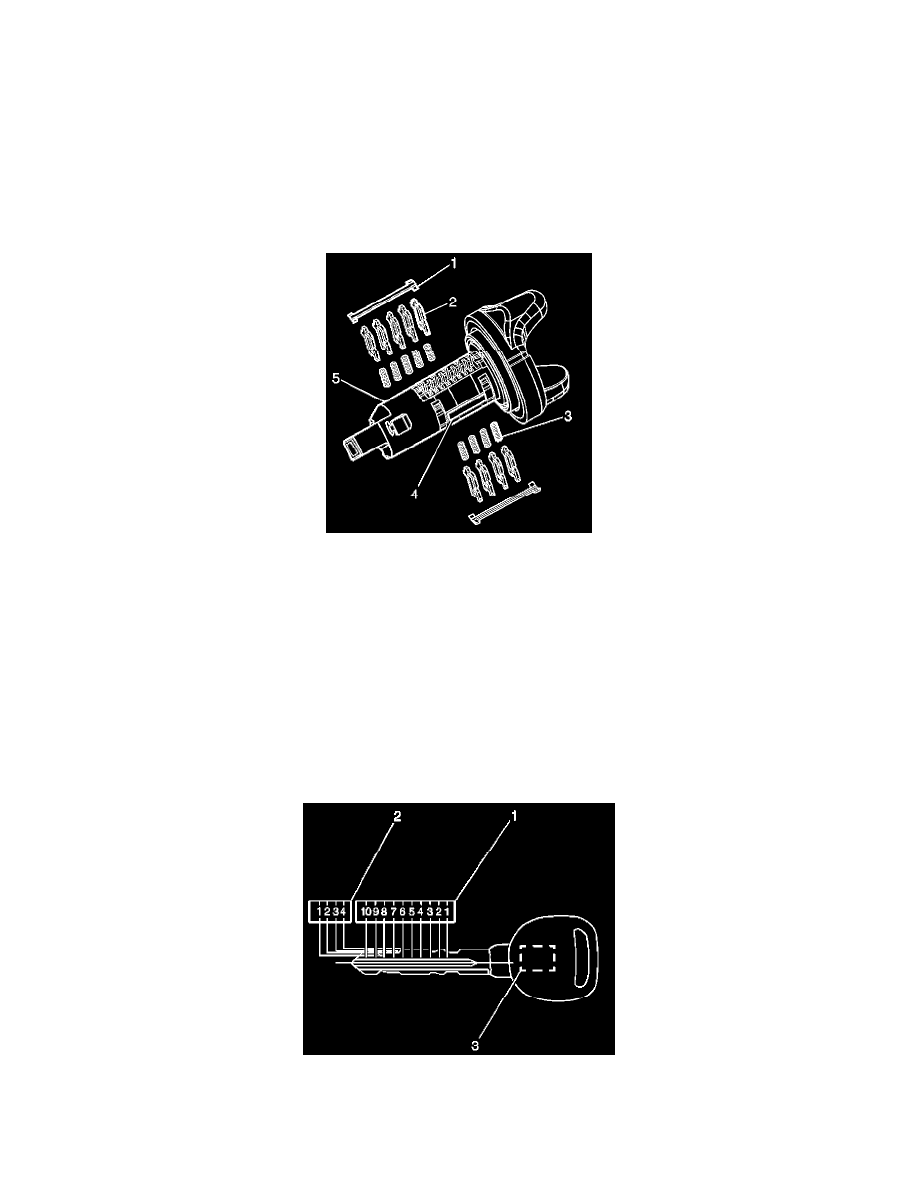
ASSEMBLING AND CODING THE IGNITION LOCK CYLINDER
The ignition lock cylinder uses nine of the ten cut positions, 1-9. The tumbler positions are staggered from side to side, five on one side and four on
the other.
1. Hold the uncoded cylinder assembly (4) so the side with five tumbler spring wells is facing upward.
IMPORTANT: The ignition lock cylinder tumblers (2) are not self retaining and must be held in place if the key is not fully inserted into the lock
cylinder, or until the tumbler retainer (1) is properly staked into the cylinder.
2. Insert one tumbler spring (3) into the five tumbler spring wells.
3. The first tumbler to be loaded will be key cut position, number 1. Determine the cut depth at this position and install the corresponding tumbler (2)
into the tumbler slot nearest the front of the cylinder Assembly (5) the end where the key is inserted. It may be necessary to move the sidebar (4)
already pre-assembled in to the uncoded cylinder assembly (5) out slightly to full install the tumbler (2) into the correct tumbler slot.
4. Install the 4 remaining tumblers on this side of the lock cylinder, key cut positions 3, 5, 7 and 9.
5. Inspect for correct loading of the tumblers (2) by inserting the key into cylinder (5). The sidebar (4) should be flush with the outside diameter of
the cylinder (5).
6. Turn the cylinder (5) so that the side with the 4 tumbler spring wells is facing up. Remove the key.
7. Insert the tumbler springs (3) into the four tumbler spring wells.
8. Install the tumbler (2) for the key cut position 2 into the slot nearest to the front of the lock cylinder.
9. Install the three remaining tumblers, key cut positions 4, 6 and 8, on this side of the lock cylinder.