
SRX AWD V6-3.6L (2008)
Suspension Strut / Shock Absorber: Service and Repair
Front Suspension Shock Absorber
Shock Absorber Disposal
Shock Absorber Disposal
Caution: Gas charged shock absorbers contain high pressure gas. Do not attempt to cut the shock open before all gas pressure is released. Failure to do
so may result in personal injury.
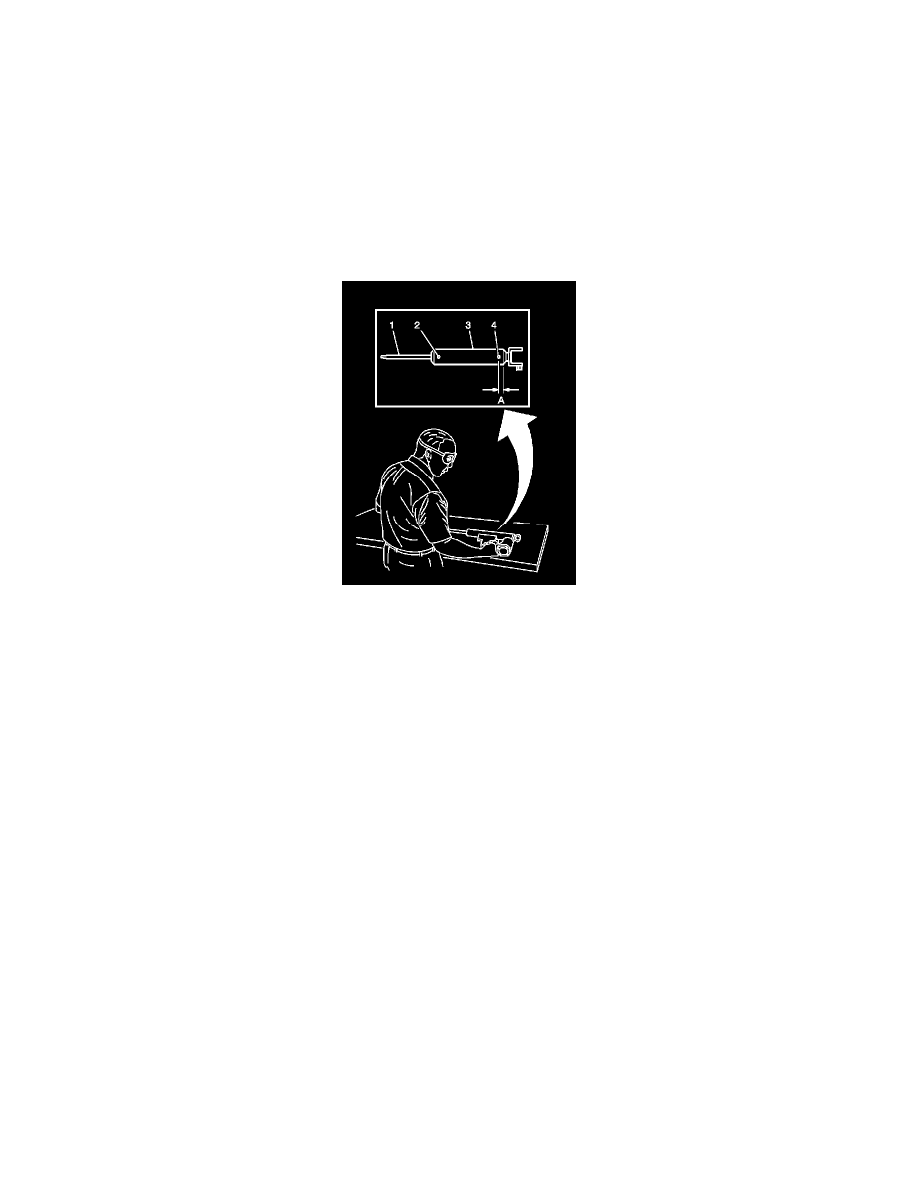
Caution: To prevent personal injury, wear safety glasses when centerpunching and drilling the shock absorber. Use care not to puncture the shock
absorber tube with the centerpunch.
1. Make an indentation 50 mm (2 in) from the top (2) of the tube using a centerpunch.
2. Make an indentation 25 mm (1.0 in) from the bottom (4) of the tube (3) using a centerpunch.
3. Clamp the shock absorber in a vise horizontally with the shock absorber rod (1) completely extended.
4. Drill a hole in the shock absorber at the centerpunch (4) using a 5 mm (3/16 in) drill bit. Gas or a gas/oil mixture will exhaust when the drill bit
penetrates the shock absorber. Use shop towels in order to contain the escaping oil.
5. Drill a second hole in the shock absorber at the centerpunch (2) using a 5 mm (3/16 in) drill bit. Oil will exhaust when the drill bit penetrates the
shock absorber. Use shop towels in order to contain the escaping oil.
6. Remove the shock absorber from the vise. Hold the shock absorber over a drain pan horizontally with the holes down. Move the rod (1) in and out
of the tube (3) to completely drain the oil from the shock absorber.
Shock Module Replacement
Shock Module Replacement
Tools Required
J 24319-B Steering Linkage and Tie Rod Puller
Removal Procedure
1. Raise and support the vehicle. Refer to Lifting and Jacking the Vehicle (See: Wheels and Tires/Vehicle Lifting/Service and Repair) .
2. Remove the tire and wheel. Refer to Tire and Wheel Removal and Installation (See: Wheels and Tires/Service and Repair) .
3. Remove the shock yoke. Refer to Shock Module Yoke Replacement (See: Shock Module Yoke Replacement) .
4. Vehicles equipped with electronic suspension control (ESC), or automatic headlamp aiming, disconnect the suspension position sensor link rod
from the upper control arm .
Notice: The ball stud must not rotate during disassembly or reassembly. Hand tools must be used to keep the ball stud from rotating. If air tools
are used and the stud is allowed to rotate, damage to the ball stud and/or stud mounting hole may occur.
Important: Hold the upper control arm to the steering knuckle when removing the retaining nut.