
Pacifica V6-3.8L VIN L (2005)
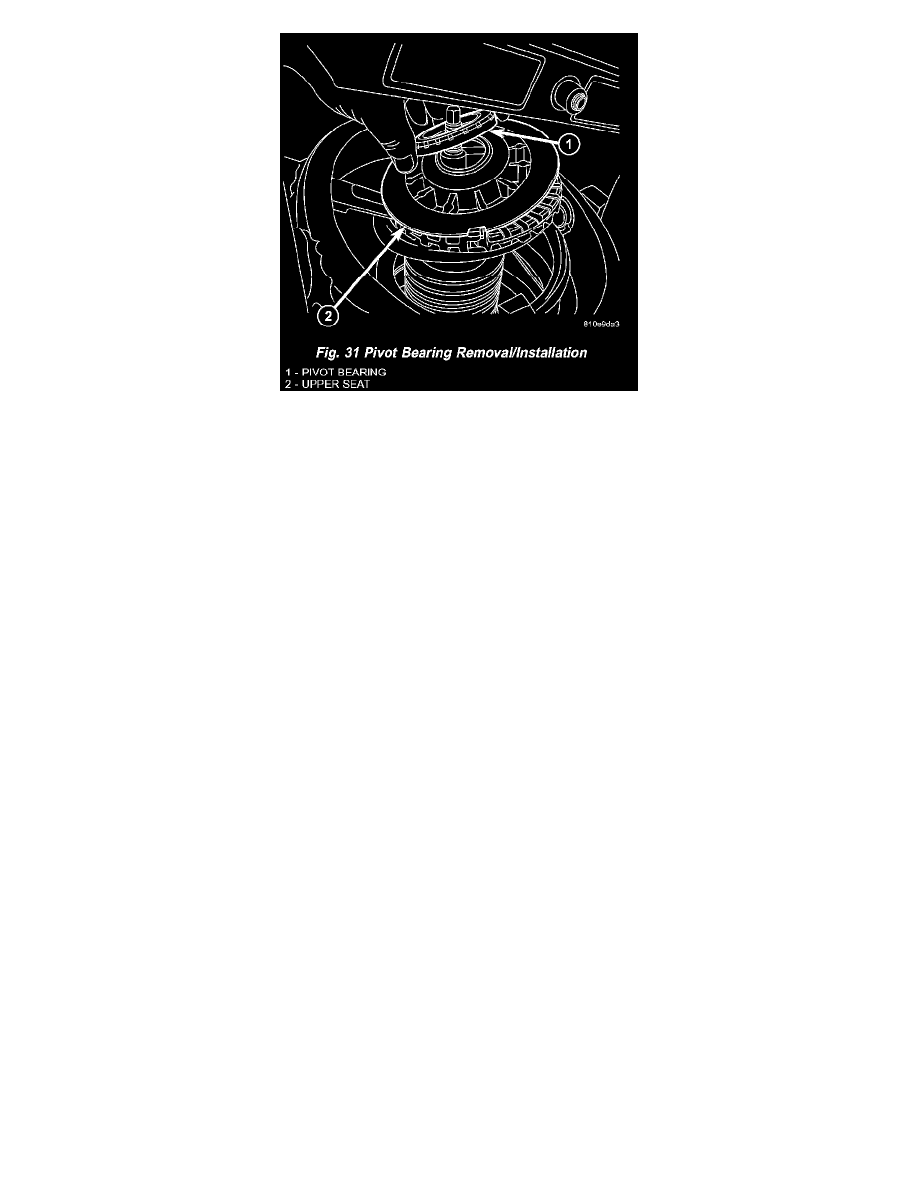
5. If pivot bearing needs to be serviced, remove it from top of upper seat by pulling it up off seat (Fig. 31).
6. If upper spring seat or isolator need to be serviced, remove them from top of coil spring pulling both up off spring, then removing isolator from
seat.
7. Remove clamp from bottom of coil spring and remove strut out through bottom of coil spring.
NOTE: If coil spring needs to be serviced, proceed with next step, otherwise, proceed with step 10.
8. If not previously removed, lift pivot bearing, upper spring seat or isolator off coil spring (Fig. 22).
NOTE: Prior to removing spring from compressor, note location of lower spring coil end in relationship to compressor to ease assembly of
components later.
9. Release tension from coil spring by backing off compressor drive fully. Push back compressor upper hooks and remove coil spring from spring
compressor.
10. Remove dust shield and jounce bumper as an assembly from strut shaft by pulling both straight up and off strut shaft (Fig. 22). Dust shield cannot
be separated from jounce bumper until after it is removed from strut shaft.
11. Remove jounce bumper from dust shield. Jounce bumper is removed from dust shield by collapsing dust shield until jounce bumper can be pulled
free from dust boot.
12. Remove spring isolator from lower spring seat on strut (Fig. 22).
13. Inspect strut assembly components for following and replace as necessary:
-
Inspect strut for any condition of shaft binding over full stroke of shaft.
-
Check upper mount for cracks and distortion and its retaining studs for any sign of damage.
-
Check upper seat for stress cracks and wear.
-
Check upper spring isolator for severe deterioration.
-
Check for binding of strut assembly pivot bearing.
-
Inspect dust shield for rips and deterioration.
-
Inspect jounce bumper for cracks and signs of deterioration.
ASSEMBLY
CAUTION: Use care not to damage coil spring coating during spring assembly. Damage to coating will jeopardize its corrosion protection.
NOTE: Left and right springs must not be interchanged.
NOTE: If coil spring has been removed from spring compressor, proceed with next step, otherwise, proceed with step 4.
1. Place coil spring (part number tag end downward) in compressor lower hooks following manufacturers instructions. To ease strut reassembly,
rotate coil spring around until lower coil end is in same location as it was upon disassembly. Proper orientation of spring to strut (once installed) is
necessary.
2. Position compressor upper hooks over coil spring following manufacturers instructions.
3. Compress coil spring far enough to allow strut installation.