
Neon L4-2.0L VIN F HO (2003)
6. Install the strut through the bottom of the coil spring until the lower spring seat contacts the lower end of the coil spring. Rotate the strut until the
end of the coil spring fits against the step in the lower spring seat. If done correctly, the clevis on the bottom of the strut should face toward the
compressor.
7. Install the clamp on the lower end of the coil spring and strut, so the strut is held in place with the coil spring.
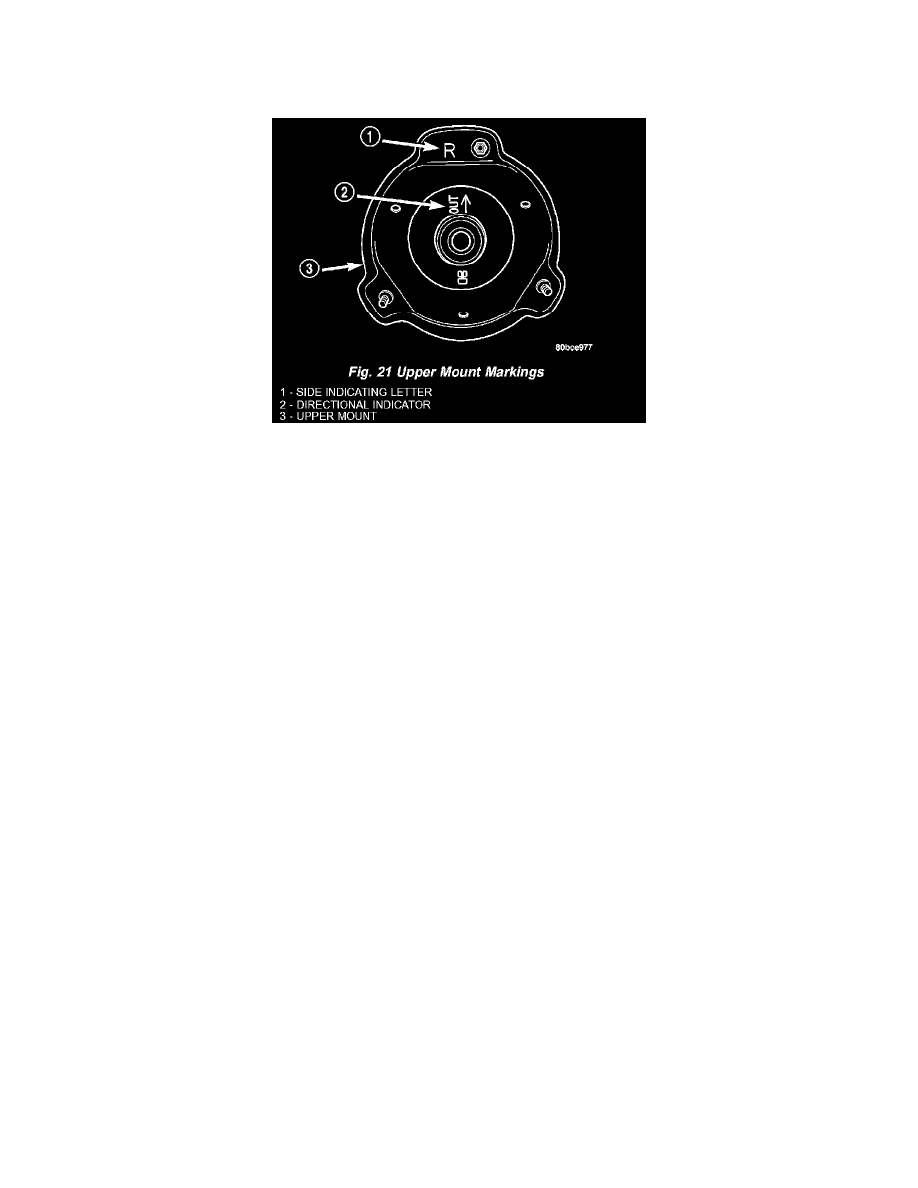
NOTE: Before installing the upper mount, check to make sure the correct side mount is being installed. Left and right upper mounts are different. A left
mount will be marked with the letter "L" while a right mount will be marked with the letter "R".
8. Install the upper mount over the strut shaft and onto the top of the upper spring. Near the center on the top of the mount is the word "OUT" and an
arrow. Point the arrow on the mount in the same direction that the clevis bracket on the lower end of the strut is pointed in. This direction should
be straight toward the compressor.
9. Loosely install the retaining nut on the strut shaft. Install Strut Nut Socket (on the end of a torque wrench), Special Tool 6864, on the strut shaft
retaining nut. Next, install a socket on the hex on the end of the strut shaft. While holding the strut shaft from turning, tighten the strut shaft
retaining nut to a torque of 75 Nm (55 ft. lbs.).
10. Slowly release the tension from the coil spring by backing off the compressor drive completely. As the tension is relieved, make sure the upper
mount's seat aligns properly with the coil spring.
11. Verify the arrow on the upper mount is pointing in the same direction as the strut clevis bracket as mentioned in step 9.
12. Remove the clamp from the lower end of the coil spring and strut. Push back the spring compressor upper and lower hooks, then remove the strut
assembly from the spring compressor.
13. Install the strut assembly on the vehicle.
INSTALLATION - STRUT ASSEMBLY (REAR)
NOTE: Before proceeding with this procedure, Refer to Service Precautions
.
1. To place the strut assembly into mounting position, start the lower end of the strut over the top of the knuckle and down the back between the two
lateral arms. Next, lift the top of the strut assembly up into the strut tower aligning the studs on top of the upper mount with the three mounting
holes in the strut tower. While holding the strut assembly in place, install the three mounting nuts on the upper mount studs inside the luggage
compartment. Tighten the 3 mounting nuts to a torque of 34 Nm (300 inch lbs.).
2. Install the carpeting back on top of the rear strut tower.
3. Close the deck lid.
4. Raise the vehicle.
CAUTION: The strut-to-knuckle attaching bolts are serrated and must not be turned during installation. Once installed, hold the bolts stationary in the
steering knuckle while installing and tightening the nuts.
5. Align the holes in the strut clevis bracket on the lower end of the strut with the mounting holes in the knuckle. Install the two bolts attaching the
strut to the rear knuckle. Install the nuts. Tighten the two nuts to 88 Nm (65 ft. lbs.).
6. If the vehicle is equipped with disc brakes, install the brake rotor and disc brake caliper on the knuckle. Install the two guide pin bolts securing the
front disc brake caliper to the steering knuckle. Tighten the guide pin bolts to a torque of 22 Nm (192 inch lbs.).
7. If equipped with a rear stabilizer bar, reinstall the stabilizer bar link:
a. Place the link center sleeve and bushings between the eye in the end of the stabilizer bar and the link mounting bracket on the strut.
b. Start the stabilizer bar link bolt with bushing from the top, down through the stabilizer bar, inner link bushings and sleeve, and strut link
mounting bracket.