
RAM 1500 Truck 4WD V8-5.9L VIN Z (2002)
BEFORE PERFORMING FURTHER DIAGNOSIS OR SERVICE. THIS IS THE ONLY SURE WAY TO DISABLE THE SUPPLEMENTAL
RESTRAINT SYSTEM. FAILURE TO TAKE THE PROPER PRECAUTIONS COULD RESULT IN ACCIDENTAL AIRBAG
DEPLOYMENT AND POSSIBLE PERSONAL INJURY.
-
THE HORN SWITCH IS INTEGRAL TO THE DRIVER AIRBAG UNIT. SERVICE OF THIS UNIT SHOULD BE PERFORMED ONLY BY
DAIMLERCHRYSLER-TRAINED AND AUTHORIZED DEALER SERVICE TECHNICIANS. FAILURE TO TAKE THE PROPER
PRECAUTIONS OR TO FOLLOW THE PROPER PROCEDURES COULD RESULT IN ACCIDENTAL, INCOMPLETE, OR IMPROPER
AIRBAG DEPLOYMENT AND POSSIBLE OCCUPANT INJURIES.
-
USE EXTREME CARE TO PREVENT ANY FOREIGN MATERIAL FROM ENTERING THE DRIVER AIRBAG, OR BECOMING
ENTRAPPED BETWEEN THE DRIVER AIRBAG CUSHION AND THE DRIVER AIRBAG TRIM COVER. FAILURE TO OBSERVE THIS
WARNING COULD RESULT IN OCCUPANT INJURIES UPON AIRBAG DEPLOYMENT.
-
THE DRIVER AIRBAG TRIM COVER MUST NEVER BE PAINTED. REPLACEMENT TRIM COVERS ARE SERVICED IN THE
ORIGINAL COLORS. PAINT MAY CHANGE THE WAY IN WHICH THE MATERIAL OF THE TRIM COVER RESPONDS TO AN
AIRBAG DEPLOYMENT. FAILURE TO OBSERVE THIS WARNING COULD RESULT IN OCCUPANT INJURIES UPON AIRBAG
DEPLOYMENT.
1. Obtain a new driver airbag trim cover and horn switch service replacement package. Three new blind rivets are included in the package. Always
use the correct new blind rivets provided in the service package when installing the new trim cover and horn switch unit.
2. Place the new driver airbag trim cover on a suitable work surface with the airbag receptacle facing up. Be certain to take the proper precautions to
prevent the trim cover from receiving cosmetic damage during the following procedures.
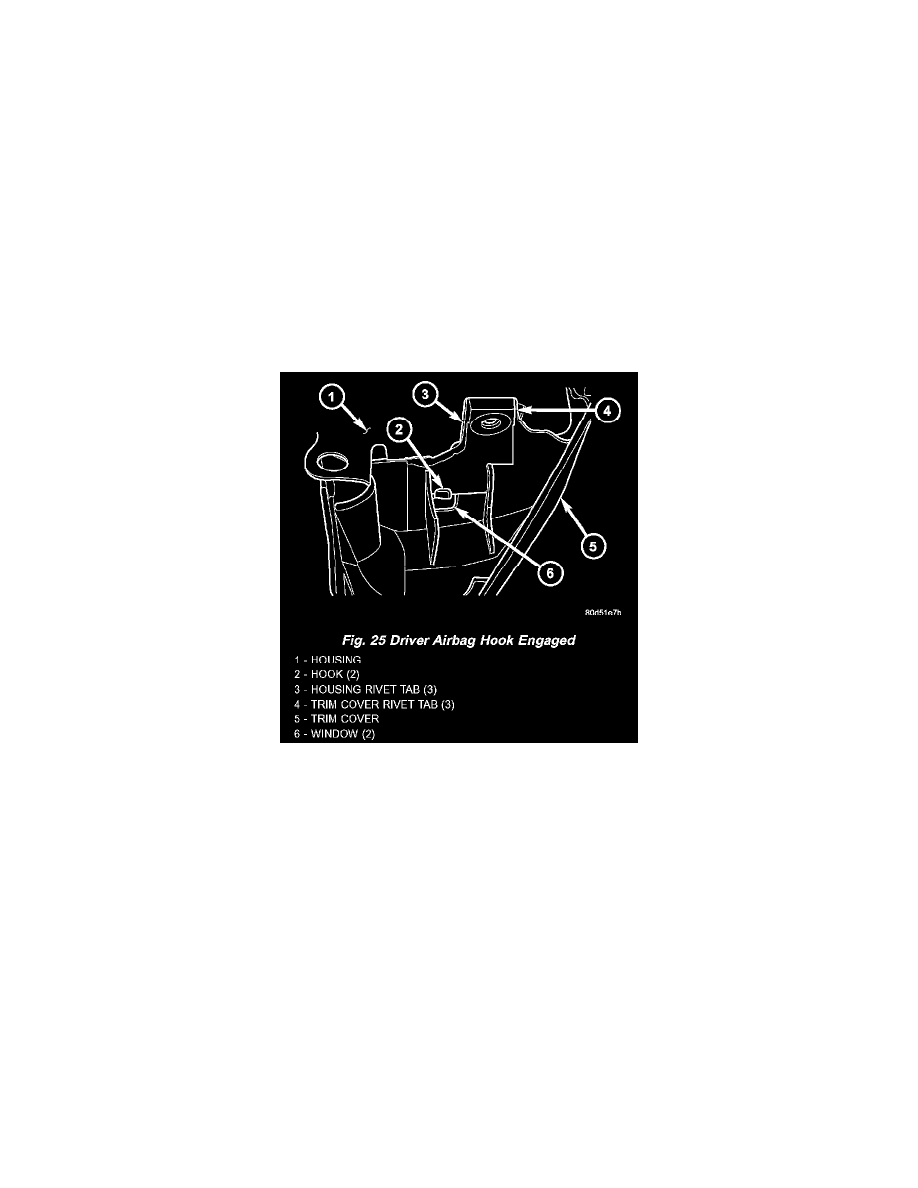
Fig. 25 Driver Airbag Hook Engaged
3. Insert one side of the airbag housing and cushion unit into the trim cover receptacle far enough to engage the hook on that side of the housing
through the window in the vertical side wall of the receptacle.
4. Pull outward on the trim cover rivet tab on the opposite side of the driver airbag trim cover and push that side of the airbag housing down into the
trim cover far enough to engage the second hook on the housing through its window in the vertical side wall of the trim cover receptacle.
5. Be certain that the two horn switch pigtail wires are routed between the driver airbag housing and the trim cover outboard of their respective sides
of the upper trim cover locking block.
6. Push the metal airbag housing stamping down into the trim cover receptacle far enough to engage the locking tabs on the upper and lower edges of
the housing into the slots in the upper and both lower trim cover locking blocks.
7. Pull the metal airbag housing stamping upward within the trim cover receptacle far enough to align the holes in the three rivet tabs of the airbag
housing with the holes in the rivet tabs of the trim cover. Inspect each of the locking tabs and hooks on the airbag housing to be certain they are
still fully engaged in their respective slots and windows in the trim cover. If any are not engaged, go back to Step 6.
8. Install the three blind rivets included in the service replacement package through the holes in the trim cover and airbag housing rivet tabs using an
appropriate blind rivet installation tool. The blind rivets must be installed with their flanged heads oriented toward the outboard side and flush with
each trim cover rivet tab.
9. Position the horn switch ground pigtail wire eyelet terminal over the upper left inflator stud on the back of the driver airbag housing.
10. Install and tighten the nut and washer that secures the horn switch ground pigtail wire eyelet terminal to the upper left inflator stud on the back of
the driver airbag housing. Tighten the nut to 8 Nm (70 in. lbs.).