
RAM 1500 Truck 4WD V8-5.9L VIN Z (2002)
Clutch: Service and Repair
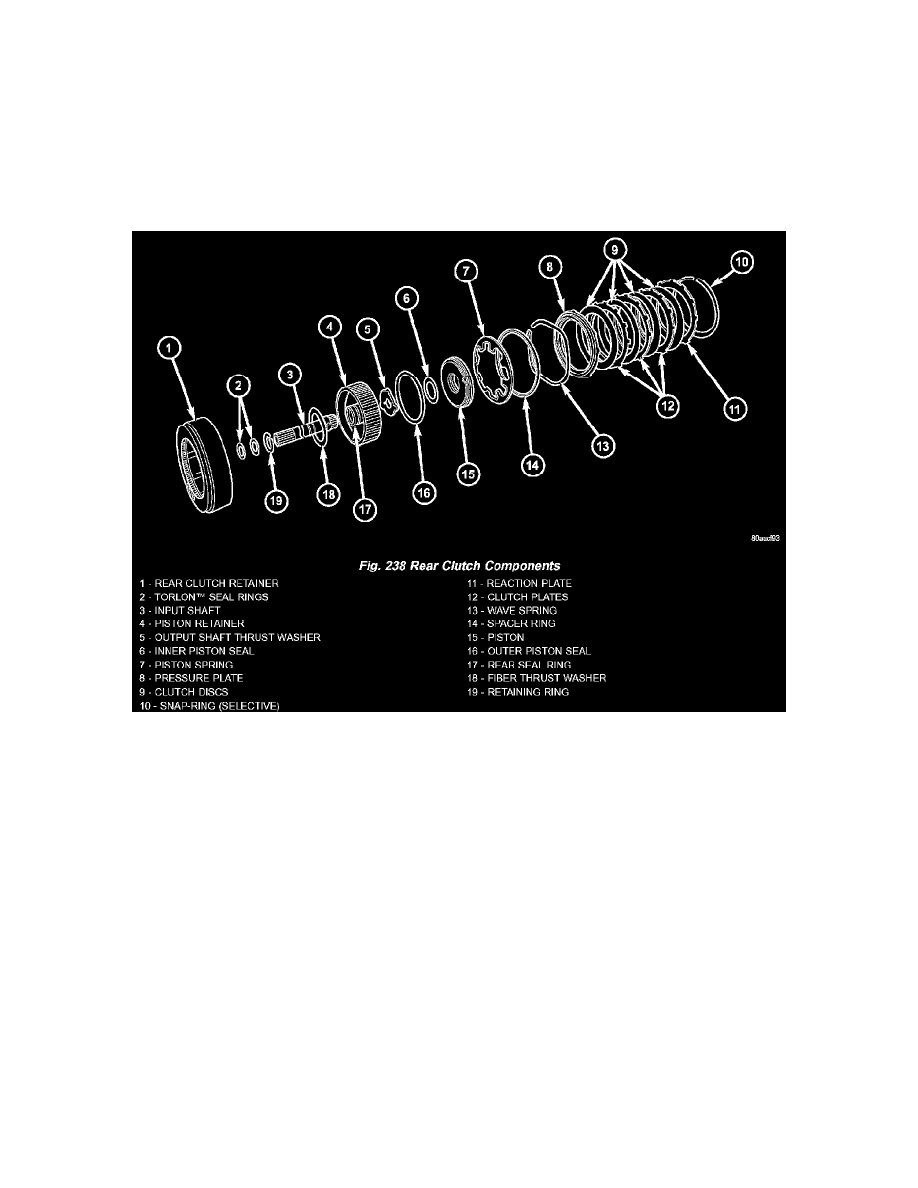
Rear Clutch
Disassembly
46RE - Automatic Transmission
DISASSEMBLY
1. Remove fiber thrust washer from forward side of clutch retainer.
2. Remove input shaft front and rear seal rings.
3. Remove selective clutch pack snap-ring (Fig. 238).
4. Remove the reaction plate, clutch discs, steel plates, pressure plate, wave spring, spacer ring, and piston spring (Fig. 238).
5. Remove clutch piston with rotating motion.
6. Remove and discard piston seals.
7. Remove input shaft retaining ring. It may be necessary to press the input shaft in slightly to relieve tension on the retaining ring
8. Press input shaft out of retainer with shop press and suitable size press tool. Use a suitably sized press tool to support the retainer as close to the
input shaft as possible.
Cleaning and Inspection
46RE - Automatic Transmission
CLEANING
Clean the clutch components with solvent and dry them with compressed air. Do not use rags or shop towels to dry any of the clutch parts. Lint from
such materials will adhere to component surfaces and could restrict or block fluid passages after assembly.
INSPECTION
Replace the clutch discs if warped, worn, scored, burned/charred, the lugs are damaged, or if the facing is flaking off. Replace the top and bottom
pressure plates if scored, warped, or cracked. Be sure the driving lugs on the pressure and clutch plates are also in good condition. The lugs must not be
bent, cracked or damaged in any way.
Replace the piston spring and wave spring if either part is distorted, warped or broken.
Check the lug grooves in the clutch retainer. The clutch and pressure plates should slide freely in the slots. Replace the retainer if the grooves are worn or
damaged. Also check action of the check balls in the retainer and piston. Each check ball must move freely and not stick.